Internet Protocol is a unique numerical label assigned to each device that is connected to a PC Network. This IP address is used for communication, hosting, network interface identification and location addressing. It’s pertinent to mention without IP address identification, it’s not possible to browse the internet.
Since we have mentioned different devices have unique IP addresses and PC’s use them to interact with one another over the internet.
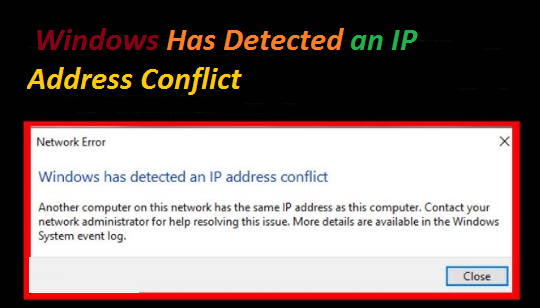
But when the IP addresses of two or more devices are similar, the network cannot differentiate between them and as a result the users receive “Windows Has Detected an IP Address Conflict.” The full error message reads as:
Windows has detected an IP address conflict
Another computer on this network has the same IP address as this computer. Contact your network administrator for help resolving this issue. More details are available in the Windows System event log.
According to the error message, your IP address is already in use and hence two computers or devices run into IP address conflict error. And if we talk about the causes, following are the reasons:
#. A device is in sleep mode and when you turn it on again, it connects to a different network with a device that has the same IP address.
#. Your PC is configured with multiple adapters
#. Two or more PCs are assigned the same static IP address
#. One device is assigned a static IP address in local network DHCP range, duplicate IP address is assigned to another device by the DHCP server.
But don’t panic, there are a number of measures to resolve the above mention error.
Solutions to fix Windows Has Detected an IP Address Conflict Error
Method 1: Restart the Router
In the first method we suggest you to restart the router. Restarting the Router will remove the minor glitches and several users have claimed that this method resolved their issue.
Here’s how:
Step 1: First of all find the Power button on the Router and turn it off > then leave the Router turned off for several minutes
Step 2: Then, turn on the Router back
Method 2: Remove your Static IP
Removing the Static IP may also resolve the error. To do so follow the below mention guidelines:
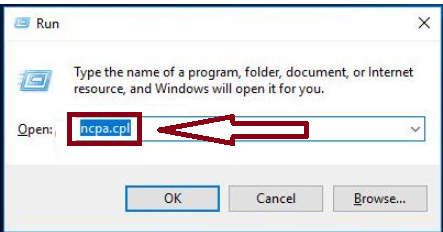
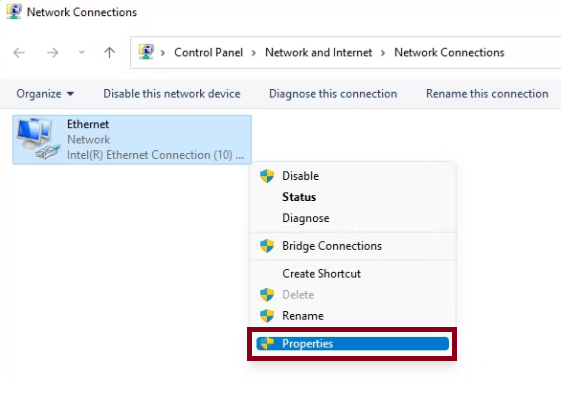
Step 1: Use Windows + R keys to open Run utility box > In the prompted box, type in ncpa.cpl and press Enter key to open Network Connections
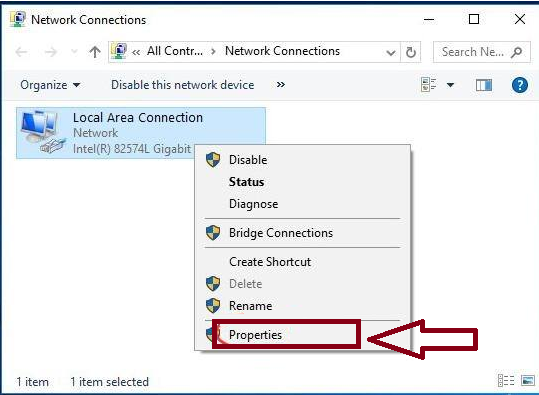
Step 2: Right-click on your Network Connection and choose Properties
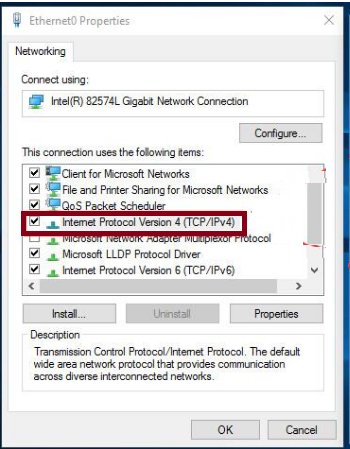
Step 3: Double-click on Internet Protocol Version 4(TCP/IPv4) > then tick on Obtain an IP address automatically and Obtain DNS server address automatically> then click OK and close all Windows
Step 4: Finally Restart your PC and see if the issue resolved or not
Method 3: Release and Renew your IP Address
Several users have claimed that releasing and renewing your IP Address may resolve the error. To try this method, use the following steps:
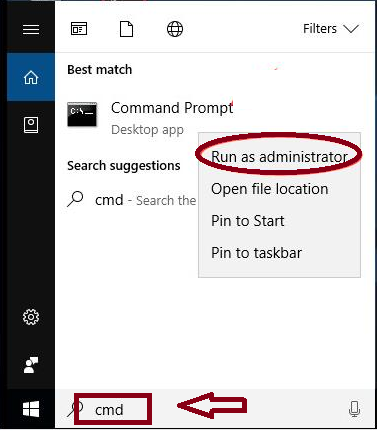
Step 1: Type in cmd in the search box from the Start Menu > then right-click Command Prompt from the top result and select Run as administrator
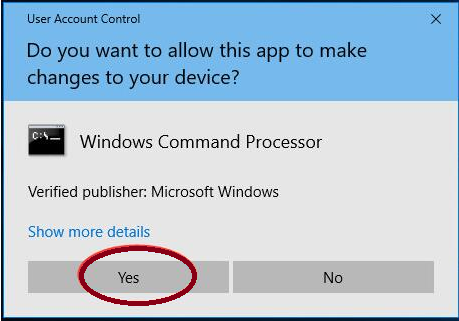
Step 2: Click Yes when prompted by User Account Control
Step 3: On the Pop up Window, type the following and press Enter after each:
ipconfig/release
ipconfig/renew
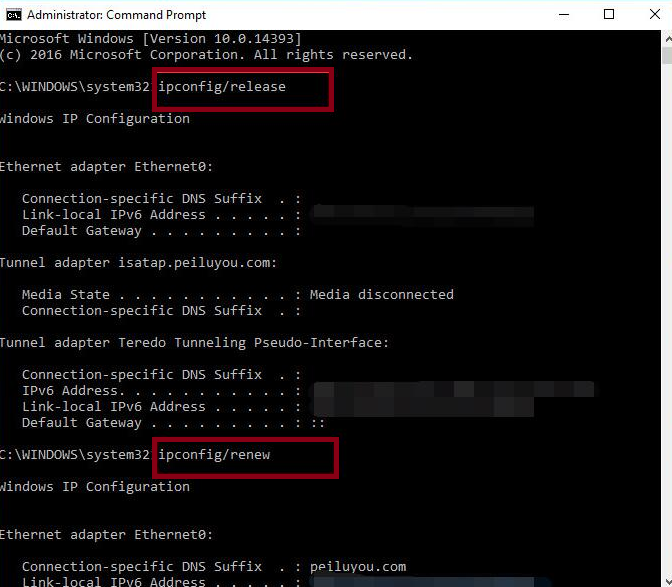
Once done then see if the issue resolved or not.
Method 4: Re-enable Network Adapter
The error may be fixed by disabling or re-enabling the Network Adapter. In order to re-enable the Network Adapter, follow the below mention guidelines:
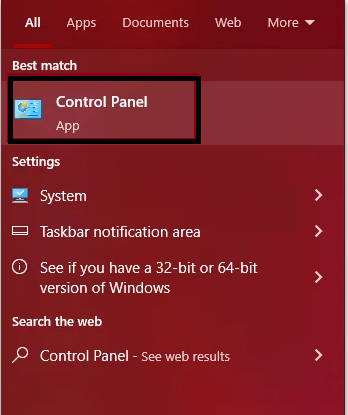
Step 1: Click Start Menu and type Control Panel in the search box
Step 2: Open Control Panel and navigate to the following path:
Control Panel\Network and Internet\Network and Sharing Center
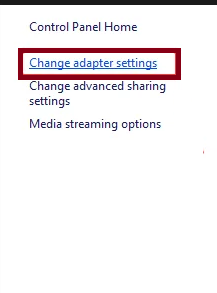
Step 3: Click on Change Adapter Settings from the left pane
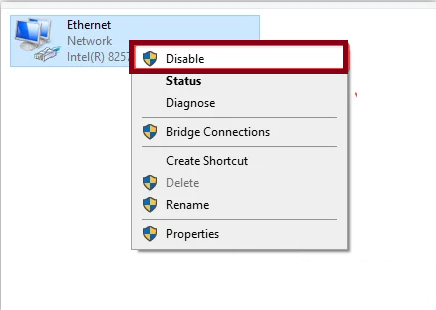
Step 4: Right-click on the current adapter and click Disable
Step 5: Again, right-click on the adapter and click Enable > Once done, try to reconnect with the problematic network
Method 5: Flush DNS and Reset TCP/IP
Flushing DNS and Reset TCP/IP is also an effective way to resolve the error, to do so follow the below mention guidelines:
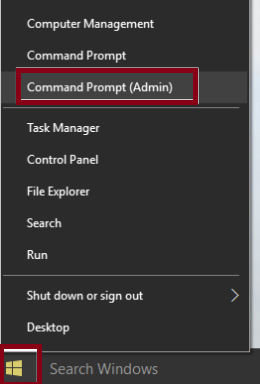
Step 1: Right-click on Windows button and select “Command Prompt (Admin)”
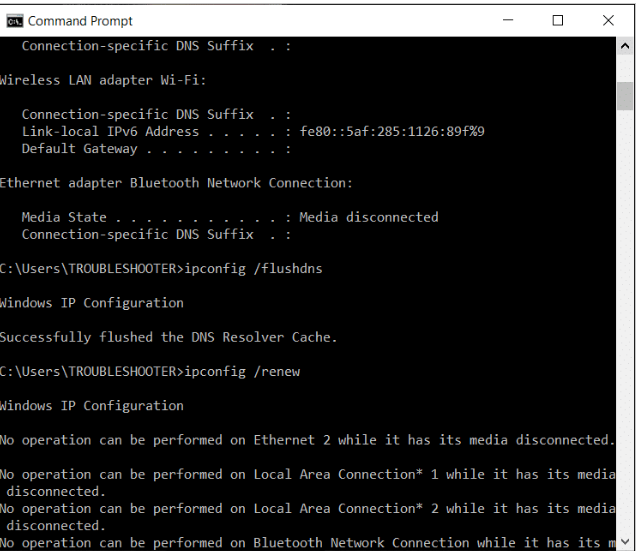
Step 2: Now type the following command and press Enter after each one:
ipconfig /release
ipconfig /flushdns
ipconfig /renew
Step 3: Again, open Admin Command Prompt and type the following and press Enter key:
ipconfig /flushdns
nbtstat –r
netsh int ip reset
netsh winsock reset
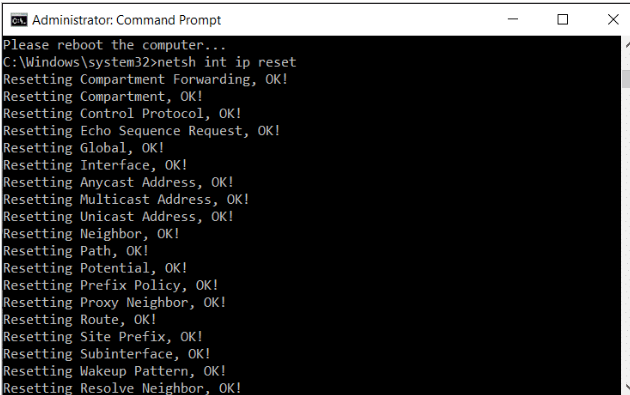
Step 4: Reboot to save changes and see if the issue resolved or not.
Method 6: Turn Off IPv6
In this method you are suggested to disable IPv6, to do so follow the below mention guidelines:
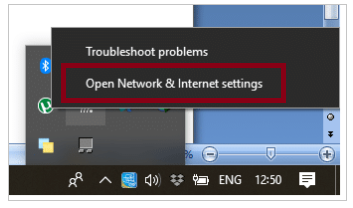
Step 1: Right-click on the Wifi icon on the system tray and then click on “Open Network and Sharing Center”
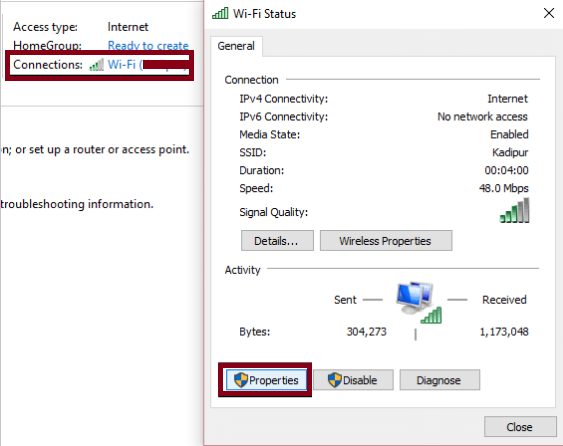
Step 2: Now click on your current connection to open Settings
Note: If you can’t connect to your Network, then use an Ethernet Cable to connect and then follow this step.
Step 3: Click the Properties button in the window that just open
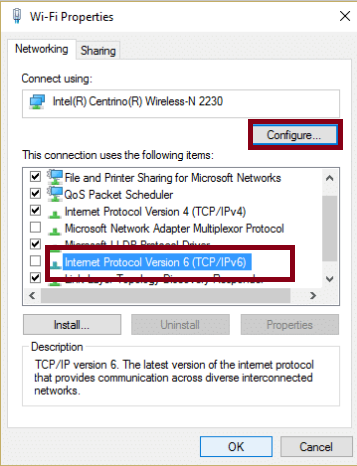
Step 4: Ensure to uncheck Internet Protocol Version 6 (TCP/IP)
Step 5: Click OK, then click Close. Reboot your PC to save changes
Method 7: Change DNS Servers
In this method, you are suggested to change the default DNS server in Windows, to do so follow the below mention guidelines:
Step 1: Press Windows + I keys to open Settings app > Go to Network & Internet > Advanced Network Settings > More Network Adapter Options

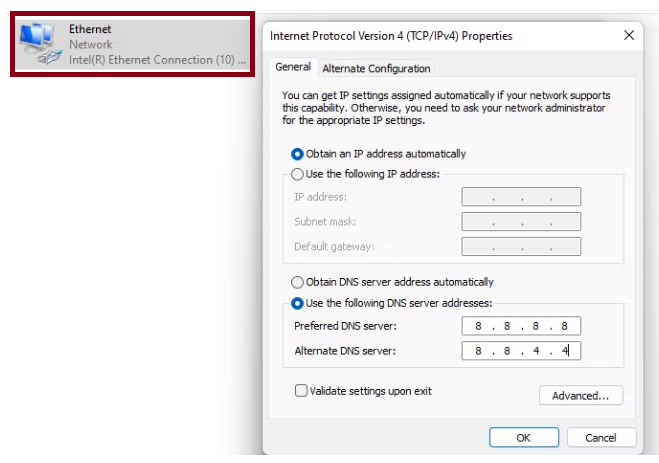
Step 2: Right-click your internet connection and select Properties from the context menu
Step 3: Select Internet Protocol Version 4 (TCP/IPv4) and double-click on it > Click the “Use the following DNS server address “option
Step 4: Type 8.8.8.8 in the Preferred DNS server field and 8.8.4.4 in the Alternate DNS server field
Step 5: Finally, click OK button to save the changes
Method 8: Perform a Winsock Reset
If you are unable to connect to the Internet, you can use the Command Prompt utility to reset Winsock. To reset the Winsock using a Command Prompt, follow the instructions below:
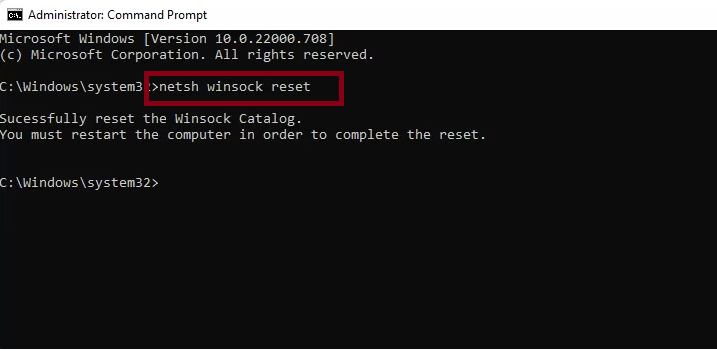
Step 1: First of all log in as an administrator and open Command Prompt > You can use one of the many ways to open a Command Prompt on Windows:
Step 2: Type the Command given below, then press the Enter key
netsh winsock reset
Step 3: Restart your PC now, and then verify if the internet issue did not resolved
Method 9: Reinstall Network Driver
If you are still struggling with Windows Has Detected an IP Address Conflict, it is suggested to reinstall Network driver.
To do so follow the below mention guidelines:
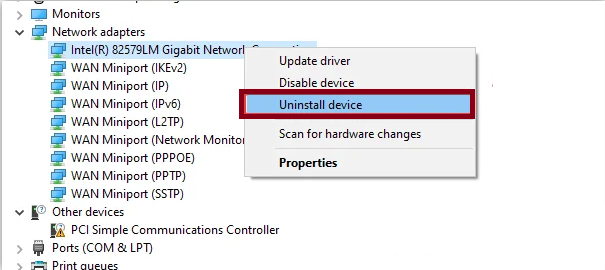
Step 1: Press Windows + R keys to open Run utility box > In the prompted box, type in devmgmt.msc and click OK to navigate into it
Step 2: Now expand the Network Driver tab and right-click the current Network Adapter
Step 3: Click Uninstall, then restart your PC for Windows to install the driver
Step 4: Once done, connect with the network and see if the issue resolved or not
Final Thoughts!
That’s all about Windows Has Detected an IP Address Conflict Error. We have provided ample solutions to get rid of the error. Now it’s your turn to follow our guidelines.