Since the implementation of Microsoft’s Protection Program i.e. Windows Defender in Windows Operating System it have never gained this much trust like today. With every update it is getting better and smarted in catching up to the world’s standard of malware and virus protection.
With new and improved Windows Defender in Windows 10 more and more users are using it as their daily driver. But still it is undeniable that yet if is far away from perfection. With new updates come new bugs and issues. It still continues to affect many of its members.
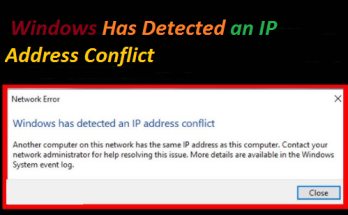
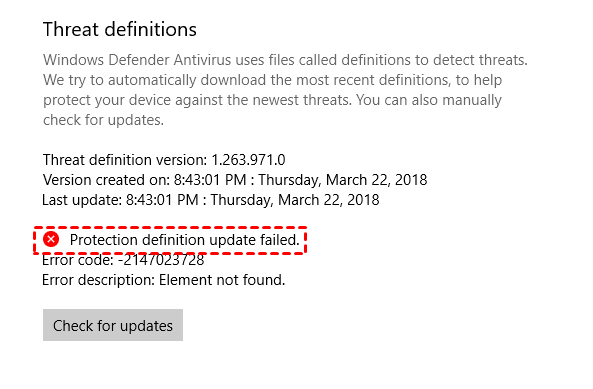
Protection Definition Update Failed Error happens when Windows Defender receives an update and failed to install it on the system. There are various why this happen therefore we have listed all the possible ways and steps to resolve this error.
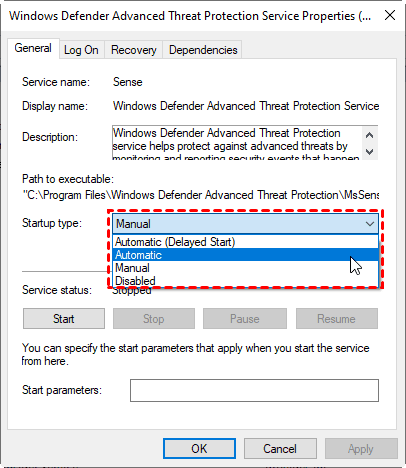
FIX 1: Restart Windows Defender
Windows Defender is an in-built tool even though it can be disabled. Hence you can try to restart it and see if this solves the problem or not.
Step 1: Open RUN dialogue box by pressing Windows + R key on the keyboard at the same time.
Step 2: Type services.msc and press Enter key.
Step 3: Find every services associated with Windows Defender.
Step 4: Right-click on each of those service and select properties.
Step 5: Check if all of them are set to automatically start.
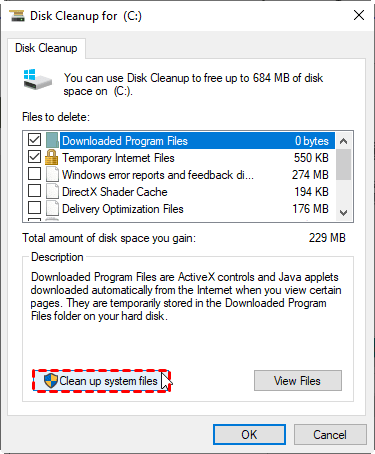
FIX 2: Removing Temporary Files
Sometime older version of Windows Defender’s files gets corrupted through update distribution is quite common to happen. In case if the previous version was corrupted somehow then this might explain the reason why you are getting this error. Removing all temporary files on your system can solve this issue. To do so, follow these steps:
Step 1: Go to search in taskbar and type disk.
Step 2: From the results choose Disk Cleanup.
Step 3: Then select System Partition (C:) and click Ok.
Step 4: Now choose, Clean up System Files.
Step 5: Check the Temporary files box and click OK.
After the process is finished, boot into Safe Mode.
Step 6: Go to the following path
C:\\Windows\Software Distribution
Step 7: Delete all the folder’s content.
Step 8: Reboot your system and make sure it is connected to a stable internet connection.
Windows Defender will automatically get the update and install it if everything goes well.
FIX 3: Run Windows Update Troubleshooter
Most of the time, if the issue is not complicated or big then it can be resolved through Windows In-Built troubleshooter program. To execute Windows Update Troubleshooter, do these simple steps:
Step 1: Go to search in taskbar.
Step 2: Type Troubleshoot setting and click first option from the list.
Step 3: In Setting window, click on Additional Troubleshooter to see additional option.
Step 4: Find Windows Update and click run the troubleshooter button.
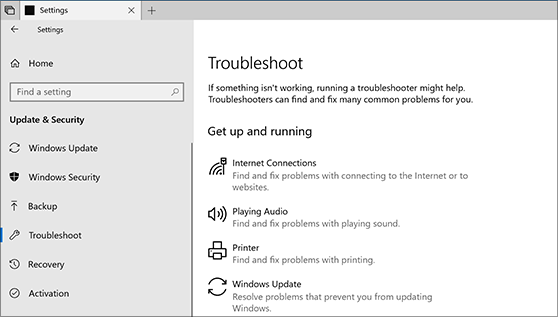
Step 5: Follow the on-screen instructions to complete the process.
Step 6: After it is done, click Close the troubleshooter and reboot your computer to save the changes you have made.
Check if the download is resumed or restarted for Windows Defender.
FIX 4: Manually Update Defender
Windows Defender is set to download update automatically by default through Windows Update feature. If you encounter this issue, this means Windows Defender is not able to download the update automatically like it is programmed. Therefore, you have to download the update manually and install the update yourself.
Step 1: Download the installer from Microsoft website. Check the compatibility of the system whether you have 32 bit or 64 bit and download accordingly.
Step 2: After download is completed, go to the location where you downloaded and run the file.
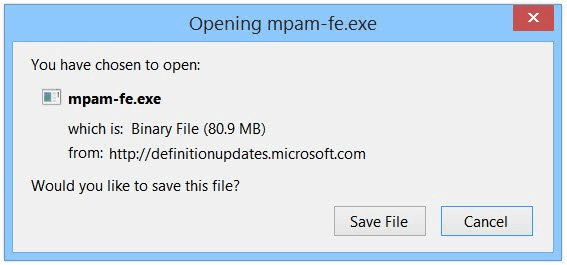
Step 3: Follow the given instructions in install wizard and reboot your computer after it is done.
FIX 5: Run SFC
Corrupted system files make cause the download package to stop working. This is not very common to happen but it happen none the less. The SFC or System File Checker Command Tool is built into the system for scenarios like this. This command line will scan your whole computer looking for corrupted files and fixes them. To run this command, follow the instructions given below:
Step 1: Go to search in taskbar and type “command”.
Step 2: From the list, right click on Command Prompt and select Run as Administrator.
Step 3: Now, type the following command and press Enter
sfc /scannow
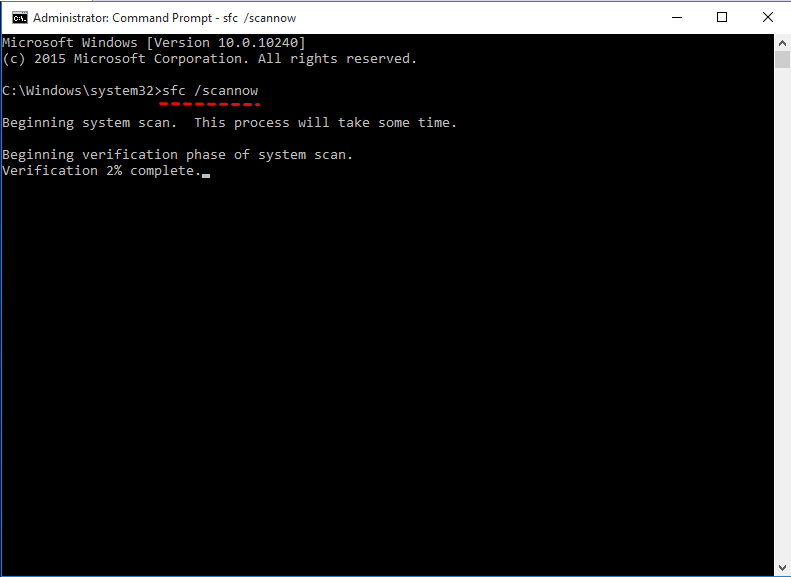
Step 4: Wait for it to complete. It will take some time. After the process is finished restart your computer to save the changes.
Manually checking for corrupted system file, missing dlls or damaged registry can take a lot of time and is complicated for normal computer users. For that reason, we suggest you to use dedicated software. Our Advance System Repair Tool not only scans your whole system thoroughly but with its advance algorithms and complex logics it fixes all these problems automatically with a single mouse click.
⇓DOWNLOAD ADVANCE REPAIR TOOL⇓
Protection definition update failed error is quite common amongst Windows Defender users. Therefore we have mentioned all the possible fixes and solution to rectify this error with ease.