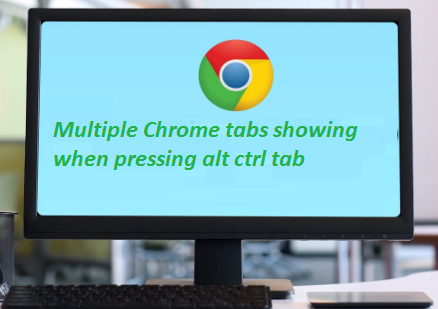
A huge number of users have claimed that multiple Chrome tabs shows when they press alt ctrl tab keys. Well this phenomenon is not only weird but also annoying. Besides this unwanted phenomenon, consumes Windows resources for no reason.
Many of the users have claimed that they start facing this annoying issue started just after they accessed Chrome’s full screen mode by pressing F11. But it’s pertinent to mention that Chrome has nothing to do with it. The issue is most likely related to a Windows Bug. While Microsoft has not posted any reply regarding this trouble.
However, some Windows users have shared their experiences how they managed to seal with the issue. Some users have claimed that restarting their PC worked for them while some of them shared they prevent using fullscreen mode. So if you are too struggling with the Multiple Chrome tabs showing when pressing Alt Ctrl tab, you can try these workarounds to get rid of the trouble. But it may not work for you because some of the users have also claimed that accessing the fullscreen mode again resolved their issue.
Well don’t panic we have collected some of the workable solutions to deal with the issue; you can try them one by one.
Try these Solutions to Resolve Multiple Chrome tabs Can’t be closed or accessed when pressing Alt Ctrl tab
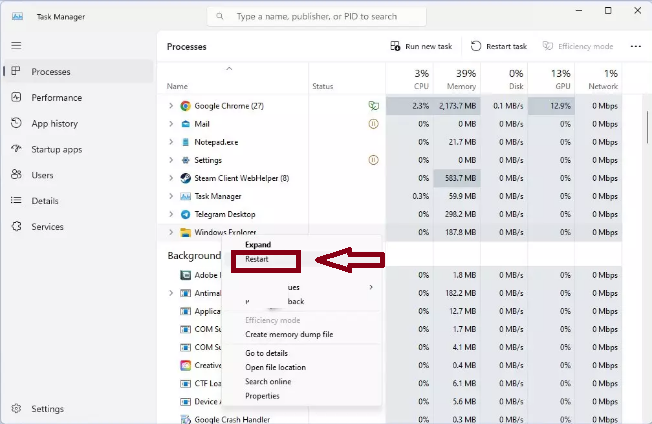
Method 1: Restart Windows Explorer
In this method you are suggested to restart Windows Explorer, doing so will refresh the user interface and clear the minor glitches.
Here’s how:
Step 1: First of all open Task Manager using Ctrl + Shift + Esc
Step 2: Click More details if required > Search for Windows Explorer
Step 3: Right-click and select Restart
Step 4: Several UI elements will disappear for a few moments and reappear soon afterward.
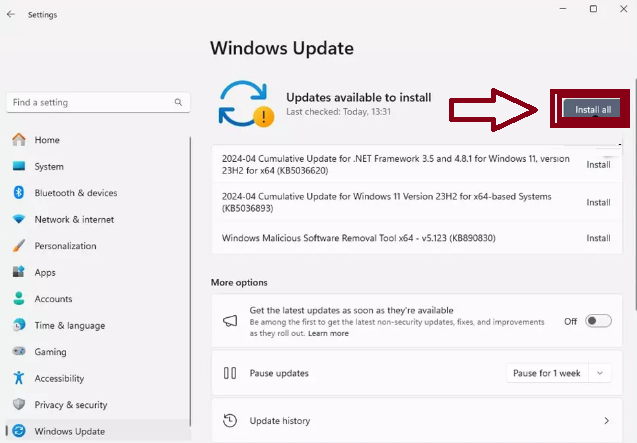
Method 2: Install all the available Windows Updates
In this method you are suggested to update Windows to the latest version to fix the issue. In order to proceed with the method follow the below mention guidelines:
Here’s how:
Step 1: In Windows Search, type in Updates and press Enter key
Step 2: When the new Window opens, click Check for Updates (or install all if pending) and wait
Step 3: If there are Optional Updates available,install them as well
Step 4: Once the update is completed, Restart the PC
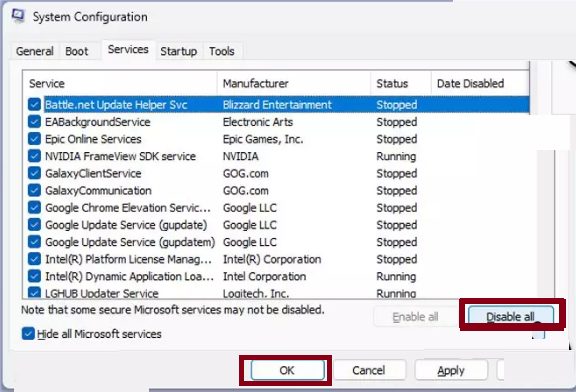
Method 3: Perform Clean Boot
Performing a Clean Boot may also resolve the issue; it will start your PC with minimal resources. To do so follow the below mention guidelines:
Step 1: Press Windows + R keys to open Run dialog box > In the prompted box, enter msconfig and press Enter key
Step 2: Select the Services tab and tick the Hide all Microsoft services checkbox
Step 3: Choose Disable all > navigate to the Startup tab and click Open Task Manager
Step 4: Here right-click on each of the non-Windows entries and select Disable > Close down the Task Manager
Step 5: Then navigate to the Boot tab and tick the Safe boot option > Reboot your System
Step 6: If this issue is not occurring in this mode, it implies that conflicting software is causing it. In order to find which one, disable each of the services one by one or in groups and reboot your device. Afterwards, update, pause or uninstall the problematic app or/ and service.
Method 4: Access and Exit Full-Screen Mode in Chrome
In this method we suggest you to perform one of the easiest methods to resolve the above mention error.
Here’s how:
Step 1: Open Chrome > Press F11 to enter fill-screen mode
Step 2: Then Press F11 again to exit full-screen mode

Method 5: Perform SFC and DISM Scans
Running SFC and DISM Scans may also resolve the above mention issue. This utility tool will scan your system files thoroughly. In order to get started with the method, use the following:
Step 1: In Windows Search, type in cmd > Right-click on Command Prompt and select Run as administrator
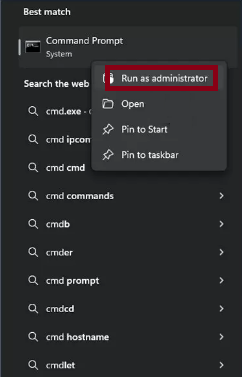
Step 2: The User Account Control window will ask whether you want to allow changes-click Yes
Step 3: In the Command Prompt window, paste the following command and press Enter key:
sfc /scannow
Step 4: Once the scan is completed, use the following commands and don’t forget to press Enter after each command:
Dism /Online /Cleanup-Image /CheckHealth
Dism /Online /Cleanup-Image /ScanHealth
Dism /Online /Cleanup-Image /RestoreHealth
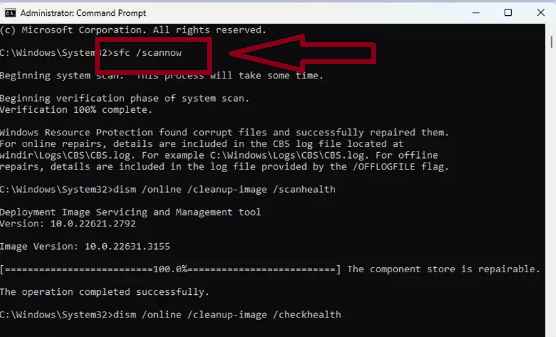
Point to Remember: If you get an error executing this last command, add /Source:C:\RepairSource\Windows /LimitAccess to it and try again
Step 5: Restart your PC
Alternatively, you can use an automatic PC Repair Tool to scan your system files. This professional tool is capable for resolving Windows issues in juts few clicks. So if you don’t want to struggle with the manual methods or have limited time you can use this tool as well.
⇑Get PC Repair Tool from Here⇓
Method 6: Repair Install Windows
If none of the abovementioned methods works for you, we suggest you to repair install Windows. To do so follow the below mention guidelines:
Step 1: Download Windows 11 Installation media from the official Microsoft website > Double-click the MediaCreationTool.exe file to launch it
Step 2: When UAC shows up, click Yes > Accept license terms
Step 3: Select Language and Edition (ensure it matches the one you have currently installed) or simply marks the Use the recommended options for this PC and click Next)
Step 4: Select the ISO file and click Next > Choose the location for your ISO file and wait till all the required files are downloaded, then click Finish
Repair- Install Windows
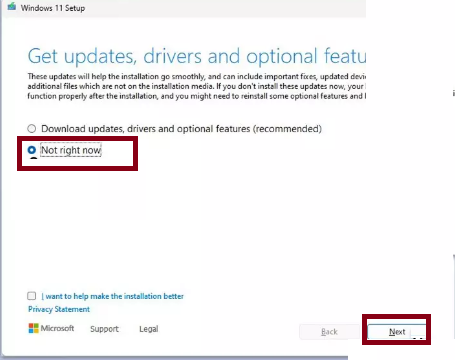
Step 1: Navigate to the location of your ISO file, right-click and choose Mount > Run the Setup.exe file
Step 2: You will be asked whether you want to update Windows to the latest version- choose Now right now and click Next
Step 3: Accept Terms and Windows will make several checks to ensure everything is fine > Click Change what to keep
Step 4: Then you will have several options: Keep your files and apps, Keep files only, or Keep nothing –choose what suits you the best. Click Next
Step 5: Lastly, click Install to start the installation process
Bottom Line!
Here we conclude the article. This article contains ample solutions to get past Multiple Chrome tabs showing when pressing Alt Ctrl tab. Apart from the manual methods, we have mentioned an automatic PC Repair Tool, so you can choose either of the ways to fix the issue.