What is ‘Wifi Authentication error’ on Android?
If you are facing ‘Android Wifi Authentication error’ or ‘WiFi Authentication Problem’ error on your Android device whenever you try to connect your Android phone to WiFi network, then you are in right place for the solution. Here, you will be guided with easy steps/methods to resolve the issue. Let’s starts the discussion.
‘Android Wifi Authentication’ error: It is common Android Device Problem considered WiFi connection error. This error indicates that you are unable to connect your Android phone to WiFi Network and getting ‘Authentication Error Occurred’ or ‘Authentication Problem’ error on the screen under the WiFi network name that failed to establish the connection. This issue can occur on both adding new network and existing networks.
One core reason behind this error can be the incorrect WiFi password you are entering to access the WiFi Network. You should make sure you are entering correct WiFi password in order to access the WiFi network. It might possible the password of the WiFi network you are trying to access, has been changed and you are still entering old password. In such case, you can contact Wifi Network administrator for new WiFi password and retry accessing WiFi with new password. Also, make sure your device is not blocked by WiFi administrator or the WiFi network administrator has set the limited user access that’s why you are facing the ‘Authentication Error Occurred’ error under ‘WiFI Name’.
Another possible reason behind this issue can be the issue with your Android device’s network settings that is not letting your WiFi to work properly. You can fix the issue by making some possible changes in network settings or perform reset the network on Android. This issue can also be occurred due to incorrect IP address. DHCP IP settings will not configure the IP address correctly for Wifi network. You can resolve the issue by using static IP address for your network settings. Let’s go for the solution.
How to fix Android Wifi Authentication error?
Method 1: Recheck WiFi password
This issue can also be occurred due to incorrect password you are entering to access the Wifi Network. Make sure you are entering correct password for your WiFi. Sometimes, your password resets on the router because of resetting your router/settings. You should check your router settings to check your password in wireless settings.
Step 1: On Android Phone, open ‘Settings’ App and go to ‘WiFi’
Step 2: Tap on ‘WiFi Network Name’ that is giving ‘Android Wifi Authentication error’, and select ‘Forget the network’ option
Step 3: After that, tap on WiFi Network, provide the ‘Password’ and make sure the ‘Show Passwod icon’ is checked, and check if you are able to access the network
Step 4: If not, go to your router settings to confirm the password. You can type ‘192.168.1.1’ in URL bar of browser and provide username & password to login
Step 5: In the opened page, go to ‘Wireless > Security’ and check your password. Or you can also check login and WIfi password listed on back of routers.
Method 2: Turn ON Airplane Mode

This issue can also be occurred due to some temporary glitch in computer. You can turn ON Airplane Mode temporarily to turn off all connectivity of device temporarily. To do so, you need to just swipe up or down your notification bar on main screen and tap ‘Airplane Mode’ option to turn it ON and wait for about 30 seconds, and after that, tap on ‘Airplane Mode’ option again to turn it OFF, and retry accessing to Wifi network and check if the issue is resolved.
Method 3: Reset Network Settings on Android
One possible way to fix the issue is to reset Network Settings in Android phone. This will reset saved WiFI password as well.
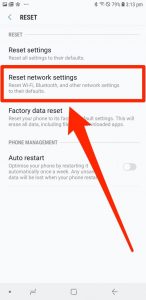
Step 1: Open ‘Settings’ App on Android and go to ‘Backup and reset’ and tap on ‘Reset Network Settings’
Step 2: Tap ‘Reset Settings’ option and confirm the action. Once finished, retry connecting to WiFi network and check if the error is resolved.
Method 4: Configure IP address settings on Android
This issue can be occurred due to Dynamic IP address settings applied in your phone. You can change it to Static IP address in order to fix the issue.
Step 1: Open ‘Settings’ App on Android and go to ‘WiFi’ and tap on WiFi network name that is causing error, and select ‘Modify’ settings
Step 2: Check ‘Show Advanced Options’ if available or you can directly change the settings
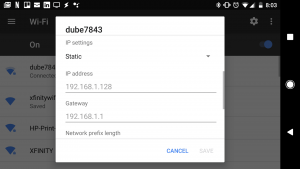
Step 3: Tap ‘IP Settings’ and select ‘Static’ for it
Step 4: Now, change IP address to ‘192.168.1.14’. The last digit can be changed to any number between 1 to 255.
Step 6: Enter 8.8.8.8 and 8.8.4.4 in DNS1 and DNS2 field and then save the changes. Once done, retry connecting to WiFi network and check if the issue is resolved.
Method 5: Restart your Android phone and router
Sometimes, this issue can be occurred due to some temporary issue in your Android phone and in network equipments like router. You can fix the issue just by restarting your router/networking equipment devices and Android phone. Check if restarting both router and phone resolves the issues.
Method 6: Use WPS Push button
Step 1: Open ‘Settings’ app and go to ‘Wireless and Network > Advanced Settings’
Step 2: There will be many different WPS options depending on your model. Once you see WPS connection or WPS Push button, press it and WPS setup will appear on screen waiting for the configuration from router.
Step 3: Go to your router and press ‘WPS‘ button and wait for the connection to be successful on your phone.
Method 7: Change Security protocol
You can also try to fix the issue by changing security protocol of your Wifi. If it is set to WPA2, change it to WPA and vice versa.
Method 8: Update System Software on Android
Updating Android phone can resolve any issue in your phone. To do so, open ‘Settings’ App and go to ‘About Phone > System Updates’ and Download updates manually. Once updated, restart your device and check if the error is resolved.
Conclusion
I am sure this post helped you on How to fix Android Wifi Authentication error with several easy steps/methods. You can read & follow our instructions to do so. That’s all. For any suggestions or queries, please write on comment box below.