
Tips to record Audio on Windows 11:
Here, we are going to discuss on “How to record Audio on Windows 11”. You will be guided with easy steps to do so. Let’s starts the discussion.
‘Windows Voice Recorder’: Windows Voice Recorder is audio recording software included in all recent Windows OS versions. Its user interface has been replaced twice in past. It can record audio from microphone or headset in your Windows computer. Many modern sound cards allow their output channels to be recorded through a lookback channel called ‘Wave-Out Mix’ or ‘Stereo Mix’.
It is quite simple to record sound/audio in your Windows 11 computer by using Windows 11 build-in Voice Recorder app. In sort, there is no need of any third-party voice recorder software for recording audio on Windows 11 computer. However, depending on types of audio quality or purposes of audio recording, you can try third-party voice recorder software in Windows 11 also. But you can also accomplish your audio recording tasks using Windows 11 build-in Windows Voice Recorder app.
Windows Voice Recorder App on Windows 11 comes with various features including recording audio, trimming audios that you have recorded. If you have uninstall this in-build recording app, then you can download and install Windows Voice Recorder app again from Microsoft Store in your Windows 11 computer. Let’s go for steps.
How to download and install Windows Voice Recorder App in Windows 11?
If Windows Voice Recorder app is not installed in your computer or you have uninstall it for some reasons, then you can download and install it again in computer through Microsoft Store.
Step 1: Open ‘Microsoft Store’ in your Windows 11 computer and search for ‘Windows Voice Record’ on Search bar in Microsoft Store window
Step 2: Open ‘Windows Voice Recorder’ app from results appear and click on ‘Install/Get’ button and wait to finish installation.
How to record Audio on Windows 11 using ‘Windows Voice Recorder’ App?
Now, you have ‘Windows Voice Recorder’ App install in your Windows 11 computer and you can follow the steps given below to perform audio recording operation in Windows computer.
Step 1: Make sure ‘Windows Voice Recorder’ App is allowed to access your microphone/mic in ‘Microphone privacy settings’. Microphone must be enabled for ‘Windows Voice Recorder’ app or ‘Voice Recorder’ app in your Windows 11’s Settings.
Step 2: At first, you need to select the Mic you will be using to record audio. To do so, open ‘Settings’ App in Windows 11 and go to ‘Sound’ tab in left pane and under ‘Input’ section in right pane, you can add the microphone as default audio device to record audio.
Step 3: Now, open ‘Windows Voice Recorder’ or ‘Voice Recorder’ App via Windows Search in Windows 11 computer and click on ‘Record/Mic’ button to record audio, or press ‘CTRL + R’ keys on keyboard for recording
Step 4: If you want to pause recording in middle, you can press ‘Pause’ button to pause the recording and you can resume it again. If you want to stop recording, click ‘Stop’ to stop the recording or click ‘Flag’ button flag it.
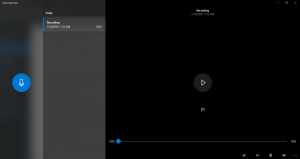
Step 5: Once recording finished, you will be able to play it from application or you can access it from ‘Sound Recordings’ folder inside ‘Documents’ folder in ‘File Explorer’ in your computer.
How to trim and share record audio on Windows 11?
If you want to trim/cut audio from recorded audio and share the recorded audio, then Windows 11 build-in ‘Windows Voice Recorder’ app again can be helpful.
How to Trim recorded audio?
Step 1: Open ‘Windows Voice Recorder’ or ‘Voice Recorder’ App in Windows 11 and select the recording you want to trim from left pane
Step 2: You will see an option to trim audio and click on it. Drag the pins to select the part of audio you want to trim and once you have selected trim part, click ‘Save’ button to save the changes.
How to share recorded audio?
Step 1: Open ‘Windows Voice Recorder’ App in Windows 11 computer and select the audio you want to share
Step 2: Click on ‘Share’ button and select the app to which you want to share the audio files.
Conclusion
I am sure this post helped you on How to record Audio on Windows 11 with several easy steps. You can read & follow our instructions to do so. That’s all. For any suggestions or queries, please write on comment box below.


