
Tips to use chkdsk in Windows 10:
In this article, we are going to discuss on How to use chkdsk in Windows 10. You are provided with easy steps/methods to do so. Let’s starts the discussion.
What is ‘CHKDSK Scan’ in Windows 10?
CHKDSK Scan or Check Disk is system tool and command in DOS, Digital Research FlexOS, IBM/Toshiba 4690 OS, IBM OS/2, Microsoft Windows and relating operating systems. It verifies the file system integrity of a volume and attempts to resolve logical file system errors. You can run CHKDSK Scan from DOS prompt, Windows Explorer, Windows Command Prompt, Windows Powershell or Recovery Console.
CHKDSK Scan is designed & developed to help you for monitoring your disk drive health. This tool uses a multipass scan of drive to verify that its soundness and functionality are intact. You can use CHKDSK tool to ensure your drives are running properly & correctly and helps to keep your drives safe and healthy. When you run this scan, it scans the file system on hard disk drive and analyzing the integrity of the files, file system, and file metadata on the drive.
CHKDSK resolves misaligned time stamps, file size data, and security flags on the files on the drive. It scan then conduct a full scan of the drive, accessing and testing every sector of hard drive. If you are not aware, hard drives are divided in logical sectors, defined areas of the drive where a certain defined quantity of data will be stored. If you are looking for ways to use CHKDSK Scan in your Windows 10 computer, then you are in right-place for this. Let’s go for the steps.
How to use chkdsk in Windows 10?
Method 1: Run CHKDSK Scan through Windows Explorer
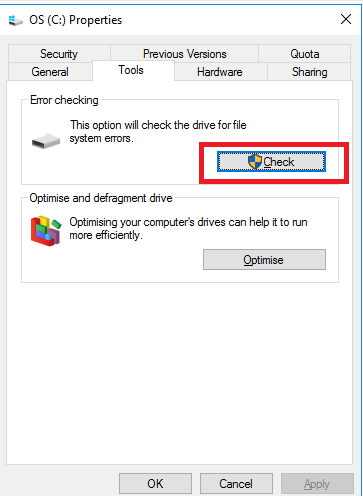
Step 1: Open ‘Windows Explorer’ in Windows PC and go to ‘This PC’, find and right-click on your drive you want to scan like C: drive, and select ‘Properties’
Step 2: Click ‘Tools’ tab and click ‘Check’ button under ‘Error Checking’ section. It will scan and repair hard disk drives & sectors to fix all detected issues. Wait to finish the scan process and once done, check if it works toward resolving your problem.
Method 2: Run CHKDSK Scan via Command Prompt
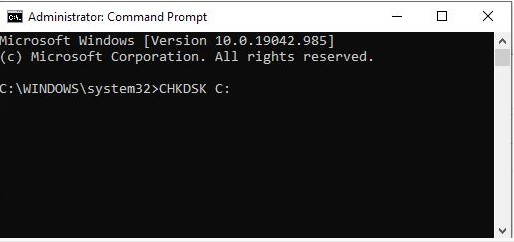
Step 1: Type ‘cmd’ in Windows Search Box and press ‘CTRL + SHIFT + ENTER’ keys on keyboard to open ‘Command Prompt as Administrator’
Step 2: Type ‘CHKDSK C:’ command and hit ‘Enter’ key to execute. This will scan and repair your main drive like C: drive in computer. You can replace ‘C:’ with your hard drive you want to scan.
Step 3: Once executed, restart your computer and check if the issue is resolved.
Method 3: Run CHKDSK Scan through Powershell
Step 1: Right-click on ‘Start Menu’ and select ‘Windows Powershell (Admin)’
Step 2: Type the ‘chkdsk c: /x /r’ command and hit ‘Enter’ key to execute. You can replace ‘C’ with your hard disk drive you want to scan.
Step 3: Once executed, restart your computer and check if it works for you.
Additional CHKDSK Scan parameters:
CHKDSK Scan contains a large library of optional parameters that you can use to change the program’s behaviour.
- /v – The /v parameter displays the name of each file in every directory as the disk is checked.
- /r – The /r parameter locates bad sectors and recovers readable information. The disk must be locked. /r includes the functionality of /f, with the additional analysis of physical disk errors.
- /x – The /x parameter forces the volume to dismount first, if necessary. All open handles to the drive are invalidated. /x also includes the functionality of /f.
- <Volume> – The Volume parameter allows you to specify a drive letter (with a colon) or volume name. You do not actually need the < and > characters.
- [<Path>]<FileName> – The Path and FileName parameters can be used only a drive using the FAT or FAT32 organizational models. With Path and FileName, you can specify the location and name of a file or set of files that you want CHKDSK to check for fragmentation. You can use the ? and * wildcard characters to specify multiple files.
- /b – The /b parameter is usable only with NTFS. It clears the list of bad clusters on the volume and rescans all allocated and free clusters for errors. /b includes the functionality of /r. Use this parameter after imaging a volume to a new hard disk drive.
- /? – The /? parameter displays a help file containing this list of parameters and other instructions for using CHKDSK.
- /f – The /f parameter instructs CHKDSK to actually fix errors on the disk. The disk must be locked. If CHKSDK cannot lock the drive, a message appears that asks you if you want to check the drive the next time you restart the computer.
- /i – The /i parameter can only be used with a drive formatted with the NTFS model. This speeds up CHKDSK by performing a less vigorous check of index entries, which reduces the amount of time required to run CHKDSK.
- /c – The /c parameter also is only usable on an NTFS disk. This tells CHKDSK not to check cycles within the folder structure, which reduces the amount of time required to run CHKDSK.
- /l[:<Size>] – The /i parameter can only be used with NTFS. It changes the size of the resulting log file to the size you type. If you omit the size parameter, /l displays the current size.
Conclusion
I am sure this post helped you on How to use chkdsk in Windows 10 with easy ways. You can read & follow our instructions to do so. That’s all. For any suggestions or queries, please write on comment box below.


