Tips to Update RSAT Network Directory Windows 11:
In this post, we are going to discuss on How to Update RSAT Network Directory Windows 11. You will be guided with easy steps/methods to do so. Let’s starts the discussion.
‘Update RSAT Network Directory Windows 11’:
‘RSAT’: RSAT stands for Remote Server Administration Tools. RSAT enables IT administrators to remotely manage roles and features in Windows Server from a computer that is running Microsoft Windows 10/8/8.1/7 or Windows Vista. If you have installed Microsoft Windows OS of Windows Home or Standard editions, you will not be able to install RSAT in your computer.
You can install RSAT only on Windows OS of Professional or Enterprise editions. Unless the download page specifically states that you must be running a full (RTM) release applies to a beta, preview or other pre-release version of Windows. If you are looking for ways to install/ Update RSAT in computer, then you are in right-place for this. On Windows Vista and Windows 7, the RSAT tools are not automatically available after you download and install RSAT. You must enable this tool through Control Panel in Windows computer.
On other hand, you don’t need to download a standalone setup for RSAT (Remote Server Administration Tools) on the latest Windows 11 OS based computer. If you are not aware, RSAT is included as set of ‘Features on Demand – Optional Features’ with the recent Windows 10 OS and Microsoft followed the same method for Windows 11 as well.
Prerequisites for Windows 11 RSAT Tool:
As mentioned, you can’t install and use RSAT on Windows 11 Home PCs so you should check system requirements for RSAT before that. Also, you should make sure security polices, corporate firewalls and proxies are allowed for FOD updates from Microsoft Update kinds of download and update. If your organization allows only offline updates, then you might get into a complex RSAT installation scenario for Windows 11 PCs.
How to install/Update RSAT Network Directory Windows 11?
Step 1: Open ‘Settings’ App in Windows PC via Windows Search Box and go to ‘Apps > Optional Features > Add an optional feature > View Features’
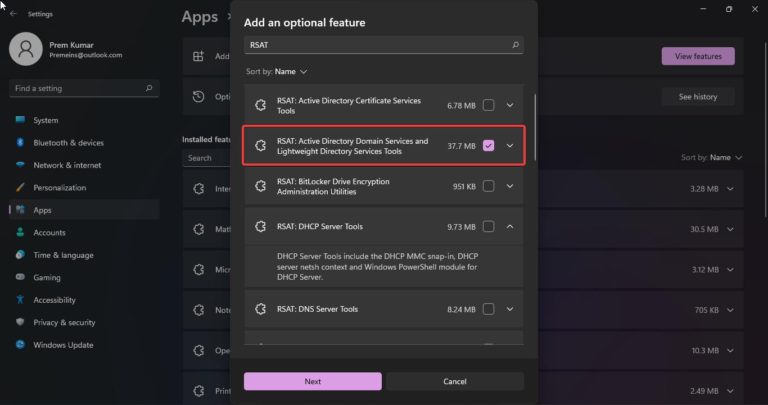
Step 2: On the optional features window, you will see two options including RSAT: Remote Access Management Tools, RSAT: Remote Desktop Services Tools
Step 3: Select ‘RSAT: Remote Access Management Tools and click ‘Next’ and click ‘Install’ to install ‘RSAT: Remote Access Management Tools’ in your Windows 11 computer. You don’t have to reboot your computer after installing RSAT.
How to install/ Update RSAT Network Directory Windows 11 via Powershell?
Step 1: Right-click on ‘Start menu’ and select ‘Windows Powershell (Admin) to open Windows Powershell as administrator
Step 2: Type following command to install RSAT tools
Add-WindowsCapability -online -Name Rsat.ActiveDirectory.DS-LDS.Tools~~~~0.0.1.0
Step 3: You can install additional tools using following commands
Add-WindowsCapability -Online -Name Rsat.FileServices.Tools~~~~0.0.1.0
Add-WindowsCapability -Online -Name Rsat.GroupPolicy.Management.Tools~~~~0.0.1.0
Add-WindowsCapability -Online -Name Rsat.IPAM.Client.Tools~~~~0.0.1.0
Add-WindowsCapability -Online -Name Rsat.LLDP.Tools~~~~0.0.1.0
Add-WindowsCapability -Online -Name Rsat.NetworkController.Tools~~~~0.0.1.0
Add-WindowsCapability -Online -Name Rsat.NetworkLoadBalancing.Tools~~~~0.0.1.0
Add-WindowsCapability -Online -Name Rsat.BitLocker.Recovery.Tools~~~~0.0.1.0
Add-WindowsCapability -Online -Name Rsat.CertificateServices.Tools~~~~0.0.1.0
Add-WindowsCapability -Online -Name Rsat.DHCP.Tools~~~~0.0.1.0
Add-WindowsCapability -Online -Name Rsat.FailoverCluster.Management.Tools~~~~0.0.1.0
Add-WindowsCapability -Online -Name Rsat.RemoteAccess.Management.Tools~~~~0.0.1.0
Add-WindowsCapability -Online -Name Rsat.RemoteDesktop.Services.Tools~~~~0.0.1.0
Add-WindowsCapability -Online -Name Rsat.ServerManager.Tools~~~~0.0.1.0
Add-WindowsCapability -Online -Name Rsat.Shielded.VM.Tools~~~~0.0.1.0
Add-WindowsCapability -Online -Name Rsat.StorageMigrationService.Management.Tools~~~~0.0.1.0
Add-WindowsCapability -Online -Name Rsat.StorageReplica.Tools~~~~0.0.1.0
Add-WindowsCapability -Online -Name Rsat.SystemInsights.Management.Tools~~~~0.0.1.0
Add-WindowsCapability -Online -Name Rsat.VolumeActivation.Tools~~~~0.0.1.0
Add-WindowsCapability -Online -Name Rsat.WSUS.Tools~~~~0.0.1.0
Step 4: Once executed, it’s done.
Fix Windows PC issues with ‘PC Repair Tool’:
‘PC Repair Tool’ is easy & quick way to find and fix BSOD errors, DLL errors, EXE errors, problems with programs/applications, malware or viruses infections in computer, system files or registry issues and other system issues with just few clicks.
Conclusion
I hope this post helped you on How to Update RSAT Network Directory Windows 11 with easy ways. You can read & follow our instructions to do so. That’s all. For any suggestions or queries, please write on comment box below.


