What is ‘Zoom camera not working’ in Windows 10?
In this post, we are going to discuss on “How to fix zoom camera not working in Windows 10”. You will be guided with easy steps/methods to resolve the issue. Let’s starts the discussion.
‘Zoom’ – Video Conferencing platform: ZOOM Meetings (commonly shortened to Zoom) is proprietary video teleconferencing software designed & developed by Zoom Video Communications. Zoom offers free plan up to 100 concurrent participants, with a 40-minute time restriction. You have option to upgrade by subscribing to paid plain. The highest plan supports up to 1000 concurrent participants for meetings lasting up to 30 hours. Zoom Meetings is available for Microsoft Windows OS, MacOS, Linux, Android, iOS, and Chrome OS.
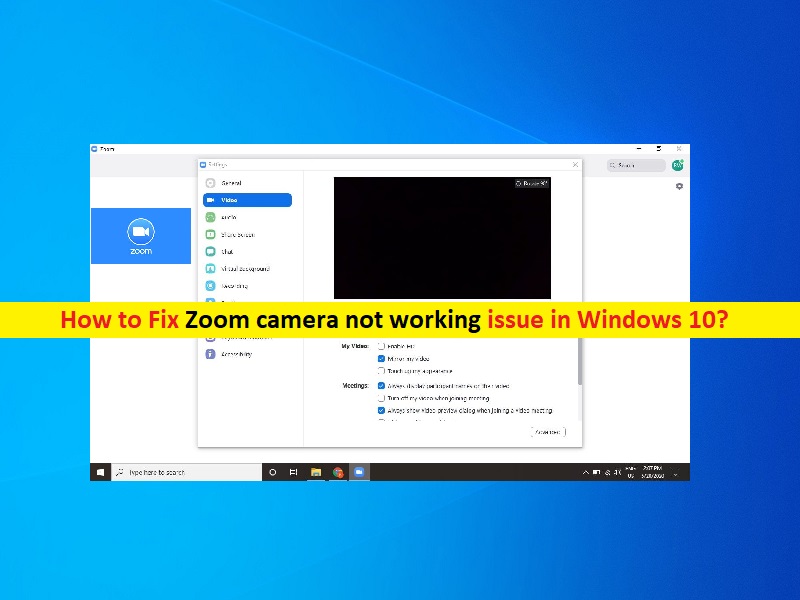
However, several Windows PC/laptop users reported they faced ‘Zoom camera not working’ issue while in Zoom meetings on their Windows computer. This issue indicates you are able to run Zoom Meetings in your Windows 10 computer but Zoom is unable to detect your PC/laptop’s camera and video box only display a grey area instead of output. Webcam/Camera plays important role during video conferencing and without proper functioning of camera/webcam, you can’t imagine video conferencing.
Before troubleshooting issue, you should make sure webcam/camera hardware is working fine and is connected/attached to your Windows computer properly. Also, make sure camera/webcam is enabled in your computer and check if Zoom Meetings Desktop app or the browser that you are using for Zoom video conferencing, is allowed to access your system’s camera. In sort, you should make sure Zoom desktop app or your browser is allowed to access your device’s camera in ‘Camera Privacy Settings’.
The possible reasons behind this issue can be the wrong configuration of Zoom Meetings’ setting, corrupted/outdated cache of Camera App, disabled camera/webcam, interference of some other conflicting software, camera is already in use, outdated Windows OS and others. It is possible to resolve the issue with our instructions. Let’s go for the solution.
How to fix Zoom camera not working in Windows 10?
Method 1: Fix ‘Zoom camera not working’ with PC Repair Tool
If this issue is occurred due to some issues in your Windows computer, then you can try to fix the issue with ‘PC Repair Tool’. This software offers you to find and fix BSOD errors, EXE errors, DLL errors, problems with programs/applications, malware or viruses infections, system files or registry issues, and other system issues with just few clicks.
Method 2: Check if Zoom Meetings is using correct camera/webcam
Step 1: Open Zoom desktop app in your computer or open Zoom Meeting in your browser and login into your account
Step 2: In left pane, click ‘New Meeting’. The new video session will be started.
Step 3: Now, scroll down to bottom-left corner and click ‘Stop Video’
Step 4: In elevated panel, check if Zoom App is using right camera like integrated webcam. To close the session, click ‘End’
Method 3: Use Zoom Troubleshooting

Step 1: Open Zoom desktop app in your computer, click on ‘Gear-shaped’ icon to open ‘Zoom Settings’
Step 2: In left pane, click ‘Video’ and in right-pane, click ‘Troubleshooting’. Make sure that you have followed every instructions of that list minutely and also make sure webcam/camera is plugged-in
Step 3: Ensure webcam/camera is not used by another app like Skype. If another app using webcam, close it and re-launch Zoom app
Step 4: If the issue is still persist, restart your computer and then re-launch Zoom desktop app and check if it works for you.
Method 4: Configure Zoom Video settings
Step 1: Open Zoom desktop app in Windows 10 and open Zoom Settings from top-right corner
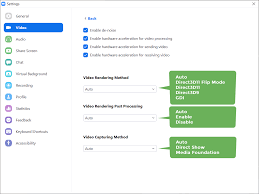
Step 2: Now, click ‘Video’ in left pane, and click on ‘Advanced’ in bottom-right corner
Step 3: In right-pane, check ‘Enable de-noise’ option, ‘Enable Acceleration for video processing’ option, ‘Enable acceleration for sending video’ option and ‘Enable hardware acceleration for receiving video’ checkboxes
Step 4: Similarly, you have to set all other three settings to ‘Auto’ and save the changes and close ‘Settings’
Step 5: Once done, re-launch Zoom meeting desktop app and check if the issue is resolved.
Method 5: Check camera permission
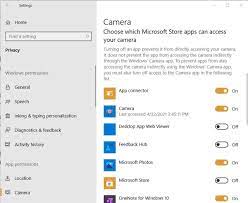
Step 1: Open ‘Settings’ App in Windows 10 via Windows Search Box and go to ‘Piracy > Camera’
Step 2: Under ‘Allow Access to the camera on this device’, click ‘Change’ and turn ON ‘Camera access for this device’
Step 3: Scroll down in ‘Settings’, turn ON ‘Allow desktop apps to access your camera’ and close Settings. Now, re-launch Zoom App and check if it works for you.
Method 6: Reset Camera App
Step 1: Open ‘Settings’ App and go to ‘Apps > Apps & Features’, find and select ‘Camera’ app and click ‘Advanced ’
Step 2: Click on ‘Reset’ and click ‘Reset’ button again to confirm and once done, restart Zoom app and check if it works for you.
Method 7: Disable and re-enable webcam
Step 1: Open ‘Device Manager’ in Windows 10 via Windows Search Box and expand ‘Cameras’ category
Step 2: Right-click on integrated webcam, and select ‘Uninstall Device’ and follow on-screen instructions to finish uninstall process and after that, restart your computer.
Step 3: After restart, open ‘Device Manager’ and click ‘Action > Scan for hardware changes’. This will automatically reinstall all necessary drivers in computer.
Download or reinstall webcam/camera driver update in Windows 10 [Automatically]
You can also try to get latest update for all Windows drivers including webcam/camera driver using Automatic Driver Update Tool. You can get this tool through button/link below.
Conclusion
I am sure this post helped you on How to fix Zoom camera not working in Windows 10 with several easy steps/methods. You can read & follow our instructions to do so. That’s all. For any suggestions or queries, please write on comment box below.


