
Usually Antivirus Software is considered as the savior of our PC. It prevents our Operating System from getting infected by any malware. But sometimes these security software may create nuisance for the users just because of their over protectiveness and Your IT administrator has limited access is an example of such errors.
This error is caused by third party antivirus software and pop-ups when you have recently updated your Windows 10 or attempted to turn on the Windows Defender. The full error message reads as:
Page not available
Your IT administrator has limited access to some areas of this app, and the item you tried to access is not available. Contact IT helpdesk for more information.
Why I am facing “Your IT administrator has limited access” Error?
The major reason why this error occurs is due to the fact that the user’s account is not authorized to access part of the Windows Security. You are also most likely to face this error if your PC has a Group Policy that prevents you from changing anything beyond the default settings on your PC.
When you try to switch on Windows Defender after a recent Windows 10 Upgrade, you may find this error. As we have earlier mentioned this error occurs when you use third-party antivirus software.
But thankfully there are some tried and tested methods which can be used to bypass the error. So without any further delay let’s get started with the discussion.
Try these Methods to Troubleshoot then Error
Method 1: Make Sure Windows Defender isn’t disabled by Group Policy
First of all ensure that Windows Defender isn’t disabled by Group Policy, to do so follow the below mention guidelines:
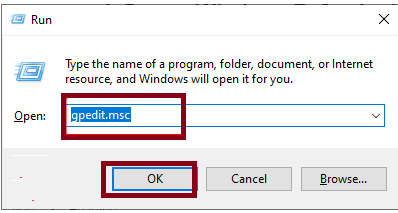
Step 1: Use Windows + R keys, type in gpedit.msc , and click OK to launch the Group Policy Editor
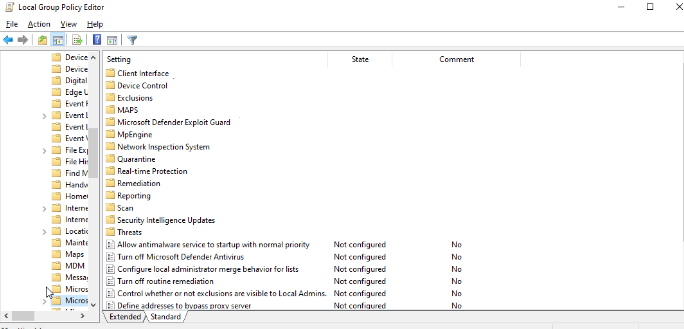
Step 2: Now go to the path below in the left pane:
Computer Configuration > Administrative Templates > Windows Components > Microsoft Defender Antivirus
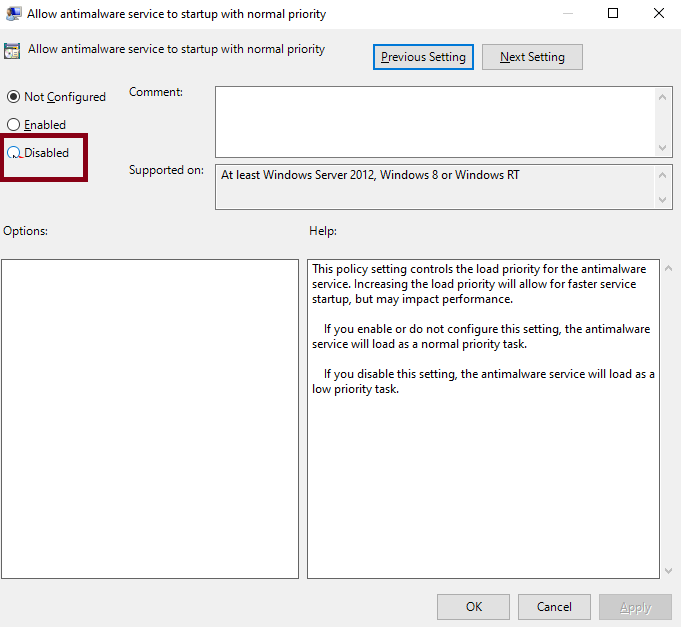
Step 3: Double-click the Allow antimalware service to startup with normal priority.
Step 4: Set this Policy to Disabled and click Apply and OK to save the changes.
Step 3: Now, double-click the Turn off Windows Defender Antivirus > Set it to Disabled then click Apply and OK
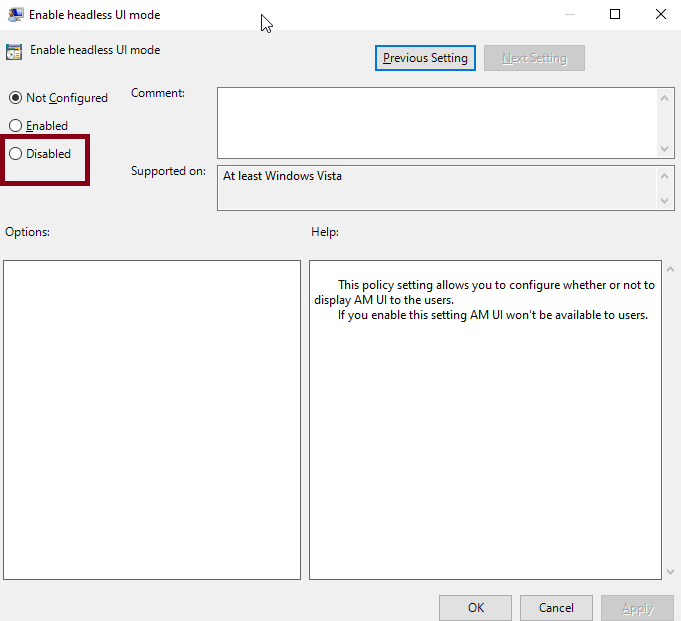
Step 4: Now go back to the Windows Defender Antivirus navigate and double-click Client Interface
Step 5: In the right pane, double-click the Enable headless UI mode > Select Disabled and click Apply and OK to save the changes
Method 2: Use Command Prompt
Using the Command Prompt may also resolve the error, to do so follow the below mention guidelines:
Step 1: Use Windows + S keys, type in cmd and select Run as administrator under Command Prompt
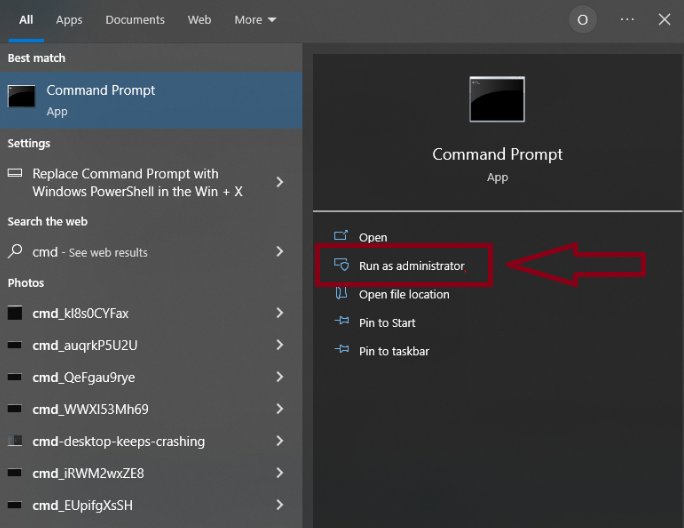
Step 2: Then type the following commands and press Enter key after each:
reg delete “HKLM\Software\Microsoft\Windows\CurrentVersion\Policies” /f
reg delete “HKLM\Software\Microsoft\WindowsSelfHost” /f
reg delete “HKLM\Software\Policies” /f
reg delete “HKLM\Software\WOW6432Node\Microsoft\Policies” /f
reg delete “HKLM\Software\WOW6432Node\Microsoft\Windows\CurrentVersion\Policies” /f
reg delete “HKLM\SOFTWARE\Policies\Microsoft\Windows Defender” /v DisableAntiSpyware
reg delete “HKCU\Software\Microsoft\Windows\CurrentVersion\Policies” /f
reg delete “HKCU\Software\Microsoft\WindowsSelfHost” /f
reg delete “HKCU\Software\Policies” /f
reg delete “HKLM\Software\Microsoft\Policies” /f
Step 3: Note that you might get an error message after some of the commands. Just ignore it and proceed to the next one.
Step 4: Now Restart your PC after running the commands.
Method 3: Enable the hidden administrator account
In this method we suggest you to enable the hidden administrator account, to do so follow the below mention guidelines:
Step 1: In order to open the Windows Search box, press Windows key > then type in cmd then click Run as administrator under Command Prompt
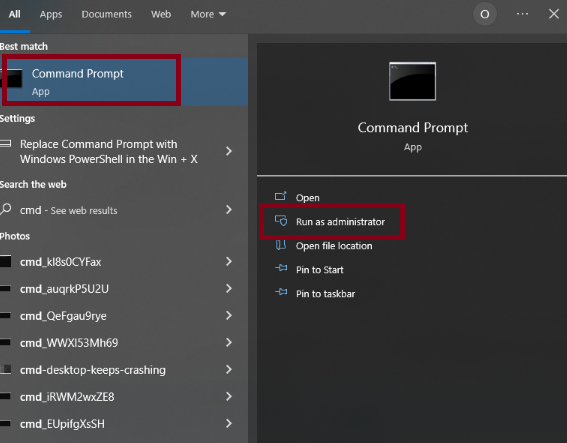
Step 2: Once the Command Prompt starts, copy and paste the below mention command and press Enter:
net user administrator /active:yes
Step 3: Now log out and switch to the administrator account > then see if the issue resolved or not.
Note that once you are done with using the administrator account, you can disable it by starting Command Prompt as administrator and running the command below:
net user administrator /active:no
Method 4: Delete Windows Defender Records
Several users have claimed that deleting Windows Defender Records resolved their error. So you can also try the same for you.
Here’s how:
Step 1: Use Windows + R keys, type in regedit , click OK
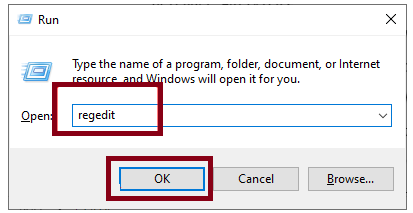
Step 2: Navigate tothe pathbelow in the left pane:
HKEY_LOCAL_MACHINE\SOFTWARE\Policies\Microsoft\Windows Defender\Policy Manager
Step 3: Now delete everything in this folder except the first one
Method 5: Remove Work or School Account
In this method we suggest you to remove work or school account, to do so follow the below mention guidelines:
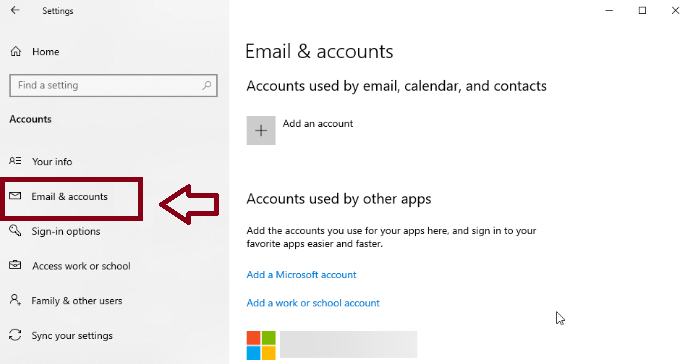
Step 1: Use Windows + I keys and select the Accounts option
Step 2: Select Email and Accounts and see if there is a work or school email listed there.
Step 3: Finally remove the email and restart (don’t’ shut down) your PC.
Bottom Line
We have mentioned all the possible fixes to resolve the Your IT administrator has limited access, we really hope these methods will resolve the error. Thanks for your time.


