Countless Users have claimed TPM-WMI Event ID 1795 Error code. It’s pertinent to mention that Trusted Platform Module is used to improve the security of your PC. It is used y Services like BitLocker drive encryption and others to create and store cryptographic keys.
But sometimes, TPM may malfunction which results in the frequent crashes with the above mention error code. And if we talk about the reason that manifests the error then the factors may include hardware failure, software compatibility issues, incompatible Windows updates and obsolete drivers.
But thankfully, this error is manageable and can be fixed with simple methods. So without any further delay let’s get started with the discussion.
Also Read: Event ID 1001 the Computer has Rebooted from a bugcheck
Try these Methods to troubleshoot Event ID 1795 TPM-WMI
Method 1: Reinstall the relevant drivers
As we have earlier mentioned obsolete drivers are one of the prominent reasons to face this error, so we recommend you to reinstall the related drivers.
To proceed with the method, use the following steps:
Step 1: Use Windows keys, type in Device Manager in the search bar and click Open

Step 2: Go to Sound, video and game controllers to expand ad right-click on the problematic drivers. Realtek High Definition Audio drivers were the most reported culprits so tap on it and choose Uninstall device.
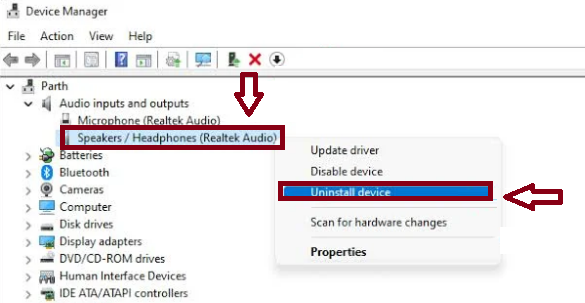
Step 3: Now Restart your device and the others will automatically reinstall themselves
Alternatively, you can use an automatic driver tool. This professional tool is capable for updating your drivers to the latest version. Use can use this tool if you don’t want to struggle with the above mention steps.
⇑Get Driver Tool from Here⇓
Method 2: Uninstall Recent Windows Update
We suggest you to uninstall the recent Windows Update if you are facing the above mention error after a Window Update.
Here’s how:
Step 1: Use Windows + I keys to open Settings

Step 2: Then navigate to Windows Update, after that go to Update history
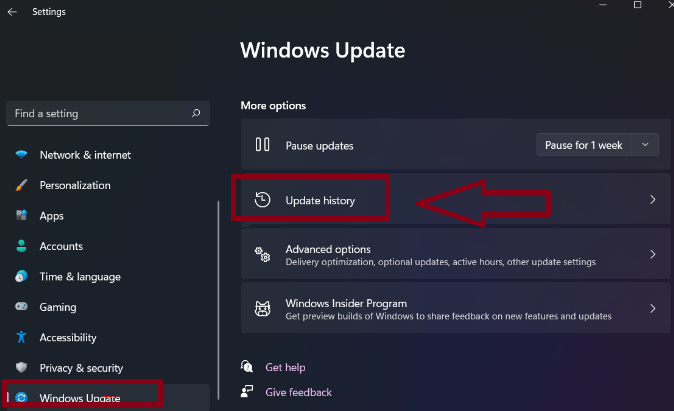
Step 3: Tap on Uninstall Updates > Select the most recent update, then click Uninstall
Method 3: Perform a Clean Boot
In this method we suggest you to perform a clean boot to check whether third party software is causing the error. So clean boot your PC to fix the issue.
Here’s how:
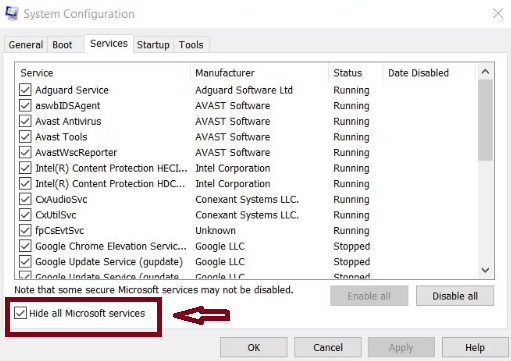
Step 1: In the Start Menu search bar, type sysconfig > In the search results, click on System Configuration
Step 2: In the next window, click on the Services tab > Now check the Hide all Microsoft services box
Step 3: After that select all the Services listed in the Windows and click Disable all
Step 4: Click OK and close System Configuration > Now press CTRL + Shift + Esc to launch the Task Manager
Step 5: Under the Startup tab, click on each services one by one and click on Disable

Step 6: Now tap on OK and close Task Manager > Once done then reboot your PC
Method 4: Reinstall problematic software
You are most likely to face the above mention error, if a program is conflicting, so in such case, it is suggested to remove the software.
Here’s how:
Step 1: Tap on the Start Menu icon, type in Control Panel on the search bar and click on Open
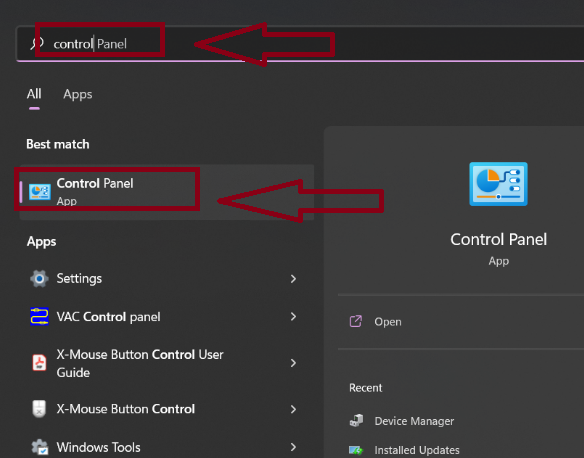
Step 2: Select Uninstall a Program under Programs > find the problematic app, click on it, & select Uninstall
Step 3: Finally confirm the uninstallation in the next pop-up
Method 5: Enable/Disable Secure Boot
To enable follow the below mention guidelines:
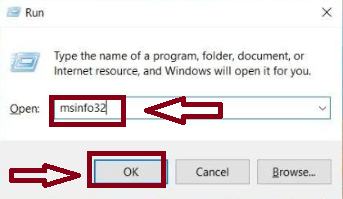
Step 1: Use Windows + R keys to open the Run application and then type msinfo32 and click Yes or press Enter
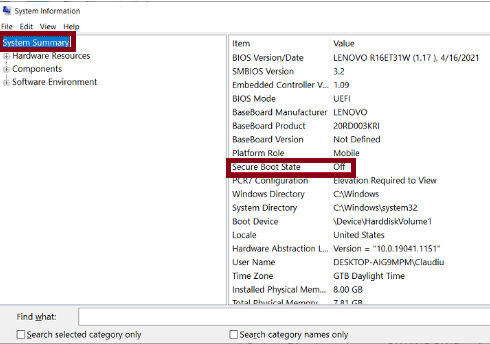
Step 2: In the System Summary, you will find an option called Secure Boot State. If it’s On it connotes that Secure Boot is enabled and if it’s off, Secure Boot is disabled.
Step 3: If its disabled, follow the instructions from the next step to enable it> don’t forget to create a restore point or backup the registry before making any edits.
Step 4: Use Windows + R keys to open Run utility box
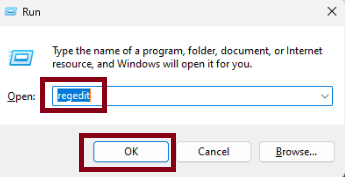
Step 5: Then type in Regedit and press Enter to open Registry Editor> then follow the below mention path:
Computer\HKEY_LOCAL_MACHINE\SYSTEM\CurrentControlSet\Control\SecureBoot\State
Step 6: Now locate and double-click the DWORD UEFISecureBootEnabled
Step 7: Change the Value data to 1 and click OK >Now restart your PC to confirm the changes.
If enabling Secure Boot doesn’t work, you need to disable it. We suggest you to temporarily disable it. To proceed with the method follow the below mention guidelines:
Step 1: Restart your PC> during Startup, press a key designated by the OEM or computer manufacturer to access the UEFI settings. For instance in HP. it is F10, in Dell, it is F2.
Step 2: You will enter the UEFI settings > locate the Security or System Configuration section
Step 3: Now search for Secure Boot or UEFI Secure Boot, select it, and change the status to Disabled.
Step 4: On the basis of your machine, you might also have to change the UEFI Mode to Legacy mode to disable Secure Boot.
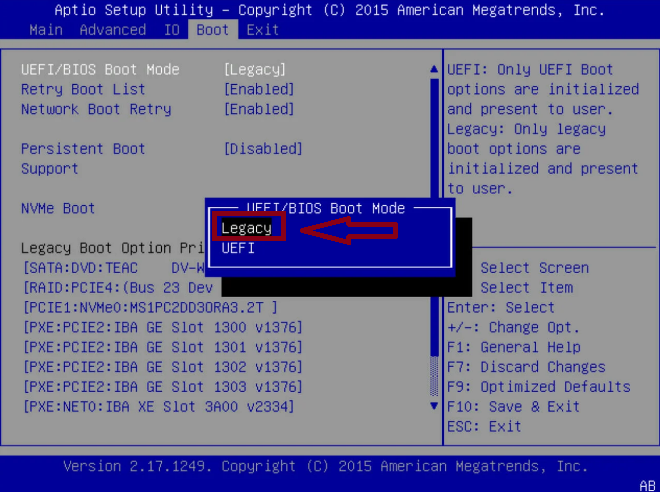
Step 5: Once done, Save & Exit to save the changes > Restart your PC
Once you resolved the error, don’t forget to re-enable it to avoid exposing your system to vulnerabilities.
Method 6: Reset TPM
If you are still struggling with Event ID 1795 TPM-WMI, we suggest you to reset TPM. But ensure to have a backup.
Here’s how:
Step 1: Boot your PC and press the F2 key to enter the BIOS Setup mode > locate the Security option on the left side and expand it
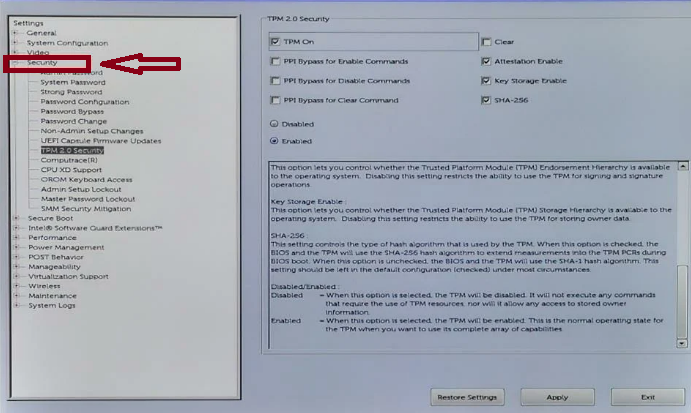
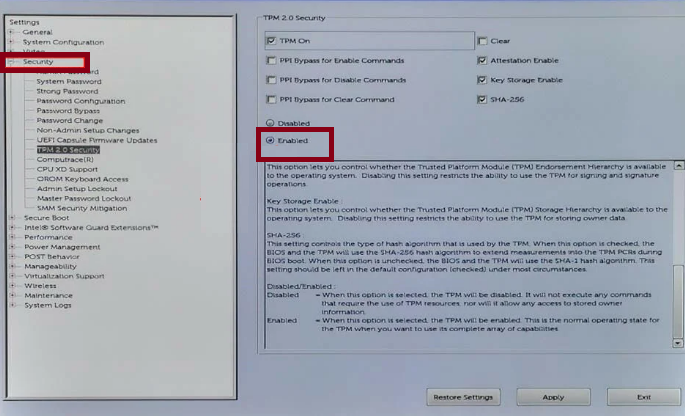
Step 2: Click on the TPM option nested in the Security Setting, and check the Clear box >Reboot your PC and re-enter onto the BIOS menu, again by tapping the F2 key.
Step 3: Ensure the Enabled radio button is checked to activate TPM.
Step 4: Finally Restart your PC
Wrapping Up
That’s all folks! We have mentioned all the possible methods to bypass TPM-WMI Event ID 1795. This error is extremely annoying and may lead to frequent crashes. In order to tackle with the error, you can use the above mentioned methods one by one. We really hope this article helped you a lot and you learnt something from it.


