0x00007ff Referenced Memory Error is one of the frequently reported errors. This error connotes that the allocated physical memory could not read a program’s contents. Basically it’s a RAM related error. It’s pertinent to mention all information are stored in RAM in a particular location. When a particular software requires information stored in a specific address and the process goes wrong, you get this error.
And if we talk about the causes that surface the above mention error, there could be several reasons; some potential reasons have been listed below:
#. Corrupted System files: You are most likely to face the above mention error if your system has corrupted system files. These damaged files may lead to several Windows errors and the current error is one of them.
#. Incompatible third-party programs: Often times incompatible third party programs interferes in the working of your PC.
#. Presence of Malware: If your system is infected with malware it may create a lot of nuisance and the above mention error is one of them.
But thankfully this error can be easily resolved using simple methods; you can use the suggested measures one by one.
Also Read: Your Computer is Low in Memory error Windows 10
Try these Methods to troubleshoot 0x00007ff Referenced Memory Error
Method 1: Run the Windows Memory Diagnostics Tool
In the first methods we suggest you to run the Windows Memory Diagnostics tool, to proceed follow the below mention guidelines:
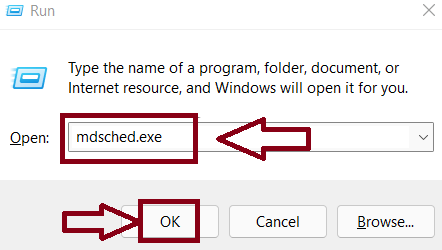
Step 1: Use Windows + R keys to open Run dialog box> type in mdsched.exe and press Enter
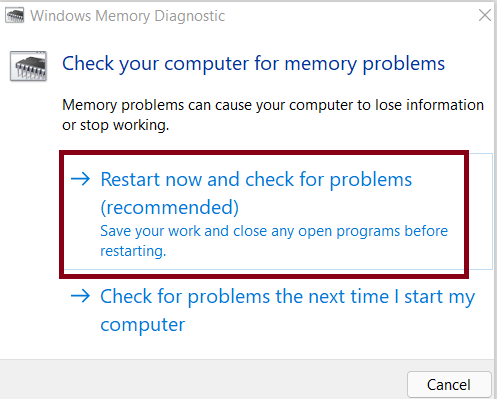
Step 2: In the Windows Memory Diagnostic window that shows up, click on Restart now and check for problems
Step 3: Once the tool completes running, restart the system.
Method 2: Allocate more Virtual Memory
In this method we suggest you to allocate more virtual memory. To do so follow the below mention guidelines:
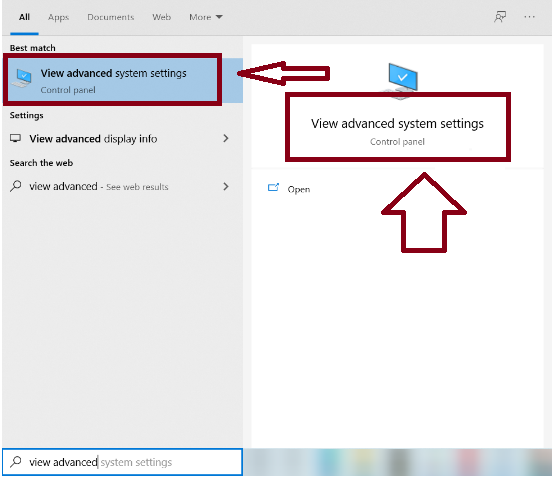
Step 1: In the Search bar, type Advanced, and then open View advanced system settings
Step 2: Under Performance click on Settings > Navigate to the Advanced tab and click on Change under Virtual Memory
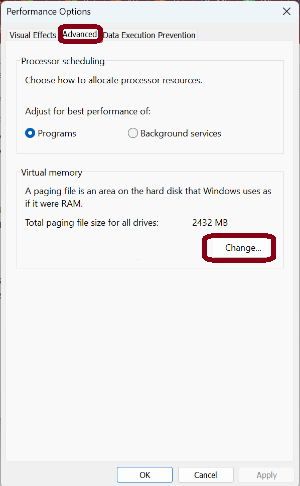
Step 3: Uncheck the Automatically manage paging file size for all drivers option and then select Custom
Step 4: Enter the following values in the two text fields based on the installed RAM in the computer:
#. Initial Size (MB): 1.5 x Total installed RAM
#. Maximum Size (MB): 3 x Total installed RAM
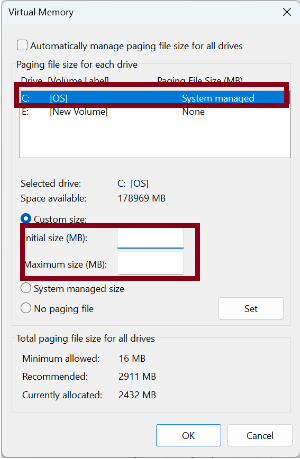
Step 5: For example, if your PC has 8GB RAM, the initial size becomes 12,288 (1.5 x 8 x 1024), and the Maximum Size becomes 24,576 (3 x 8 x 1024).
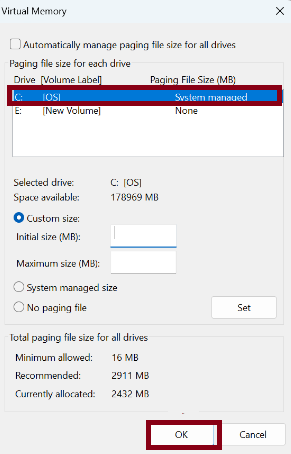
Step 6: Once done, click on OK at the bottom to save the changes.
Method 3: Perform a Clean Boot
We suggest you to perform a clean boot. It initiates the Windows with the bare minimum of services and drivers.
Here’s how:
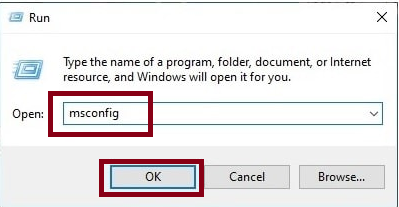
Step 1: Use Windows + R keys to open Run utility > type msconfig in the Run command box ad press Enter key
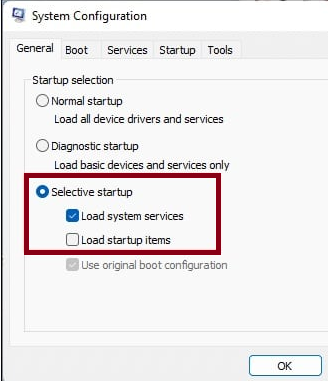
Step 2: Go to the General tabs & click on the radio button for the Selective Startup option
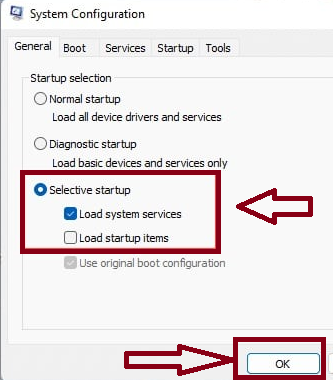
Step 3: Uncheck the Load Startup items checkbox then go to the Service tab
Step 4: Check the box for Hide all Microsoft Services and click on Disable option > All Microsoft services running in the background should get disabled this way.
Step 5: Next open the Task Manager by right-clicking on the Windows Start Menu
Step 6: Right-click on each startup item from the Startup tab you want to disable. Choose the Disable option
Step 7: Finally Restart your PC
Method 4: Turn off Automatically Hide the Taskbar Feature
Several users have claimed that disabling the automatically hiding taskbar feature resolved their issue. So you can try this method to fix the error.
Here’s how:
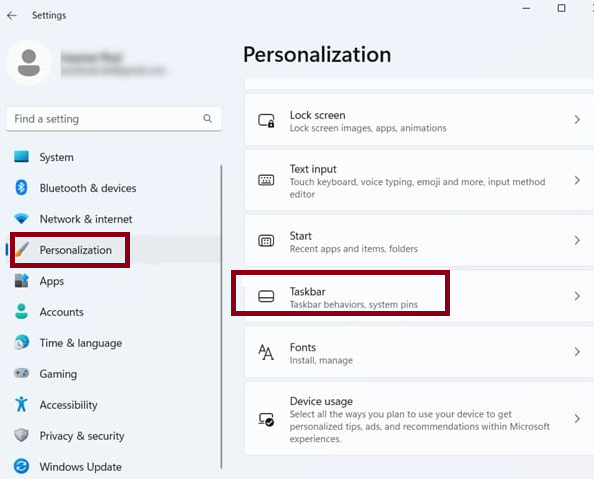
Step 1: Click on the Windows Start Menu button and select Settings > Select Personalization > Taskbar
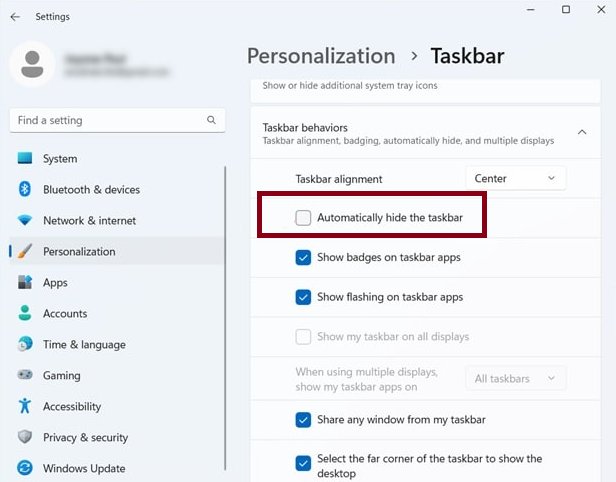
Step 2: Expand the Taskbar Behaviors section and uncheck the Automatically hide Taskbar
Method 5: Run SFC and DISM Scans
You may also run the SFC and DISM Scans; these two utility tools will repair your system files. To proceed with the method follow the follow the below mention guidelines:
Step 1: Navigate to Start, type cmd and then click on Run as administrator to start the Command Prompt > now paste the following command and press Enter key:
sfc /scannow
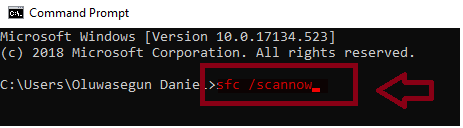
Step 2: Now wait for the process to be completed >Next, execute the following command:
DISM /Online /Cleanup-Image /RestoreHealth
Step 3: Once done with both SFC and DISM, run the Check Disk utility with the following command:
Chkdsk /r
Method 6: Update .Net Framework
If you are using an app that uses Microsoft .Net Framework and the app is being tasked with heavy memory, you may face the above mention error.
Here’s how:
Step 1: Navigate to Microsoft’s Official Download page for Microsoft .Net Framework> In .Net Framework, click Download .Net Framework Runtime to download the latest Microsoft .Net Framework
Step 2: Once you have downloaded the file, double-click on it and follow the on-screen instructions to install it on your computer.
Method 7: Reset the System
If you are still struggling with 0x00007ff Referenced Memory Error we suggest you to reset your system, to do so follow the below mention steps:
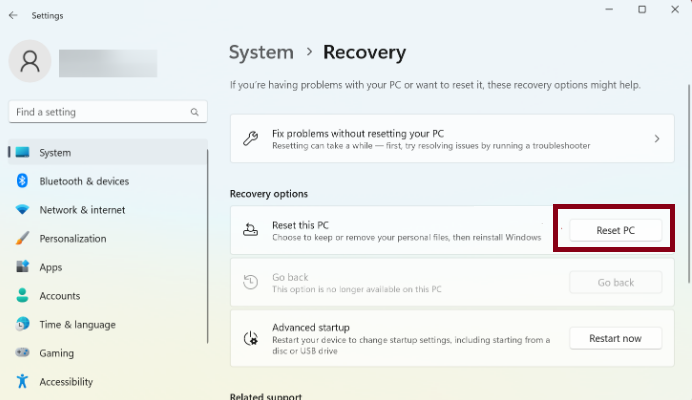
Step 1: Use Windows + I keys to open Settings then click on Recovery on the right in the System tab> Click on the Reset PC button
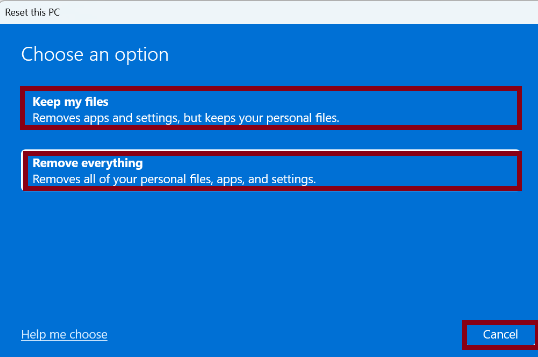
Step 2: Choose either of the two options here. We recommend you select Remove everything since that’s a more effective reset.
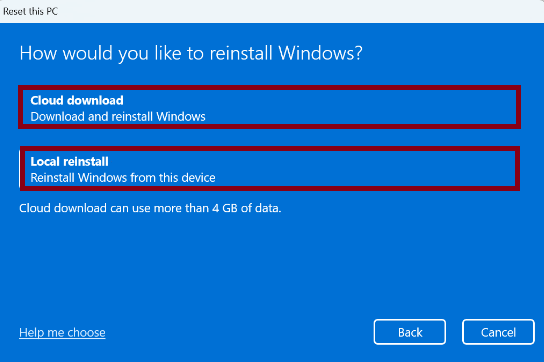
Step 3: Click on Local reinstall
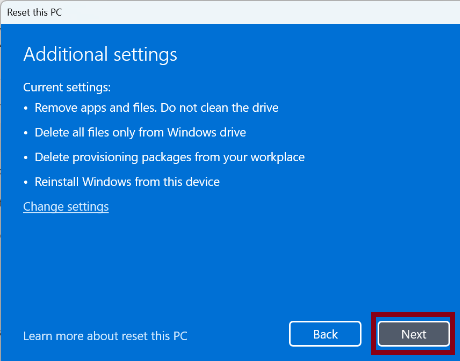
Step 4: Now Verify the reset settings and then click on Next
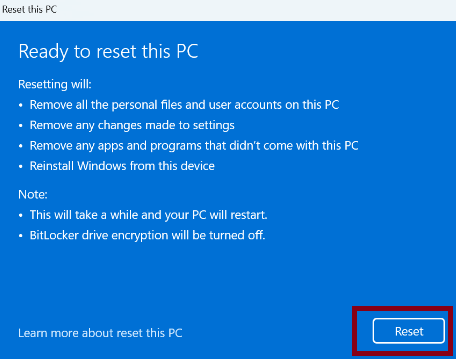
Step 5: Finally, click on Reset to start the process
Final Thoughts
That’s all guys! We have mentioned all the possible fixes to resolve 0x00007ff Referenced Memory Error, now it’s your turn to follow the guidelines.


