What is ‘Uplay Failed to Start or launch’ issue in Windows 10?
If you are experiencing ‘Uplay Failed to Start or launch’ issue while trying to launch or start ‘Uplay service’ in your Windows 10 computer, then you are in right place for the solution. Here, you will be guided with easy steps/methods to resolve the issue. Let’s starts the discussion.
‘Uplay’: Ubisoft Connect formerly ‘Uplay’ service is digital distribution rights management, multiplayer and communications service designed & developed by Ubisoft. This service offers an experience similar to the achievements/trophies offered by various other game companies. Uplay is digital distribution platform like Steam and hosts numerous multiplayer games like Assassins Creed and other famous records.
However, several Uplay users reported that they faced ‘Uplay Failed to Start or launch’ issue on their Windows 10 while they tried to open Uplay service. There could be several reasons behind this issue including missing or corrupt essential DLL files in Windows 10, bad internet connection, and service conflict issue between Uplay and other similar services running in background. This issue prevents you from accessing or open Uplay service in Windows 10.
The possible reason behind this issue can be missing important DLL (Dynamic Link Library) files in your computer. It might possible that you have deleted the essential DLL files in computer accidently or deleted by potentially unwanted applications (PUAs) or malware installed in your computer. In such case, you should try to find and remove all threats or PUAs in computer using some powerful antivirus software, and try re-registering the missing DLL files in computer.
This issue can also be occurred due to some associated services already running in your system’s background. Some services like Steam or other services can cause service conflict issue in your computer result in ‘Uplay Failed to Start or launch’ issue is occurred. You can fix the issue by closing other services that cause conflict issue, or close/kill background processes associated with conflicting services in computer.
Sometimes, this issue can be occurred due to interference of your third-party antivirus software installed in computer. It might possible your third-party antivirus software is blocking some applications like Uplay service in computer for some security reasons or due to its over security features. In such case, you can disable your antivirus software temporarily in order to fix the issue.
Another possible reason behind this issue can be problem with Uplay Client itself. Corrupted cache or data of Uplay client stored in your computer can cause this type of issue. You can try to fix the issue by run clearing local cache of Uplay client in computer. Also, when you click ‘Play’ button on Uplay service in order to play game, it launches the EXEcutable of game automatically. However, some users reported that they can’t access or open the game through Uplay.
Uplay Client Compatibility issue could be another reason behind this issue. It might possible Uplay service is not running compatibility Mode in computer or not configured to run in compatibility mode. You can change compatibility mode settings of Uplay in order to select the prior OS versions and set to run as administrator. This issue can also be occurred due to outdated or corrupted graphics card driver in Windows 10 computer.
If you are not aware, graphics card driver is important software to communicate your graphics card (hardware) with operating system software installed in your computer. Depending on your graphics card model and operating system version, the graphics card driver must be installed in computer accordingly, and graphics card driver version must be compatible with Windows computer and is up-to-date. Updating graphics card driver can fix graphics and gaming related issues in computer. Let’s go for the solution.
How to fix Uplay Failed to Start or launch issue in Windows 10?
Method 1: Fix ‘Uplay Failed to Start or launch’ issue with ‘PC Repair Tool’
‘PC Repair Tool’ is easy & quick way to find and fix BSOD errors, EXE errors, DLL errors, problems with programs/applications, malware or viruses issue, system files or registry issues, and other system issues with just few clicks. You can get this tool through button/link below.
Method 2: Install Universal C Runtime
As mentioned, this issue is occurred due to missing DLL files/libraries which are required by Uplay for successful launching in Windows 10 computer. Usually, Uplay install all the dependent files in your computer automatically when you install Uplay. However, if DLL files/libraries associated with Uplay is missing or corrupt for some reasons, then you can fix the issue by installing one of the most common external files ‘Universal C Runtime’ in computer.
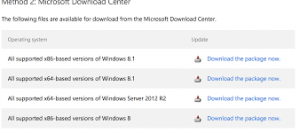
Step 1: Open your browser and visit ‘Microsoft Official’ site and then visit ‘Update for Universal C Runtime in Windows’ page, or visit ‘https://support.microsoft.com/en-us/topic/update-for-universal-c-runtime-in-windows-c0514201-7fe6-95a3-b0a5-287930f3560c’ page
Step 2: Scroll down to method to ‘obtain this update’ section, and choose any method from available two update options, and install the update. Make sure you install Universal C Runtime from main administrator user account.
Step 3: Once updated, restart your computer and re-launch Uplay client App in computer, and check if the error is resolved.
Method 3: Clear Uplay cache
As mentioned, corrupted cache of Uplay Client App in computer can cause this type of issue. You can clear the cache of Uplay in computer in order to fix the issue.
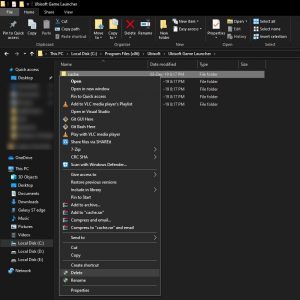
Step 1: Press ‘Windows + E’ keys on keyboard to open ‘File Explorer’ and navigate to the following path
C:\Program Files (x86)\Ubisoft\Ubisoft Game Launcher\cache
Step 2: Once you are inside the correct folder, select all files and folders inside the cache folder, and delete them. You can also cut & paste all the content inside ‘Cache’ folder to another location if you want to replace them afterwards.
Step 3: After that, restart your computer and re-launch Uplay client app again, and check if the error is resolved.
Method 4: Launch Uplay through shortcut for launching game

If the problem is still persist, then you can try to fix the issue by launching the Uplay directly through shortcut. You can easily launch the game using ‘game shortcut’ and if there was some dependency not installed, it will be conveyed to you and download process will begin. If it works, you can try launching the game directly through Uplay next time, and check if the issue is resolved.
Method 5: Run Uplay Client in Compatibility Mode
Step 1: Open ‘File Explorer’ and navigate to Uplay installation folder in main drive on computer. or locate ‘C:\Program Files (x86)\Ubisoft\Ubisoft Game Launcher\’ path
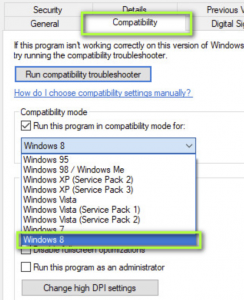
Step 2: Find and right-click on executable of ‘Uplay’, and select ‘Properties’
Step 3: In ‘Properties’ window, click on ‘Compatibility’ tab, select ‘Run this program in compatibility mode for’ checkbox, and select another operating system or older Windows OS version, and then save the changes
Step 4: Once done, restart your computer and re-launch Uplay again, and check if the issue is resolved.
Method 6: Disable your third-party antivirus/Firewall
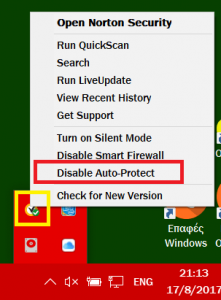
As mentioned, your third-party antivirus software could be another reason behind this issue where it may block some applications like Uplay client App in computer from accessing for some security reasons or due to its over security feature. In such case, you can disable your antivirus software temporarily in order to fix the issue. If disabling antivirus didn’t work for you, then you can fix the issue by uninstalling your antivirus software completely in computer.
Method 7: Perform clean boot in Windows 10
If the problem is still persist, then you can try to fix the issue by performing clean boot in Windows computer.
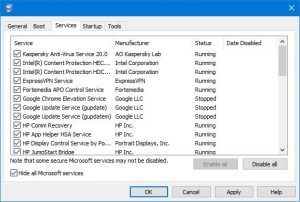
Step 1: Press ‘Windows + R’ keys on keyboard, type ‘msconfig’ in the opened ‘Run’ dialog box and hit ‘Ok’ button to open ‘System Configuration’ window
Step 2: In the opened window, click on ‘Services’ tab, select ‘Hide all Microsoft Services’ checkboxes, and hit ‘Disable All’ button and then click on ‘Apply’ button to save the changes.
Step 3: Now, click on ‘Startup’ tab, and click on ‘Open Task Manager’. In ‘Task Manager’ under ‘Startup’ tab, right-click on each item one-by-one and select ‘Disable’, and then close ‘Task Manager’
Step 4: Back to ‘System Configuration’ window, click on ‘Apply’ and ‘Ok’ to save the changes and restart your computer and try running Uplay and check if the issue is resolved.
Method 8: Update Graphics card drivers in Windows 10
Updating graphics card driver can fix corruption or outdated graphics card driver and resolve the issue associated with graphics and gaming in computer.
Step 1: Open your browser and visit your graphics card manufacturer official site
Step 2: Find and download the latest graphics card driver according to your graphics card model and operating system version
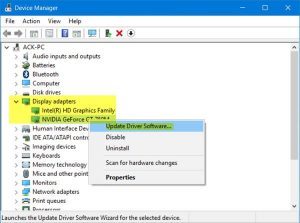
Step 3: Once downloaded, press ‘Windows + X’ keys on keyboard and select ‘Device Manager’
Step 4: In ‘Device Manager’, find and expand ‘Display Adapters’ category, find and right-click on your graphics card driver under ‘Display Adapters’ category, and then select ‘Update Driver’
Step 5: Follow on-screen instructions to install the downloaded latest graphics card driver version and after that, restart your computer to see the changes and check if the issue is resolved.
Download or reinstall graphics card driver update in Windows 10 [Automatically]
You can also try to download or reinstall graphics card driver update with ‘Automatic Driver Update Tool’. This software will automatically find/download the latest updates for all Windows drivers and then install them into computer. You can get this tool through button/link below.
Method 9: Uninstall and then reinstall Uplay client App
This issue can also be occurred due to some problems in your Uplay App itself. You can uninstall and then reinstall Uplay client in order to fix the issue.

Step 1: Press ‘Windows + R’ keys on keyboard, type ‘Control Panel’ in the opened ‘Run’ dialog box and hit ‘OK’ button to open ‘Control Panel’
Step 2: In ‘Control Panel’, go to ‘Uninstall a Program > Programs and Features’
Step 3: Find and right-click on ‘Uplay’, and select ‘Uninstall’. Follow on-screen instructions to finish uninstall and after that, restart your computer
Step 4: After restart, open your browser and visit ‘Uplay official site’ to download and install Uplay for Windows. Once installed, try running Uplay and check if it works.
Conclusion
I am sure this post helped you on How to fix Uplay Failed to Start or launch issue in Windows 10 with several easy steps/methods. You can read & follow our instructions to do so. That’s all. For any suggestions or queries, please write on comment box below.


