What is ‘File Explorer’ in Windows 10? Get help with File Explorer in Windows 10
In this post, we are going to discuss on “How to Get help with File Explorer in Windows 10”. You will be guided here with several easy steps to open ‘File Explorer’, access File Explorer’s menus and ribbons, some Windows 10 File Explorer shortcuts, and so on. Let’s starts the discussion.
‘File Explorer’: File Explorer (previously known as ‘Windows Explorer’) is Windows’ File Manager application that comes with Microsoft Windows Operating System installation. File Explorer provides GUI (Graphical User Interface) for accessing the file systems. This interface presents many user interfaces items on the screen including ‘taskbar’, ‘desktop’. There is several ways to access or open ‘File Explorer’ including double-click on new ‘My Computer’ or ‘This PC’ desktop icon to open ‘File Explorer’.
How to access or open ‘File Explorer’ in Windows 10? [Various Ways]
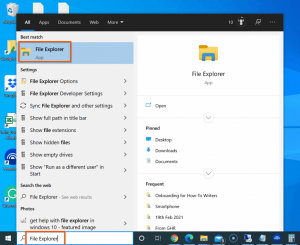
Method 1: Via ‘Windows Search’
Step: Type ‘File Explorer’ in ‘Windows Search Box’, click on ‘File Explorer’ app from results appear. By default, ‘File Explorer’ will open in ‘Quick Access’ where it will display ‘Frequent Folders’ and ‘Recent Files’.
Method 2: Via ‘Start Menu’
Step: Right-click on Windows 10’s Start Menu at bottom-left of taskbar, and select ‘File Explorer’ option

Method 3: via Keyboard Shortcuts
Step: Press ‘Windows LOGO key + E’ keys on keyboard to open ‘File Explorer’
Method 4: Via Windows 10’s Cortana Search
In Windows 10, it is possible to open ‘File Explorer’ via ‘Windows 10’s Cortana Search tool or Windows Search assistant’. To do so, you need to click on ‘Cortana’ icon in taskbar and type ‘File Explorer’ in ‘Cortana Search Box’.
Method 5: Via Taskbar
Step: Find and click on ‘File Explorer’ that is pinned in taskbar on Windows 10.
Features of ‘File Explorer’ in Windows 10
The above methods will help you to access or open ‘File Explorer’. You can try any from mentioned methods to access ‘File Explorer’. When you open ‘File Explorer’, you see the window with ‘Quick Access’ tab, ribbons, menus, ‘Frequents Folders’, ‘Recent Files’, ‘This PC’, ‘Libraries’ and so on. File Explorer provides multiple useful features and here we are providing some easy tricks to Get help with File Explorer in Windows 10.
‘Home’ tab: When you open ‘File Explorer’ in Windows 10, you see the ‘Home’ tab in menu bar at top-left corner of window. This new home tab is appeared with several groups including ‘Clipboard’ offers you to copy, cut, paste, copy path and paste the shortcut, ‘Organize’ group offers you to move to, copy to, delete and rename folder, and so on. Home tab in ‘File Explorer’ offers you to perform various tasks as mentioned in ‘File Explorer’ window
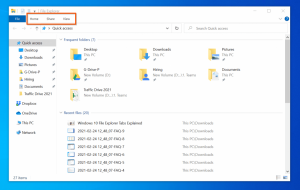
‘Share’ tab: ‘Share’ tab is appeared at top-left but next to ‘Home’ tab of File Explorer. This tab offers you to share plenty of files and folders wherever you want with just one click. This tab also offers you with option to convert files into ZIP format (compressed format) and burn them with the help of this tab. This tab also includes various groups including ‘Send’ and ‘Share with’.

‘View’ tab: View Tab is also appeared at top-left of File Explorer but next to ‘Share’ tab. This tab includes various groups such as Panes, Layout, Current View and Show/Hide. ‘Panes’ group offers you to perform navigation pane, preview pane and details pane operation, while ‘Layout’ group offers to view icons of folder & files in various different ways.
‘Quick Access’: Quick Access is one of the most helpful features of ‘File Explorer’ offers you can access files & folders which you have frequently accessed. This feature includes two different section including ‘Frequent Folders’ and ‘Recent Files’.
OneDrive: The new ‘File Explorer’ offers you to save files directly to ‘Microsoft OneDrive’ as well as you can sync the files in OneDrive with your PC or local system. This was not possible with ‘Windows Explorer’ in Windows 8.1
File Explorer keyboard shortcuts in Windows 10
There is several useful keyboard shortcuts you can use perform various tasks in Windows 10’s File Explorer. You will get help with File Explorer in Windows 10 here with some useful keyboard shortcuts. Let’s take a look at list of some useful Windows 10’s File Explorer shortcuts.
- Alt + D Go to the address bar
- Alt + Enter Display the Properties of the selected file or folder.
- Alt + Left Arrow Key Go back One Folder in history.
- Alt + Right Arrow Key Go forward One Folder in history.
- Alt + P Show/Hide the Preview pane.
- Ctrl + D Move file or folder to Recycle Bin.
- Ctrl + E Go to the search box.
- Ctrl + E Activate the Search bar in File Explorer.
- Ctrl + F Go to the search box.
- Ctrl + Mouse Wheel up or Down Increase or Decrease the size of Icons in File Explorer.
- Ctrl + N Open a new File Explorer window.
- Ctrl + Shift + E Display all folders above the selected folder.
- Ctrl + Shift + N: Create a new folder.
- Ctrl + W Close the current File Explorer window.
- F11 Maximize or minimize the active window.
- Home Display the top item in the active window.
- Num Lock + Asterisk (*) Display all subfolders under the selected folder.
- Num Lock + Minus (-) Collapse the selected folder.
- Num Lock + Plus (+) Display the contents of the selected folder.
- Shift + Delete Permanently delete file or folder.
How to enable / disable ‘Quick Access’ to Main Screen in ‘File Explorer’?
As mentioned, ‘Quick Access’ feature in ‘File Explorer’ offers to access ‘Frequent Folders’ and ‘Recent Files’ when you open ‘File Explorer’ first time. You can customize this option to main screen means you can switch from ‘Quick Access’ to ‘This PC’ in ‘File Explorer’ with the instructions below.
Step 1: Open ‘File Explorer’ in Windows 10 and click on ‘File’ menu at top-left corner of window
Step 2: Select ‘Change folder and search options’ to open ‘Folder Options’ window
Step 3: In ‘Folder Options’ window, under ‘General’ tab, select ‘This PC’ option from ‘Option File Explorer to’ dropdown.
Step 4: Finally, hit ‘Apply’ and ‘Ok’ to save the changes, and restart ‘File Explorer’ and check if it opens with ‘This PC’ option you selected.
Note: If you want to enable ‘Quick Access’ again in ‘File Explorer’, then repeat the same steps but this time select ‘Quick Access’ from ‘Open File Explorer to’ dropdown in ‘step 3’.
How to pin files/folder to ‘Quick Access’ in ‘File Explorer’ in Windows 10?
Quick Access in ‘File Explorer’ offers you to find and access the files/folders easily. So you can pin the folders/files you want to access quickly when you open ‘File Explorer’. To do so, follow the steps below.
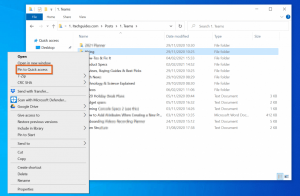
Step 1: Locate the folder/file you want to pin to ‘Quick Access’
Step 2: Right-click on the folder/file and select ‘Pin to Quick Access’ option. Once done, restart your ‘File Explorer’ and check if the folder/file you pined to ‘Quick Access’ is appeared as same.
How to unpin file/folder to ‘Quick Access’ in ‘File Explorer’?
Also, it is possible to unpin any file/folder appeared inside ‘Quick Access’ screen. To do so, follow the steps below
Step 1: Open ‘File Explorer’ in Windows 10 and access ‘Quick Access’ folder
Step 2: Find and right-click on file/folder you want to ‘unpin’, and select ‘Unpin from Quick Access’
How to remove ‘Frequent Folders’ and/or ‘Recent Files’ from ‘Quick Access’ in ‘File Explorer’?
You can use ‘File Explorer Privacy Settings’ to remove ‘Frequent Folders’ and/or ‘Recent Files’ from ‘Quick Access’.
Step 1: Type ‘File Explorer Options’ in ‘Windows Search Box’ and open it from results appear
Step 2: In ‘File Explorer Options’ window, go to ‘Privacy’ section, and deselect ‘Show recently used files in Quick Access’ and/or ‘Show frequently used folders in Quick Access’ checkbox
Step 3: Finally, hit ‘OK’ button to save the changes. Once done, restart ‘File Explorer’ and check if ‘Frequent Folders’ or ‘Recent Files’ is appeared inside ‘Quick Access’ in Windows 10
How to manage ‘Hard Drives’ in ‘This PC’ in Windows 10?
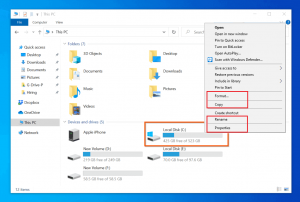
‘File Explorer’ in Windows 10 also offers you to access ‘This PC’ where you can see your hard drive partitions with drive letters. You can access to any drive by double-click on the drive in order to access data inside the drive. In ‘File Explorer’ inside ‘This PC’, you are also able to view all FAT and NTFS partitions that have drive letters.
You can perform various actions on drive like copy, format, rename, turn ON Bitlocker and so on. When you right-click on any drive like drive with drive letter ‘D:’, then you see the various options to perform on drive including format, copy, Properties and so on. Selecting ‘Properties’ option from the list of options offer you to find details about the drive like File System Type (NTFS, FAT or others) of drive.
How to fix File Explorer not working in Windows 10?
Sometimes, you will find File Explorer is not working in Windows 10. There could be several reasons behind File Explorer crashes/hangs. This issue can also be occurred after right-click inside ‘File Explorer’. However, it is possible to resolve the issue with our instructions. Let’s go for the solution.
Method 1: Run Winstock reset command
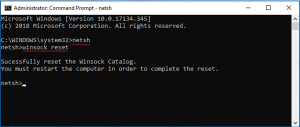
Step 1: Press ‘Windows + X’ keys on keyboard and select ‘Command Prompt as Administrator’
Step 2: Type ‘netsh’ command and hit ‘Enter’ key, and then type ‘winstock reset’ command and hit ‘Enter’ key to execute
Step 3: Once executed, restart your computer and check if the ‘File Explorer not working’ issue is resolved.
Method 2: Uninstall problematic Windows update
Sometimes, this issue can occur after recent Windows update installation. You can uninstall the recent or problematic Windows update in order to fix the issue.
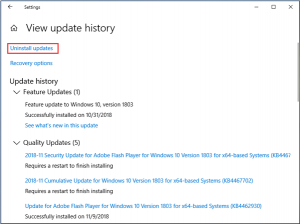
Step 1: Press ‘Windows + I’ keys on keyboard to open ‘Settings’ App in Windows 10
Step 2: In ‘Settings’ App, go to ‘Update & Security > Windows Update > View Update History > Uninstall Updates’
Step 3: Find the recently installed update or problematic updates according to date & time or KB number you installed, right-click on and select ‘Uninstall’. Follow on-screen instructions to finish uninstall process.
Step 4: Once done, restart your computer and check if the issue is resolved.
Method 3: Fix File Explorer not working issue with ‘PC Repair Tool’ [Recommended Solution]
‘PC Repair Tool’ is easy & quick way to find and fix BSOD errors, DLL errors, EXE errors, problems with programs/applications, malware or viruses issues, system files or registry issues, and other system issues with just few clicks. You can get this tool through button/link below.
Conclusion
I am sure this post helped you on How to Get help with File Explorer in Windows 10, How to fix File Explorer not working issue in Windows 10 with several easy steps/methods. You can read & follow our instructions to do so. If the post really helped you, then you can share the post with others to help them. That’s all. For any suggestions or queries, please write on comment box below.


