Tips to fix Snipping Tool not working in Windows 11:
In this post, we are going to discuss on How to fix Snipping Tool not working in Windows 11. You will be guided with easy steps/methods to resolve the issue. Let’s starts the discussion.
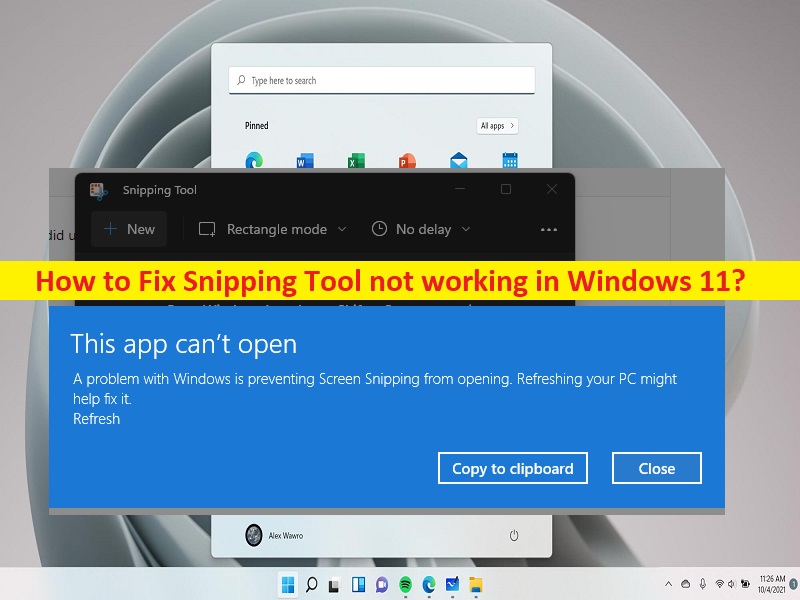
‘Snipping Tool not working in Windows 11’:
‘Snipping Tool’: Snipping Tool is Microsoft Windows screenshot utility included in Windows Vista and later version. Snipping Tool can take still screenshots of an open Window, rectangular areas, a free—form area, or the entire screen. This tool allows for basic image editing of the snapchat, with different colored pens, an eraser, and a highlighter. In Window 11, both Snip & Sketch and the legacy version of Snapping Tool were merged into an updated version of Snipping Tool.
However, several users reported they faced Snipping Tool not working in Windows 11 when they tried to launch and use Snipping Tool. This issue indicates you are unable to launch and use Snipping Tool in Windows 11 computer for some reasons. There could be several reasons behind the issue including corrupted cache of Snipping Tool, corrupted Snipping Tool, outdated/corrupted graphics card driver, interference of other conflicting apps/services, expired certificate of Snipping Tool, and other issues.
You should make sure graphics card driver is properly installed and is up-to-date to latest & compatible version in computer if you don’t want to face this type of issue. Also, make sure Windows OS is up-to-date in computer. It is possible to fix the issue with our instructions. Let’s go for the solution.
How to fix Snipping Tool not working in Windows 11?
Method 1: Fix Snipping Tool not working in Windows 11 with ‘PC Repair Tool’
‘PC Repair Tool’ is easy & quick way to find and fix BSOD errors, DLL errors, EXE errors, problems with programs/applications, malware or viruses infections in computer, system files or registry issues, and other system issues with just few clicks.
Method 2: Update Windows OS and Microsoft Store apps to latest version

Updating Windows OS and Microsoft Store apps to latest version can resolve the issue.
Step 1: Open ‘Settings’ app in Windows PC via Windows Search Box and go to ‘Windows Update’ and click ‘Check for updates’ button
Step 2: Download and install all available updates in computer
Step 3: Once updated, open ‘Microsoft Store’ app in Windows PC and go to ‘Library’ and click ‘Get Updates’ button to install updates for Microsoft Store apps. Once finished, restart your computer and check if the issues is resolved.
Method 3: Open Snipping Tool app through Start Menu
Step 1: Click ‘Start menu’, and open ‘Snipping Tool’
Step 2: Click ‘New (+)’ option and check if Snipping Tool is working fine
Step 3: If not, press ‘CTRL + SHIFT + ESC’ keys on keyboard to open ‘Task Manager’, find and right-click ‘Snipping Tool’ and select ‘End Task’ to close it.
Step 4: Now, maximize the window and change the screen clipping mode from Rectangle Mode in Full-Screen Mode, and click ‘New’ and check if it works.
Method 4: Click ‘Get’ for Snipping Tool in Microsoft Store
You may find Snipping Tool not working if you don’t own the app in Microsoft Store. You can click ‘Get’ for Snipping Tool in Microsoft Store to clear out any permissions issues.
Step 1: Click ‘Windows’ and search for Snipping Tool
Step 2: Right-click on Snipping Tool and select ‘Rate and Review’. Wait till Snip and Sketch page of Microsoft Store is shown and click ‘Cancel’
Step 3: Click ‘Get’ and wait till it is completed.
Step 4: Click ‘Open’ and check if the Snipping tool is working fine.
Method 5: Disable Auto Copy to clipboard feature Snipping Tool
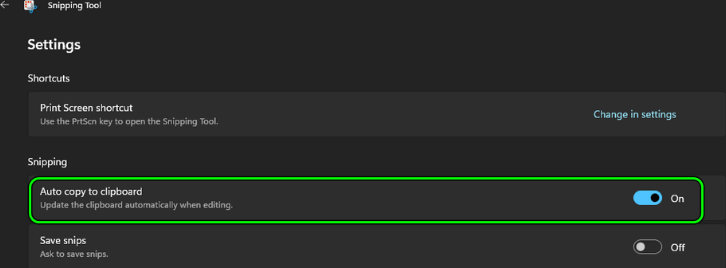
Step 1: Click ‘Windows’ and open Snipping Tool from there
Step 2: Click ‘Three-horizontal ellipses’ and select ‘Settings’
Step 3: In ‘Snipping’ section, disable ‘Auto Copy to clipboard’ by toggling its switch to OFF
Step 4: Now, re-launch Snipping Tool and click ‘new’ and check if it works
Step 5: If not, check if adding a 3 seconds delay while taking the snip resolve the issue.
Method 6: Perform Clean Boot
Step 1: Open ‘System Configuration’ app in Windows PC via Windows Search Box
Step 2: Click ‘Services’ tab, tick ‘Hide all Microsoft Services’ and select ‘Disable All’ button
Step 3: Finally, click ‘Apply > Ok’ button to save the changes and then restart your computer, and check if the issue is resolved.
Method 7: Reinstall Snipping Tool
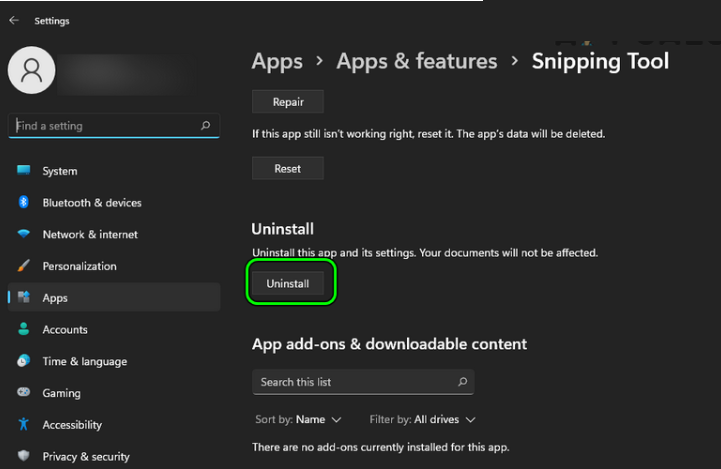
Step 1: Click ‘Windows’ and search for Snipping Tool
Step 2: Right-click on it and select App Settings’
Step 3: Scroll down and click ‘Uninstall’ and confirm it and once done, restart your computer
Step 4: After restart, open ‘Microsoft Store’ and search for ‘Snip & Sketch’ and open it. Click ‘Get’ and then install to install it. Once installed, check if the issue is resolved.
Method 8: Update graphics card driver
Updating graphics card driver to latest version can resolve the issue.
Step 1: Open ‘Device Manager’ in Windows PC via Windows Search Box and expand ‘Display Adapters’ category
Step 2: Right-click on graphics card driver and select ‘Update Driver’, and follow on-screen instructions to finish update process. Once updated, restart your computer and check if the issue is resolved.
Download or reinstall graphics card driver update in Windows PC [Automatically]
You can also try to update all Windows drivers including graphics card driver update using Automatic Driver Update Tool. You can get this tool through button/link below.
Method 9: Change Screen scaling of system to 100%
Step 1: Open ‘Settings’ app and go to ‘System > Display’ and select the first display
Step 2: In ‘Scale & Layout’ section, set the ‘Scale’ to ‘100%’ and repeat the same for all displays in use.
Step 3: Launch Snipping Tool and check if it works
Step 4: If not, check if changing ‘Project Mode’ to ‘Duplicate’ lets you take the required screenshot
Method 10: Set the laptop’s display as main display
Step 1: Right-click ‘Windows’ and open ‘Settings’
Step 2: Open ‘Display’ and select ‘Internal Display’ and expand ‘Multiple Displays’ and check ‘Make This My Main Display’ checkbox and then check if the issue is resolved.
Step 3: If not, check if scaling of main display a bit higher as compared to other display resolves the issue.
Method 11: Use older version of Snipping Tool
Step 1: Right-click ‘Start Menu’ and select ‘Run’, type ‘C:/Windows.old/Windows/System32/’ command and hit ‘Ok’ button
Step 2: Launch Snipping.exe from Windows.old folder and check if it works fine. If not, Windows.old folder is present, you may acquire the older version of snipping tool from Windows 10 PC or authentic online source. The location of Snipping Tool in Windows 10 PC is usually the following ‘C:Drive’
Step 3: Copy the ‘EXE’ file to Windows 11 PC and right-click on ‘Windows’, select ‘Run’ and navigate to ‘C:\Windows\System32’ path
Step 4: Paste the EXE file of Snipping Tool and create a shortcut of it on system’s desktop
Step 5: Launch Snipping Tool from desktop shortcut and check if it works.
Conclusion
I am sure this post helped you on How to fix Snipping Tool not working in Windows 11 with easy ways. You can read & follow our instructions to do so. That’s all. For any suggestions or queries, please write on comment box below.


