
What is ‘Origin won’t update’ issue in Windows 10?
If you are experiencing ‘Origin won’t update Windows 10’ issue while trying to update Origin Client App in Windows 10 computer and unable to play any games on Origin due to Origin update failure issue, then you are in right place for the solution. Here, you will be guided with easy steps/methods to resolve the issue. Let’s starts the discussion.
‘Origin’: Origin is digital distribution platform developed by EA (Electronics Arts) for purchasing and playing video games. This service is available for Microsoft Windows OS and MacOS based personal computers and mobile platforms. Origin service contains social features like profile management, networking with friends with chat and direct game joining along with in-game overlay.
This service also features streaming via Twitch and sharing of game library and community integration with networking sites like Faceboo, Xbox Live, PSN (PlayStation Network) and Nintendo Network. Origin components including Origin Store and Origin Client software where Origin Store allows you to browse and purchase games from EA catalogs while Origin Client software allows you to download games, expansion packs, content booster packs and patches from EA (Electronic Arts). It also shows the status of components available.
However, several users reported that they faced ‘Origin won’t update Windows 10’ issue while they tried to update Origin Client App in their Windows 10 computer. Some users reported that they are unable to play any games on Origin that they have installed on Windows PC and are present in Origin game library, due to Origin Client app is not up-to-date or due to Origin Error. In sort, if Origin Client App fails to install update, you won’t be able to spend your time playing games from Origin and that’s not something you wouldn’t want with application like Origin.
There could be several reasons behind this issue including corrupted or outdated Origin Client App cache in your Windows 10, corruption in Origin Installation files, or issue with Origin App itself. In such case, you can clear Origin Client App cache or uninstall and then reinstall Origin Client in computer in order to fix the issue. This issue can also be occurred due to issue with services related to Origin Client App in your Windows 10 computer. You can disable these problematic services via Windows Services App in order to resolve the issue.
As mentioned, corruption in Origin Client cache and corruption in Origin Client installation files could be reason behind the issue. So, you can delete cache files of Origin or uninstall Origin App completely in computer and then reinstall it in order to resolve the issue. Let’s go for the solution.
How to fix Origin won’t update Windows 10?
Method 1: Fix ‘Origin won’t update’ issue with ‘PC Repair Tool’
If this problem is occurred due to some issues in your Windows computer, then you can fix the issue with ‘PC Repair Tool’. This software offers you to find and fix BSOD errors, DLL errors, EXE errors, problems with programs/applications, malware or viruses issues, system files or registry issues, and other system issues with just few clicks. You can get this tool through button/link below.
Method 2: Clear Origin Client Cache files
Cache file is basically temporary files stored in your Windows computer that helps applications in making the experience faster for you and more. However, corrupted or outdated/damaged cache files of Origin Client App can cause issues like Origin won’t update or other problems. You can delete temporary files or cache files of Origin Client app in order to resolve the issue.
Step 1: Press ‘Windows + R’ keys on keyboard, type ‘%ProgramData%’ in the opened ‘Run’ window and hit ‘Ok’ button to open ‘ProgramData’ folder
Step 2: Once you are inside correct folder, find and open ‘Origin’ folder by double-click on the folder
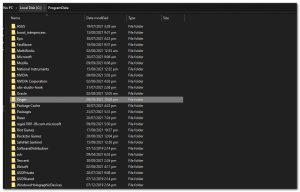
Step 3: Inside ‘Origin’ folder, select all contents except ‘LocalContent’ folder, and delete them. Make sure not to delete LocalContent folder.
Step 4: Now, open ‘Run’ window again using ‘Step 1’, type ‘%AppData%’ in the opened ‘Run’ window and hit ‘OK’ to open ‘AppData/Roaming’ folder

Step 5: Once you are inside ‘AppData/Roaming’ folder, find and delete ‘Origin’ folder
Step 6: Now, back to ‘AppData’ folder from ‘AppData/Roaming’ folder, open ‘Local’ folder
Step 7: Once you are inside ‘Local’ folder, find and delete ‘Origin’ folder
Step 8: Once you have deleted cache files of Origin using above steps, restart your computer
Step 9: After restart, re-launch Origin Client App in Windows 10 and login into your Origin account, and check if you can update Origin Client App without any issue.
Method 3: Disable/Stop Origin Client Services on Startup
This issue can also be occurred due to some issues with Origin relating services running in Windows computer. You can disable Origin Client services on Startup so that it is doesn’t startup when your computer boots up. You can perform this action using System Configuration Utility offers you to control, among with things like to perform clean boot in Windows 10, services that run on startup.
Perform Clean Boot in Windows 10:
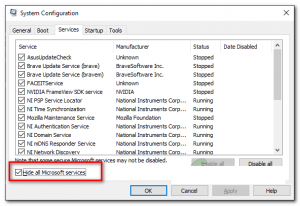
Step 1: Press ‘Windows + R’ keys on keyboard, type ‘msconfig’ in the opened ‘Run’ window and hit ‘OK’ button to open ‘System Configuration’ window
Step 2: In ‘System Configuration’ window, click on ‘Services’ tab, select ‘Hide All Microsoft Services’ checkbox and look for Origin Client service from list of services, and deselect the checkboxes relating to Origin Client
Step 3: Finally, click on ‘Apply’ and ‘OK’ button to save the changes and restart your computer
Step 4: After restart, restart Origin Client App and check if the problem is resolved.
Method 4: Disable Origin Services using Windows Services Utility
This issue can also be occurred due to some Origin services are not running in background properly or becomes unresponsive. In such case, you can disable Origin services and then opening Origin Client which will force them to start up again.
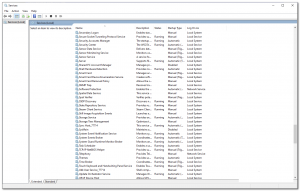
Step 1: Close ‘Origin’ App. Press ‘Windows + R’ keys on keyboard, type ‘services.msc’ in the opened ‘Run’ window and hit ‘Ok’ button to open Windows Services Utility
Step 2: In the opened ‘Services’ window, find ‘Origin Client Service’ and ‘Origin Web Helper Service’ services in list of services.
Step 3: Double-click on each service one-by-one to open its ‘Properties’. In ‘Properties’ window, select ‘Disabled’ option from ‘Startup Type’ dropdown, and hit ‘Stop’ button under ‘Service Status’ section. Repeat the same step to disable all Origin Services, finally hit ‘Apply’ and ‘OK’ button to save the changes
Step 4: Once done, re-launch Origin Client App in Windows 10 and check if you can update Origin App without any issue.
Method 5: Uninstall and then reinstall Origin Client App
If the issue is still persist, then you can try to fix the issue by uninstalling Origin Client app completely in computer and then reinstall it.
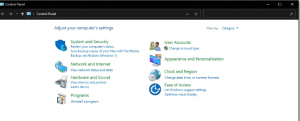
Step 1: Press ‘Windows + R’ keys on keyboard, type ‘Control’ in the opened ‘Run’ window and hit ‘Ok’ button to open ‘Control Panel’
Step 2: In ‘Control Panel’, go to ‘Uninstall a Program > Programs and Features’
Step 3: Find and select ‘Origin Client’ App in the list of programs, and click ‘Uninstall’ option. Follow on-screen instructions to finish uninstall process.
Step 4: If you are unable to uninstall Origin Client as well, then you can follow below steps to uninstall Origin Client App
- Open ‘File Explorer’ in Windows 10 and go to ‘C:\Program Files (x86)\Origin’ folder or Origin Installation folder
- Find and double-click on OriginUninstall.exe file to uninstall Origin Client App
Step 5: Once uninstalled, open your browser and visit Origin official site and download latest version of Origin Client for Windows 10 computer
Step 6: Once downloaded, find and right-click on Downloaded Origin Client App setup file, and select ‘Run as Administrator’, and follow on-screen instructions to finish installation and after that, restart your computer.
Step 7: After restart, re-launch Origin Client App and check if the error is resolved.
Conclusion
I am sure this post helped you on How to fix Origin won’t update Windows 10 with several easy steps/methods. You can read & follow our instructions to do so. That’s all. For any suggestions or queries, please write on comment box below.


