What is ‘Explorer.exe high CPU Usage/ Memory usage’ in Windows 10?
In this article, we are going to discuss on How to fix Explorer.exe high CPU Usage, Explorer.exe high Memory usage in Windows 10. You will be guided with easy steps/methods to resolve the issue. Let’s starts the discussion.
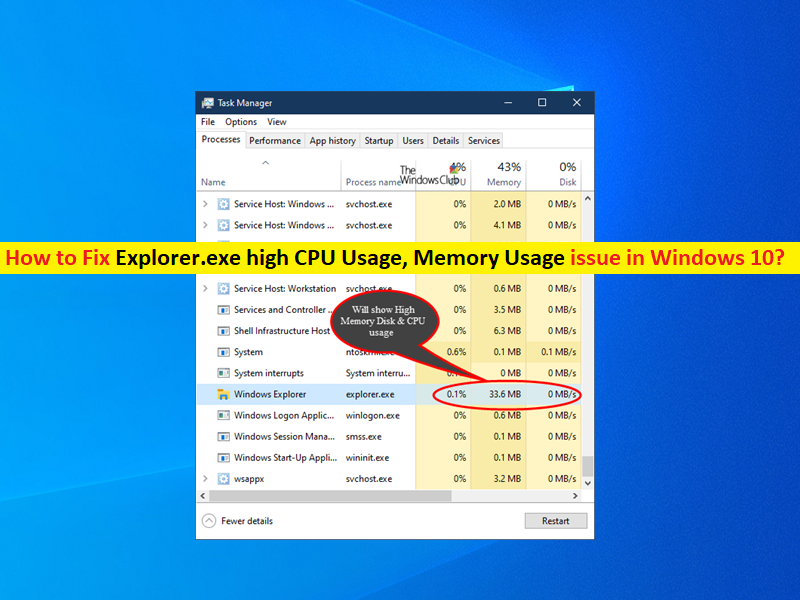
‘Explorer.exe high CPU Usage/ high Memory usage’: It is common Windows Problem considered as Explorer.exe high CPU/Memory usage issue. When you open Task Manager utility in your Windows 10/8/7 computer in order to check which program/process is consuming your system resources, you may experience Windows Explorer/File Explorer process is showing huge percentage under ‘Disk’ Usage or ‘CPU/GPU’ usage.
Several users reported they faced Explorer.exe high CPU Usage, Explorer.exe high Memory usage issue on their Windows 10/8/7 computer that is causing system shutdown/restart automatically, slowing loading apps or games on Windows PC. This issue indicates when you open Task Manager in to check CPU/Memory health conditions, you may experience high CPU or Memory usage by File Explorer/Windows Explorer or Explorer.exe process.
There could be several reasons behind the issue including the issue with WMI Service (Windows Management Instrumentation) service, unnecessarily stored files or installed apps is draining resources, Enabled ‘Show All Folders’, malware or viruses infections in computer and other Windows issues. It is possible to fix the issue with our instructions to resolve the issue. Let’s go for the solution.
How to fix Explorer.exe high CPU Usage/ Explorer.exe high Memory usage in Windows 10/8/7?
Method 1: Fix Explorer.exe high Memory usage/ CPU Usage with ‘PC Repair Tool’
‘PC Repair Tool’ is easy & quick way to find and fix BSOD errors, DLL errors, EXE errors, problems with programs/applications, malware or viruses issues, system files or registry issues, and other system issues with just few clicks.
Method 2: Remove Icons with No Image
This issue can be occurred possibly if you have icons or shortcut without image on desktop. You can remove the icons without images in order to fix.
Step 1: Go to Desktop in your Windows PC
Step 2: Find and right-click on ‘icons’ or shortcuts without an image, and select ‘Delete’ to delete them, and check if the issue is resolved.
Method 3: Check Task Manager for applications/games that create the problem
This issue can be occurred possibly due to a program/process that is not running properly. You can check and close such process in order to fix.
Step 1: Press ‘CTRL + SHIFT + ESC’ keys on keyboard to open ‘Task Manager’
Step 2: Click ‘Details’ tab to access all running computer programs. From the list of active applications, select the one with high CPU usage that you don’t need running at the moment
Step 3: Click ‘End Task’ to close selected applications and once done, check if the issue is resolved.
Method 4: Restart WMI (Windows Management Instrumentation) Service
Step 1: Open ‘Services’ app in Windows PC via Windows Search Box
Step 2: Right-click on ‘Windows Management Instrumentation’ service, and select ‘Restart’ to restart the service. Once done, restart your computer and check if the issue is resolved.
Method 5: Run Disk Cleanup Tool
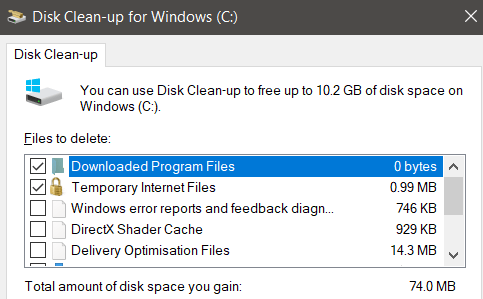
You can run Disk Cleanup Tool in your Windows computer in order to remove old and temporary files created by Windows, in order to fix.
Step 1: Open ‘This PC’ or ‘My Computer’ in Windows PC, right-click ‘C: Drive’ and select ‘Properties’
Step 2: Click ‘General’ tab and click ‘Disk Cleanup’
Step 3: You see ‘Files to Delete’ listed in new window, tick all checkboxes and hit ‘Ok’ button to perform delete and once done, check if the issue is resolved.
Method 6: Disable Show All Folders

Step 1: Open ‘Windows Explorer/File Explorer’ in Windows PC
Step 2: Right-click on panel in left side of window and click ‘Show all Folders’ if there is tick beside the option. To confirm that you have disabled ‘Show All Folders’, you won’t see a tick beside the options on list, and then check if it works for you.
Method 7: Disable OneDrive Cloud Storage
Cloud Storage can interfere with computer processes and result in Windows Explorer using high CPU/Memory Usage. You can disable OneDrive Cloud Storage in your device in order to fix.
Step 1: Click ‘OneDrive’ icon in taskbar and launch ‘Settings’ in ‘Help & Settings’ tab
Step 2: Click ‘Account > Unlink this PC’ and click ‘Unlink Account’ to disable OneDrive Cloud Storage, and then check if it works for you.
Method 8: Create a new user account on Windows PC and login with it

If the issue is still persist, you can login with new user account in your Windows PC in order to fix.
Step 1: Open ‘Settings’ App in Windows PC via Windows Search Box
Step 2: Go to ‘Accounts > Family & Other Users > Add someone else to this PC’, choose a valid username, password and password hint, and then hit ‘Next’
Step 3: Go to ‘Family & Other Users’, select ‘Change Account Type’ to make account an administrator and click ‘Ok’.
Step 4: Once done, restart your computer and check if the issue is resolved.
Conclusion
I am sure this post helped you on How to fix Explorer.exe high CPU Usage, Explorer.exe high Memory usage in Windows 10/8/7 with several easy steps/methods. You can read & follow our instructions to do so. That’s all. For any suggestions or queries, please write on comment box below.


