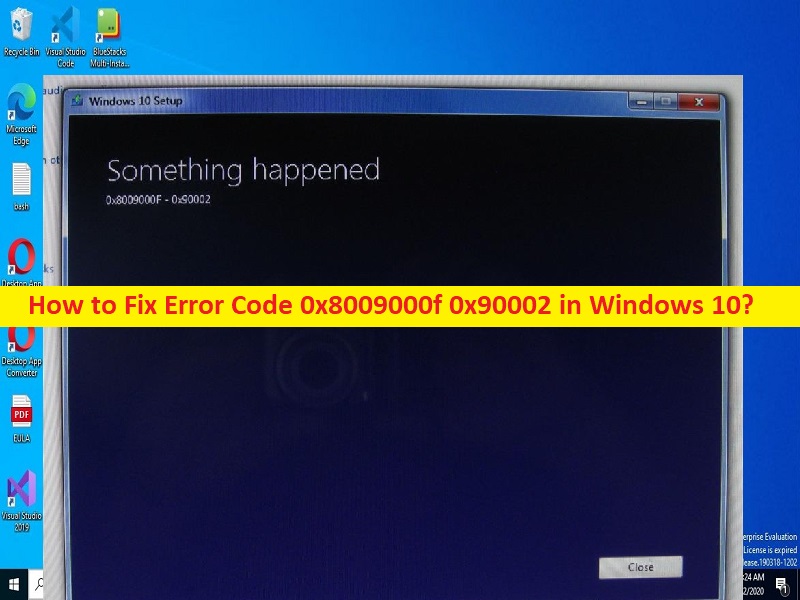
What is ‘Error Code 0x8009000f 0x90002’ in Windows 10?
If you are facing Error Code 0x8009000f 0x90002 in Windows 10 or Error Code 0x8009000f 0x90002 when you try to update Windows OS, then you are in right-place for the solution. Here, you are provided with easy steps/methods to resolve the issue. Let’s starts the discussion.
‘Error Code 0x8009000f 0x90002’:
It is common Windows problems considered as Windows Update error. This error is usually appeared when you try to install Windows updates via Windows Update Tool in Windows 10 computer. Several users reported they faced this error when trying to upgrade to Windows 10 using Media Creation Tool or create a new installation media. There could be several reasons behind the issue including corruption in system files or registry, issue with DirectX version or not installed, corrupted Windows update components, and other issues.
This issue can be occurred due to interference of antivirus/firewall program installed in computer. In such case, you can disable your antivirus/firewall program temporarily in computer in order to fix the issue, and then check if it works for you. One possible way to fix the issue is to repair corrupted files in computer, but there is also some other possible solutions to fix the issue as mentioned in the post. Let’s go for the solution.
How to fix Error Code 0x8009000f 0x90002 in Windows 10?
Method 1: Fix Error Code 0x8009000f 0x90002 with ‘PC Repair Tool’
‘PC Repair Tool’ is & quick way to find and fix BSOD errors, DLL errors, EXE errors, problems with programs/applications, malware or viruses infections in computer, system files or registry issues, and other system issues with just few clicks.
Method 2: Perform Clean Boot
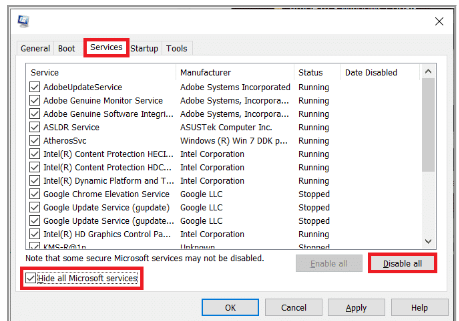
One possible way to fix the issue is to perform clean boot operation in computer in order to block interfering services/apps.
Step 1: Open ‘System Configuration’ app in Windows PC via Windows Search Box
Step 2: Click ‘Services’ tab, tick ‘Hide all Microsoft Services’ checkbox, and hit ‘Disable All’ button
Step 3: Finally, click ‘Apply > Ok’ button to save the changes. Once done, restart your computer and check if the issue is resolved.
Method 3: Run SFC Scan
You can run SFC scan in computer to repair corruption in System Files or registry in order to fix this error.
Step 1: Type ‘cmd’ in Windows Search Box and press ‘CTRL + SHIFT + ENTER’ keys on keyboard to open ‘Command Prompt as Administrator’
Step 2: Type ‘sfc /scannow’ command and hit ‘Enter’ key to execute. Once executed, restart your computer and check if the issue is resolved.
Method 4: Run Windows Update troubleshooter
Windows built-in Windows Update troubleshooter can resolve the issue.
Step 1: Open ‘Settings’ app in Windows PC via Windows Search Box and go to ‘Update and Security > Troubleshoot’
Step 2: Find and select ‘Windows Update’ troubleshooter, and click ‘Run the troubleshooter’ and follow on-screen instructions to finish troubleshooting, and once finished, check if the issue is resolved.
Method 5: Download and install DirectX latest version
One possible way to fix the issue is to download and install latest version of DirectX in computer. To do so, you need to visit Microsoft official site in your browser and download latest version of DirectX in computer, and then install it, and then check if the issue is resolved.
Method 6: Reset Windows Update components
Resetting Windows update components in computer can resolve the issue.
Step 1: Open ‘Command Prompt as Administrator’ using ‘Method 3’
Step 2: Type the following commands and hit ‘Enter’ key after each line to execute.
net stop bits
net stop wuauserv
net stop appidsvc
net stop cryptsvc
Ren %systemroot%\SoftwareDistribution SoftwareDistribution.bak
Ren %systemroot%\system32\catroot2 catroot2.bak
net start appidsvc
net start cryptsvc
net start bits
net start wuauserv
Step 3: Once executed, restart your computer and check if the issue is resolved.
Method 7: Disable your antivirus/firewall
Interference of antivirus/firewall program in computer could be a reason behind the issue. You can disable your antivirus/firewall in computer in order to fix the issue, and then check if it works for you.
Method 8: Clear Microsoft Temp folder
You can clear temp folder’s contents in order to remove problematic temporary files in computer.
Step 1: Press ‘Windows + R’ keys on keyboard, type ‘C C:\$Windows.~BT’ in ‘Run’ window and hit ‘Ok’ button
Step 2: In the opened folder, select all items and delete them, and once done, check if the issue is resolved.
Method 9: Fix Error Code 0x8009000f 0x90002 in Windows 10 using Registry Editor
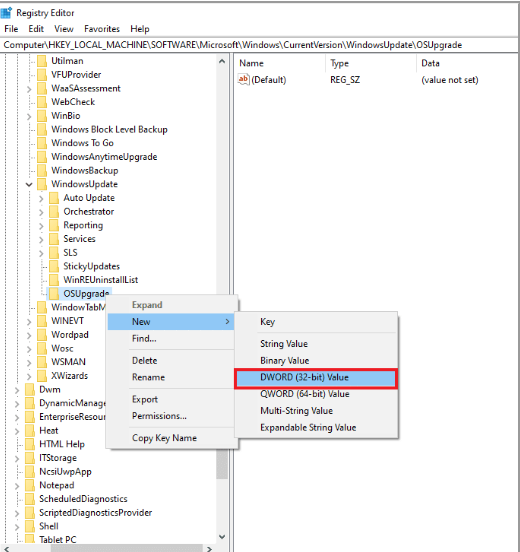
Step 1: Open ‘Registry Editor’ app in Windows PC via Windows Search Box and go to following path
Computer\HKEY_LOCAL_MACHINE\SOFTWARE\Microsoft\Windows\CurrentVersion\WindowsUpdate\OSUpgrade
Step 2: Right-click ‘OSUpgrade’ key, and select ‘New > DWORD (32-bit) value’ and name the value to ‘AllowOSUpgrade’
Step 3: Double-click on created registry value to edit, set its value data to ‘1’, and hit ‘Ok’ button to save the changes. Once done, check if the issue is resolved.
Conclusion
I am sure this post helped you on How to fix Error Code 0x8009000f 0x90002 in Windows 10 with easy ways. You can read & follow our instructions to do so. That’s all. For any suggestions or queries, please write on comment box below.


