
What is ‘Error Code 541’ in Windows 10?
In this article, we are going to discuss on How to fix Error Code 541 in Windows 10 with easy ways. You are provided with easy steps/methods to resolve the issue. Let’s starts the discussion.
‘Error Code 541’:
It is common error usually appeared while you are managing email servers for web hosts or VPS hosts. The error is appeared with message saying ‘SMTP Error 541: Mail rejected by destination domain’. In this error, SMTP stands for Simple Mail Transfer Protocol. This error can be occurred due to some issue from your ends like the issue in your Windows computer, issue with software, or the issue with hosting domains or apps.
The possible reasons behind the Error Code 541 problem can be outdated Mail and Calendar app, corrupted cache of Mail and Calendar app, issue with Microsoft Visual C++ Redist package, modify internet explorer settings, and other issues. If you are facing the same issue and looking for ways to fix, then you are in right-place for the solution.
How to fix Error Code 541 in Windows 10?
Method 1: Fix Error Code 541 in Windows 10 with ‘PC Repair Tool’
‘PC Repair Tool’ is easy & quick ways to find and fix BSOD errors, DLL errors, EXE errors, problems, with programs/applications, malware or viruses infections in computer, system files or registry issues, and other system issues with just few clicks.
Method 2: Apply some basic troubleshooting steps
Step 1: You should avoid using Bulk Email list prepared by the server. You can avoid sending the emails to unknown emails or recipient that has not subscribed to email service.
Step 2: Avoid using SPAM tripping words. You should avoid using Exclamations in subject title of mail sent and don’t write the subject of mail in Capital Letters.
Step 3: Check for PC Requirements. You should check and make sure the mail service you are using is compatible with your Windows PC.
Step 4: Interference of background apps could be a reason behind the issue. You can close background apps through Task Manager in order to fix the issue. To do so, you need to press ‘CTRL + SHIFT + ESC’ keys on keyboard to open ‘Task Manager’ app, right-click on background apps, and select ‘End Task’ to close it, and then check if it works for you.
Step 5: Check email queue in cPanel [if applicable]. If you are using cPanel platform to manage your emails, you can check the email queue using exim –bpc command, this would print the size of Exim mail queue and if the value on the result is higher, it means that there is lot of spamming in mails.
Method 3: Disable Screen Saver on Server
Step 1: Right-click on empty space on the desktop and select ‘Personalise’
Step 2: Click ‘Lock Screen’ in left pane, and click ‘Screen Saver settings’ option in right pane
Step 3: Select ‘None’ from dropdown in Screen Saver section and then hit ‘Apply > Ok’ button to save the changes, and then check if the issue is resolved.
Method 4: Update Mail and Calendar app
Updating Mail and Calendar app to latest version in computer can resolve the issue.
Step 1: Open ‘Microsoft Store’ app in Windows PC and go to ‘Library’ and click ‘Get Updates’ at top-right corner
Step 2: Wait to finish update and once updated, restart your computer and check if the issue is resolved.
Method 5: Reset Mail and Calendar app
You can clear corrupted cache of Mail and Calendar app in order to fix the issue.
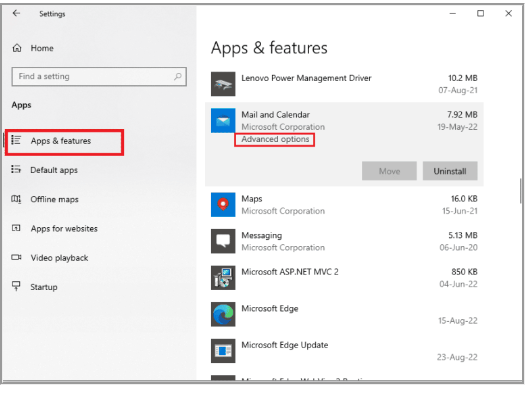
Step 1: Open ‘Settings’ app in Windows PC via Windows Search Box and go to ‘Apps > Apps & Features’
Step 2: Find and select ‘Mail and Calender’ app, and click ‘Advanced Options’ and click ‘Reset’, and confirm resetting, and once finished, check if the issue is resolved.
Method 6: Disable your antivirus/firewall program
This issue can be occurred due to interference of antivirus/firewall program installed in computer. You can fix the issue by disabling your antivirus/firewall program and then check if the issue is resolved.
Method 7: Reinstall Microsoft Visual C++ Redistributable Package
One possible way to fix the issue is to uninstall and reinstall Microsoft Visual C++ Redistributable package in computer.
Step 1: Open ‘Control panel’ app in Windows PC and go to ‘Uninstall a Program > Programs & features’
Step 2: Find and right-click ‘Microsoft Visual C++ Redistributable Package’, and select ‘Uninstall’ to uninstall it and after that, restart your computer
Step 8: After restart, download and reinstall Microsoft Visual C++ Redistributable Package in computer from official site, and then check if the issue is resolved.
Method 8: Alter Interest Explorer settings
Reset web browser:
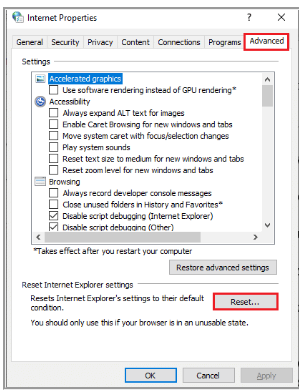
Step 1: Open ‘Internet Options’ window via Windows Search Box and go to ‘Advanced’ tab
Step 2: Click ‘Reset…’ button in ‘Reset Internet Explorer Settings’ section and confirm it. Once done check if the issue is resolved.
Alter browser settings:
Step 1: Open ‘Internet Options’ control panel via Windows Search Box and go to ‘Advanced’ tab and look for following options in Browsing section, and select it
Disable script debugging (Internet Explorer)
Disable script debugging (Other)
Step 2: Uncheck ‘Display a notification about every script error’, and then hit ‘Apply > Ok’ button to save the changes.
Method 9: Modify Excel files
Split import files:
Step 1: Open ‘Google Chrome’ browser and login into your G-email account
Step 2: Now, click ‘Google Apps’ icon and click ‘Sheets‘ option
Step 3: Click ‘File’ tab and click ‘Import’ option on the list, and browse for ‘File’ and import the data by splitting the entries into section
Export in CSV format:
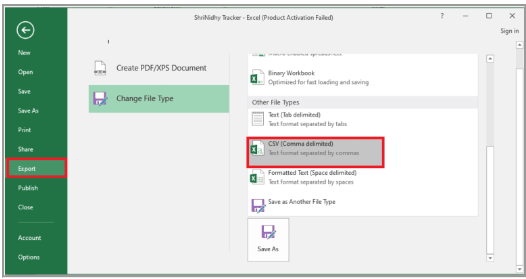
Step 1: Open ‘MS Excel’ in Windows PC and click ‘File > Export’
Step 2: Click ‘CSV (Comma delimited)’ option in ‘Other File Types’ section, and browse and ‘Save’ the file to destined location, and then check if the issue is resolved.
Method 10: Contact Mail Server Support team
If the issue is still persist, you can also try to fix the issue contact Mail Server Support team official in order to fix the issue. You can report your problem to them and ask for the solution. Hope your problem will be resolved by the official.
Conclusion
I am sure this article helped you on How to fix Error Code 541 in Windows 10 with easy ways. You can read & follow our instructions to do so. That’s all. For any suggestions or queries, please write on comment box below.


