Tips to fix dwm.exe high memory usage Windows 10:
In this article, we are going to discuss on How to fix dwm.exe high memory usage Windows 10. You will be guided with easy steps/methods to resolve the issue. Let’s starts the discussion.
‘Desktop Windows Manager – dwm.exe’: Desktop Windows Manager or DWM is compositing Window Manager in Microsoft Windows since Windows Vista that enables the use of hardware acceleration to render the graphical user interface of Windows. DWM works in different ways depending on Operating System and on the version of graphics it uses. It only writes the program’s buffer to the video RAM, even if it is a graphics device interface (GDI) in Windows 7 and with WDDM 1.1 drivers.
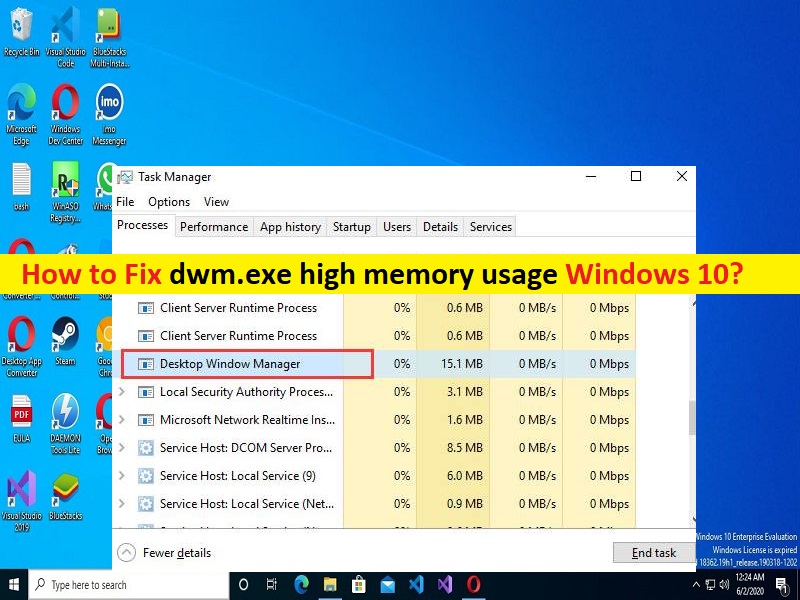
However, several users reported they faced dwm.exe high memory usage Windows 10 issue. This issue indicates when you open Task Manager app in Windows PC in order to check which program/process is causing system performance slowdown issue, you may experience Desktop Windows Manager/ dwm.exe is showing higher percentage under Disk/memory usage section in Task Manager.
There could be several reasons behind the issue including the corrupted/outdated or incompatible display drivers, problematic software installed in computer, too many processes are opened on system, malware or viruses infections in computer, and other system issues. It is possible to fix the issue with our instructions. Let’s go for the solution.
How to fix dwm.exe high memory usage Windows 10?
Method 1: Fix ‘dwm.exe high memory usage’ issue with ‘PC Repair Tool’
‘PC Repair Tool’ is easy & quick way to find and fix BSOD errors, DLL errors, EXE errors, problems with programs/applications, malware or viruses infections in computer, system files or registry issues, and other system issues with just few clicks.
Method 2: Change Wallpaper/Theme in Windows PC
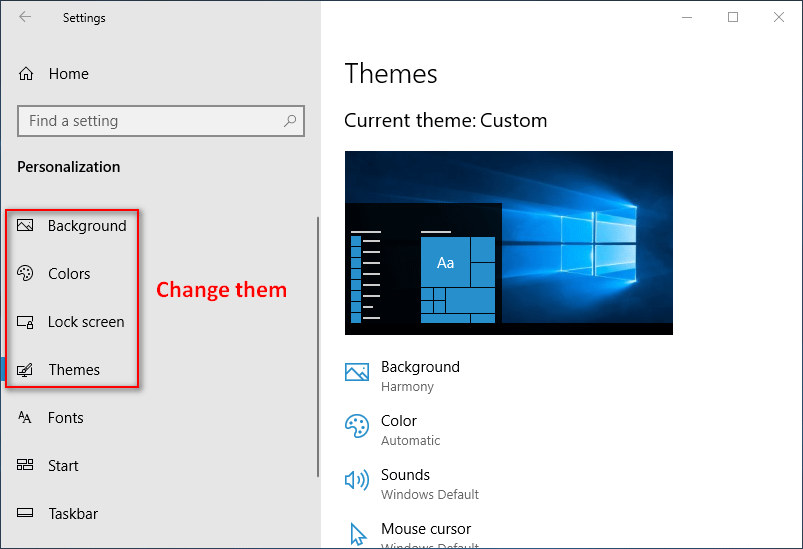
One possible way to fix the issue is to change Wallpaper/Theme of computer.
Step 1: Open ‘Settings’ app in Windows PC via Windows Search Box and go to ‘Personalization’
Step 2: Start changing ‘Background’ picture, colors, lock screen background and themes and save the changes. Once done, check if it works for you.
Method 3: Disable Screen Saver
Step 1: Type ‘Lock Screen Settings’ and open Screen Saver Settings from results appear
Step 2: In the opened ‘Screen Saver Settings’, select ‘None’ from dropdown and hit ‘Ok‘ button. Once done, check if it works.
Method 4: Check adjust for best performance
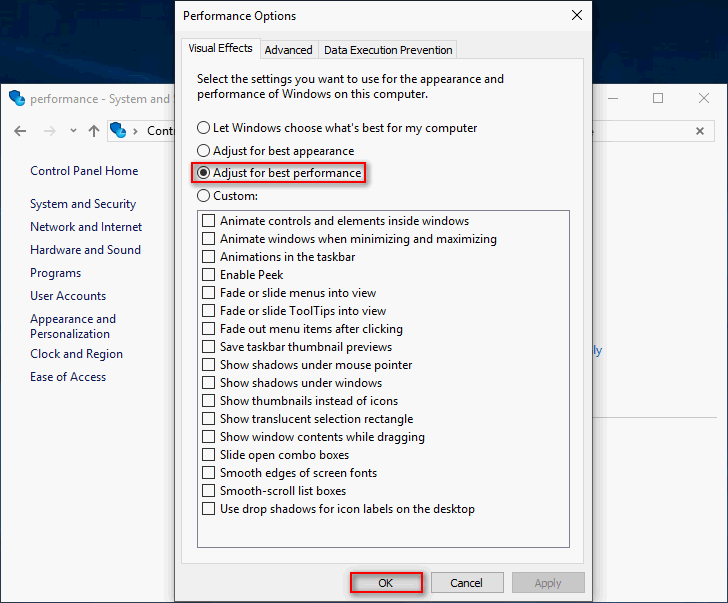
Step 1: Open ‘Control Panel’ in Windows PC and go to ‘System and Security > Performance’ into Search Box at upper right and click ‘Adjust the appearance and performance of Windows’ link under ‘System’
Step 2: Check ‘Adjust for best performance’ in Performance Options window and hit ‘Ok’ button to confirm. Once done, check if it works for you.
Method 5: Run Performance Troubleshooter
Step 1: Type ‘cmd’ in Windows Search Box and press ‘SHIFT + ENTER’ keys on keyboard to open ‘Command Prompt as Administrator’
Step 2: Type ‘msdt.exe /id PerformanceDiagnostic’ command and hit ‘Enter’ key to execute. Click ‘Next’ in Performance window to continue and wait for the troubleshooting process to finish. Once done, check if the issue is resolved.
Method 6: Disable Hardware Acieration for Microsoft Office products
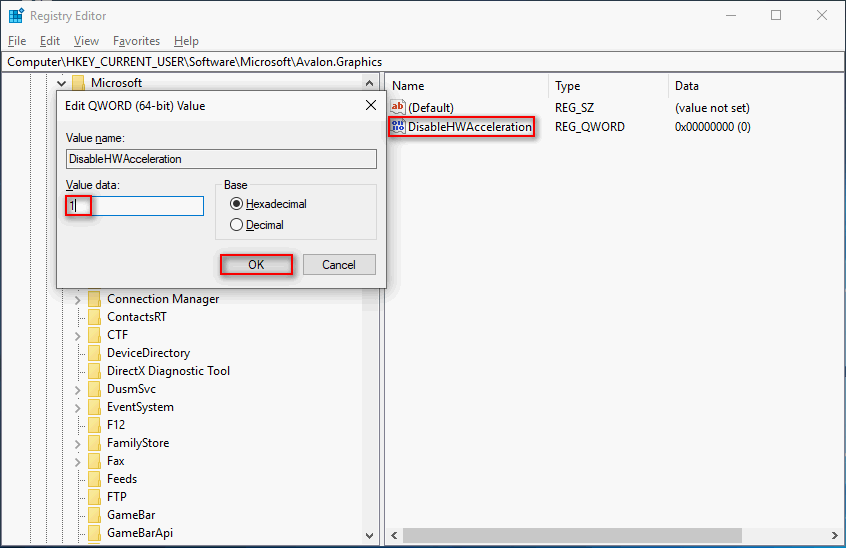
Step 1: Open ‘Registry Editor’ app in Windows PC via Windows Search Box and navigate to following path
Computer\HKEY_CURRENT_USER\Software\Microsoft\Avalon.Graphics
Step 2: Right-click on empty space in right-pane and select ‘New > DWORD (32/64 – bit) Value’ and name the value as ‘DisableHWAcceleration’.
Step 3: Double-click on newly created registry value to edit, set its value data to ‘1’ and hit ‘ok’ button to save the changes. Once done, check if the issue is resolved.
Method 7: Update Graphics card driver
Updating graphics card driver to latest & compatible version can resolve the issue.
Step 1: Open ‘Device Manager’ in Windows PC via Windows Search Box and expand ‘Display Adapters’ category
Step 2: Right-click on your graphics card driver and select ‘Update Driver’, and follow on-screen instructions to finish updating process and once done, restart your computer and check if the issue is resolved.
Download or reinstall graphics card driver update in Windows PC [Automatically]
You can also try to update all Windows drivers including graphics card driver to latest & compatible version using Automatic Driver Update Tool. You can get this tool through button/link below.
Conclusion
I am sure this post helped you on How to fix dwm.exe high memory usage Windows 10 with easy ways. You can read & follow our instructions to do so. That’s all. For any suggestions or queries, please write on comment box below.


