What is ‘Camera error code 0xa00f4292’ in Windows 10?
If you are facing ‘Camera error code 0xa00f4292’ while trying to access your Windows 10 PC/laptop camera (internal or external camera), then you are in right place for the solution. Here, you will be guided with easy steps/methods to resolve the error. Let’s starts the discussion.
‘Camera error code 0xa00f4292’: It is common Windows problem considered as camera error. This error is usually appeared when you try to access your camera in Windows 10 computer using some camera application like Windows build-in Camera App or other apps like Skype, Zoom or others. This issue indicates that your Windows computer is unable to detect your camera. Let’s take a look at error message.
“Something went wrong, try restarting your device. If you need it, here’s the error code: 0xA00F4292”
If you are facing this error with external camera/webcam, then before troubleshooting the issue you should at first make sure there is no issue with webcam/camera hardware and its connection. If camera hardware is in working conditions but still you are facing error code 0xa00f4292, then there could be some issue in your Windows computer that’s why you are facing the error. Outdated/corrupted or incompatible camera driver could be possible reason behind this error.
You should make sure camera device driver is properly installed in computer and is up-to-date. Another possible reason behind this camera error can be your camera privacy settings in Windows 10. You should make sure your Windows 10 computer or apps are allowed to access your camera in camera privacy settings. You can manually check and enable camera device in camera privacy settings. For example, if you are unable to access camera in Windows 10 build-in ‘Camera’ App, then you should check at first Camera App is allowed to access your PC’s camera in Camera Privacy Settings.
In sort, you can fix the issue by applying certain changes in Camera Privacy Settings. On other hand, Camera error code 0xa00f4292 can also be occurred due to corruption in system files, outdated Windows OS, restricted or interfered by some other programs or antivirus/firewall program installed in computer, and other reasons. Let’s go for the solution.
How to fix Camera error code 0xa00f4292 in Windows 10?
Method 1: Fix ‘Camera error 0xa00f4292’ With ‘PC Repair Tool’
If this camera error is occurred due to some problems in your Windows computer, then you can try to fix the issue with ‘PC Repair Tool’. This software offers you to find and fix BSOD errors, DLL errors, problems with programs/applications, malware or viruses issues, system files or registry issues and other system issues with just few clicks.
Method 2: Run SFC Scan and DISM Scan Tool in Windows 10
You can repair system files by running Windows 10 build-in SFC Scan tool and run DISM scan tool to repair hard disk Windows System image in order to fix Camera error.
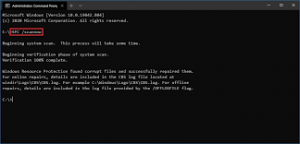
Step 1: Press ‘Windows + X’ keys on keyboard and select ‘Command Prompt as Administrator’
Step 2: Type ‘sfc /scannow’ command and hit ‘Enter’ key to execute
Step 3: Once executed, run DISM scan. Type the following commands one-by-one and hit ‘Enter’ key after each to execute
Dism /Online /Cleanup-Image /ScanHealth
Dism /Online /Cleanup-Image /RestoreHealth
Step 3: Once executed, restart your computer and check if the error is resolved.
Method 3: Check Camera Privacy Settings in Windows 10
As mentioned, this error can be occurred if your Windows 10 camera privacy settings are not allowing Windows OS or apps to access camera. You can enable camera in camera privacy settings in order to fix the issue.
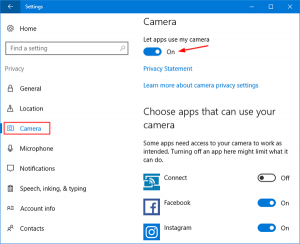
Step 1: Press ‘Windows + I’ keys on keyboard to open ‘Settings’ App in Windows 10
Step 2: In ‘Settings’ App, go to ‘Privacy > Camera’ and turn ON the option ‘Allow apps to access your camera’ or ‘Allow access to camera on this device’. Also, you can enable camera for specific apps like Skype, Zoom, Camera App or others by navigating ‘Choose apps that can use your camera’ section and then enable camera for them
Step 3: Save the changes and retry accessing camera in Windows 10 and check if it works for you.
Method 4: Update camera driver in Windows 10
Updating camera driver to latest update version can resolve the issue. Let’s try.
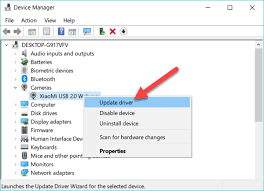
Step 1: Press ‘Windows + X’ keys on keyboard and select ‘Device Manager’
Step 2: In Device Manager, expand ‘Imaging Devices’ or ‘Cameras’ category, right-click on your camera device, and select ‘Update Driver’. Follow on-screen instructions to finish update process
Step 3: Once updated, restart your computer and check if you can use your camera in Windows 10 without any issue.
Download or reinstall camera driver update in Windows 10 [Automatically]
You can also try to update all Windows drivers including camera drivers to latest update version with ‘Automatic Software Update Tool’. You can get this tool through button/link below.
Method 5: Uninstall and reinstall camera driver
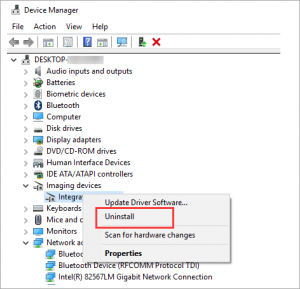
This issue can be occurred if camera driver is not installed properly. You can uninstall and then reinstall camera driver in order to fix the issue.
Step 1: Open ‘Device Manager’ using above method and expand ‘Imaging Devices’ or ‘Cameras’ category
Step 2: Right-click on your camera device and select ‘Uninstall’. Follow on-screen instructions to finish uninstall and after that, restart your computer.
Step 3: Restarting computer will automatically reinstall necessary drivers like uninstalled camera driver. Or you can reinstall driver by opening ‘Device Manager’ again, and click on ‘Action > Scan for hardware changes’ option. This will reinstall camera driver. Check if the error is resolved.
Method 6: Allow Camera access via your antivirus/firewall
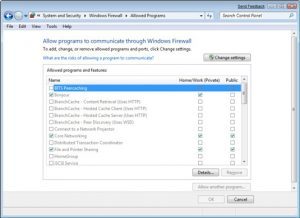
This issue can be occurred due to interference of your antivirus/firewall in computer. You can allow camera aces via firewall/antivirus in order to fix the issue.
Step 1: Open ‘Control Panel’ in Windows 10 via ‘Windows Search’ and go to ‘System and Security > Windows Defender Firewall > Allow an app or feature through Windows Firewall’
Step 2: Click on ‘Change Settings’ and tick the checkboxes relating to your camera relating applications like Camera App, Skype or other apps you want to allow for camera access, and then save the changes, and check if the error is resolved.
Method 7: Run ‘Hardware and Devices’ troubleshooter in Windows 10
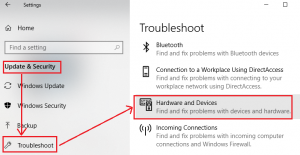
Windows 10 built-in Hardware and Devices troubleshooter can resolve the issue. Let’s try.
Step 1: Open ‘Settings’ App in Windows 10 and go to ‘Update & Security > Troubleshoot’
Step 2: Find and select ‘Hardware and Devices’ troubleshooter, and click on ‘Run the troubleshooter’ button. Follow on-screen instructions to finish troubleshooting. Once done, please check if camera error is resolved.
Method 8: Reset Camera App
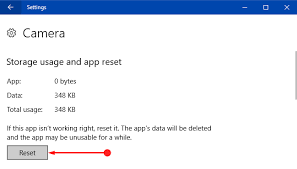
If you are facing this error in Camera App in Windows 10, then you can try to fix the issue by resetting the app.
Step 1: Open ‘Settings’ App in Windows 10 and go to ‘Apps > Apps and Features’
Step 2: Find and select ‘Camera’ App, and click on ‘Advanced Options’, click on ‘Terminate’ and then ‘Reset’ button. Click ‘Reset’ button again to confirm
Step 3: Once done, restart your computer and restart Camera App, and check if it works for you.
Method 9: Delete ‘Camera Roll’ folder and Camera’s Local State folder content
Another possible way to fix the issue is to delete Camera Roll folder and Camera Local State folder content in order to delete Camera App local data.
Step 1: Close ‘Camera’ app completely by opening ‘Task Manager’ in Windows 10 and kill any process relating to Camera app under ‘Processes’ tab
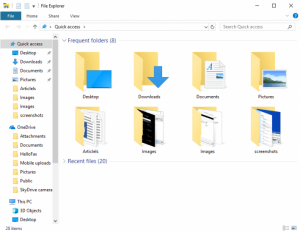
Step 2: Now, open ‘File Explorer’ and go to ‘Picture’ of your Windows User profile and delete ‘Camera Roll’ folder, and then restart your computer
Step 3: After restart, check if the error is resolved. If not, navigate to following path in ‘Run’ Window. Press ‘Windows + R’ keys on keyboard, type the following path ‘Run’ window and hit ‘OK’ button
%localappdata%\packages
Step 4: On the opened folder, double-click on ‘Local State’ folder to open it, and delete all contents inside the folder
Step 5: Restart your computer once done, and check if the error is resolved.
Method 10: Fix ‘Camera error code 0xa00f4292’ using ‘Registry Editor’
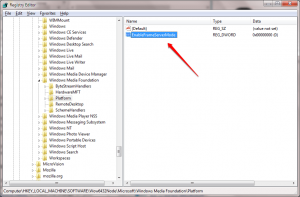
Step 1: Press ‘Windows + R’ keys on keyboard, type ‘regedit’ in the opened ‘Run’ window and hit ‘Ok’ button to open ‘Registry Editor’
Step 2: In ‘Registry Editor’, navigate to following path in left pane
HKEY_LOCAL_MACHINE\SOFTWARE\Microsoft\Windows Media Foundation\Platform
Step 3: Once you are in correct path, right-click on empty area in right pane, and select ‘New > DWORD (32-bit) Value’ and name the key to ‘Enable Frame Server Mode’
Step 4: Now, double-click on created key to edit, set its value to ‘0’ and click on ‘Ok’ to save the changes, and after that, restart your computer and check if the error is resolved.
Step 5: If the error is still persist, repeat same steps to go to newly created key and double-click on it, set its value ‘1’ this time and then hit ‘Ok’ button to save the changes. Restart your computer again and check if the error is resolved.
Method 11: Close all programs running the camera in background
If you facing this error in Camera App, then it might possible that some other application or program is using your camera currently, in such case, you can close the program using camera currently in order to fix the issue. Also, you can close all programs running the camera in background in order to fix the issue.
Step 1: Press ‘CTRL + SHIFT + ESC’ keys on keyboard to open ‘Task Manager’
Step 2: In ‘Task Manager’, under ‘Processes’ tab, find and right-click on program/process that using camera in background, and select ‘End Task’ option. Repeat the same steps to close other programs that using device camera.
Step 3: Once done, retry accessing your camera and check if it works for you.
Method 12: Run Program Compatibility troubleshooter
Step 1: Type ‘Camera’ in Windows Search and right-click on program associated with camera in System like HP TrueVision Camera from results appear, and select ‘Open File Location’
Step 2: On the opened page, find and right-click on shortcut icon relating the program, and select ‘Open File Location’
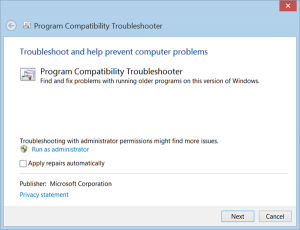
Step 3: In the opened folder, right-click on executable file relating to program and select ‘Troubleshoot Compatibility’
Step 4: In the troubleshooter window, click on ‘Try Recommended Settings’ and follow on-screen instructions to finish troubleshooting
Step 5: Once done, please check if the issue is resolved.
Method 13: Perform Windows 10 Reset
If the issue is still persist, then you can try to fix the issue by performing Windows 10 reset.
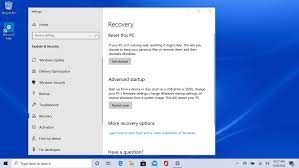
Step 1: Open ‘Settings’ App in Windows 10 and go to ‘Update & Security > Recovery > Reset This PC’ and click on ‘Get Started’ button
Step 2: Select ‘Keep my files’ or ‘Remove Everything’ option and follow on-screen instructions to finish resetting
Step 3: Once done, restart your computer and check if the error is resolved.
Method 14: Update Windows 10 OS
Updating Windows 10 OS to latest update version can resolve any issue in Windows computer. Let’s try.
Step 1: Open ‘Settings’ App and go to ‘Update & Security > Windows Update’ and click on ‘Check for updates’ button
Step 2: Download and install the available update in computer. Make sure your computer is connected to stable internet during update. Once done, restart your computer to see the changes
Method 15: Revert Windows update
Sometimes, this issue can be occurred due to recently installed Windows update version. You can uninstall the problematic Windows update version or recently install Windows update and install the previous update version
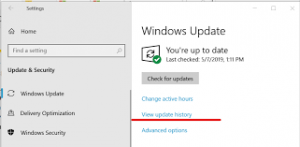
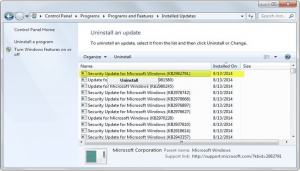
Step 1: Open ‘Settings’ App and go to ‘Update & Security > Windows Update > View Update History > Uninstall Updates’
Step 2: Find and right-click on recently installed Windows update according to date & time, and select ‘Uninstall’. Follow on-screen instructions to finish uninstall.
Step 3: After that, restart your computer and check if the camera error is resolved.
Method 16: Perform Power Reset/hard reset

You can force the system to detect the camera in your computer by performing hard reset.
Step 1: Turn OFF your computer and disconnect all peripherals and charger/power cable connected to computer. Remove laptop battery (for laptop)
Step 2: Now, press ‘Power’ button on your laptop for 15 seconds and after that, insert battery back into laptop and plug charger/power cable and turn ON your system
Step 3: Now, connect your peripheral devices to laptop and check if the error is resolved.
Conclusion
I am sure this post helped you on How to fix Camera error code 0xa00f4292 in Windows 10 with several easy steps/methods. You can read & follow our instructions to do so. That’s all. For any suggestions or queries, please write on comment box below.


