What is ‘OBS failed to connect to server’ error in Windows 10?
If you are facing ‘OBS failed to connect to server’ error while trying to stream through OBS application in Windows 10 computer, then you are in right place for the solution. Here, you will be guided with easy steps/methods to resolve the error. Let’s starts the discussion.
‘OBS’ or OBS Studio: OBS stands for Open Broadcaster Software. OBS or OBS Studio is free and open-source cross-platform streaming and recording program build with Qt and maintained by the OBS Project. OBS Studio is available for Microsoft Windows OS, MacOS, Linux Distributions, and BSD. OBS service provides real-time source and device capture, scene composition, encoding, recording and broadcasting. For video encoding, OBS Studio is capable of using x264 free software library, Intel Quick Sync Video, NVIDIA NVENC and AMD Video Coding Engine to encode video streams into H.264/MPEG-4 AVC format and H.265/HEVC format.
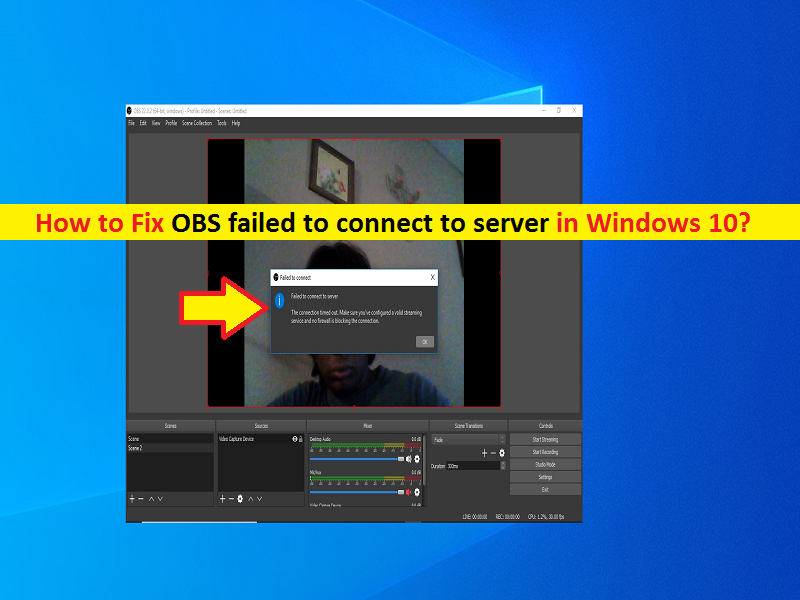
However, several users reported that they faced ‘OBS failed to connect to server’ error while they tried to stream OBS Studio application in their Windows 10 computer. This error is also appeared on other Microsoft Windows OS platform and MacOS based devices. This error prevents you from streaming OBS Studio app and accessing OBS server in your device. Let’s take a look at error message.
“Failed to connect to server. The connection time out. Make sure you’ve configured a valid streaming service and no firewall is blocking the connection.”
The error message states you should make sure you have configured a valid streaming service and also make sure no firewall is blocking the connection. According to this error, the possible reason behind OBS failed to connect to server error can be interference of your firewall/antivirus software installed in computer that is blocking OBS server connection for some security reasons or due to its over security features.
Before troubleshooting the issue, you should check if you can stream in OBS application on some other network or on different device on same network in order to check whether your network/device is problematic or not. You should make sure you have stable internet connection and there is no issue with internet connection at all. To speed up your internet bandwidth, you can try Ethernet cable for internet connection instead of choosing wireless network.
Also, you can switch the network from WiFi to Ethernet or Ethernet to WiFi in order to fix the issue. Sometimes, this issue can be occurred due to temporary glitch in your computer and networking equipments. So in such case, you can just restart your computer and networking equipment in order to fix the issue. Let’s go for the solution.
How to fix OBS failed to connect to server error in Windows 10?
Method 1: Fix ‘OBS failed to connect to server’ error with ‘PC Repair Tool’
‘PC Repair Tool’ is easy & quick way to find and fix BSOD errors, DLL errors, EXE errors, problems with programs/applications, malware or viruses issues and other system issues with just few clicks. You can get this tool through button/link below.
Method 2: Create and re-enter the Stream key
This issue can be occurred due to temporary glitch between OBS application and streaming service. You can fix the issue by re-entering the stream key after resetting key.
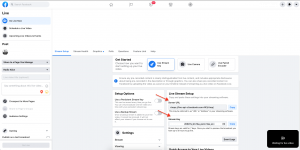
Step 1: Open your browser and visit ‘Facebook’ page and login into your Facebook account
Step 2: Once you logged-in, click on ‘Live Video’ in new post section and select ‘Use Stream key’, scroll down till the end and click ‘Reset’ in front of stream key, then copy the ‘Stream Key’
Step 3: Now, open ‘OBS App’ in your Windows 10 computer and go to ‘Settings’ at bottom of screen
Step 4: In ‘Settings’ page, select ‘Stream’ in left pane, enter or paste the copied Stream key in ‘Stream Key’ box
Step 5: Apply your changes and check if you can stream OBS without any issue.
Method 3: Enable Dynamic Bitrate in OBS

One possible way to fix the issue is to enable Dynamic Bitrate in OBS.
Step 1: Open ‘OBS App’ and go to ‘Settings’
Step 2: In ‘Settings’ page, click on ‘Advanced’ option in left pane, and scroll down to ‘Network’ section in right pane and check ‘Dynamically Change Bitrate to Manage Congestion’ and then apply the changes.
Step 3: Once done, re-launch OBS app and check if the error is resolved.
Method 4: Update OBS app in Windows 10

This issue can be occurred due to outdated OBS app or some corruption in OBS app. You can fix the issue by updating OBS to latest update version.
Step 1: Open ‘OBS’ app in Windows 10 and go to ‘Help’ menu and select ‘Check for updates’ option
Step 2: If update is available, install the update in computer and then restart your computer to see the changes and check if the error is resolved.
Download/install latest OBS app version without uninstalling previous version:
This method is for obsolete version if you using this version, then you can download and install latest OBS version app without uninstalling previous one. Once installed, please check if error is resolved.
Method 5: Update Windows 10 OS
Updating Windows 10 OS to latest update version can resolve any issue in computer. Let’s try.
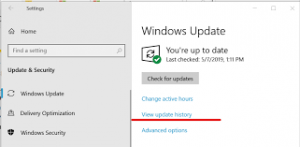
Step 1: In Windows 10, press ‘Windows + I’ keys on keyboard to open ‘Settings’ App
Step 2: Go to ‘Update & Security > Windows Update’ and click on ‘Check for updates’ button. Download and install the available update in computer and once done, restart your computer and check if error is resolved.
Method 6: Change Stream Server location
This error can be occurred if server itself is down or some issue with server. In such case, you can change streaming server to different location in order to fix the issue.
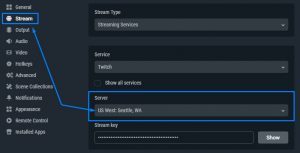
Step 1: Open ‘OBS App’ in Windows 10 and go to ‘Settings’
Step 2: In ‘Settings’ page, click on ‘Stream’ tab in left pane and expand dropdown of ‘Server’, select a different server from dropdown and apply the changes. Once done, re-launch OBS application and check if you can stream OBS without any issue. if not, you can repeat same steps and try different server again but not choose the last one in order to check which server location is right for you.
Method 7: Edit Bind IP Option in Advanced Network Settings in OBS App
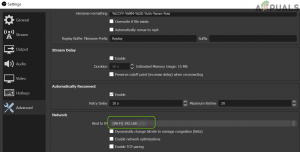
Step 1: Open OBS App and go to ‘Settings > Advanced’ and scroll down to ‘Network‘ section
Step 2: Now, select ‘Default’ option from ‘Bind to IP’ dropdown. If ‘Default’ option is already selected, select network connection name with IP address of your system. If Bind to IP is grayed out, make sure to disable all OBS outputs like NDI, Virtual camera, etc. and try again
Step 3: Save the changes and check if you connect to OBS server without any issue.
Method 8: Allow OBS app through Windows Firewall
This issue can be occurred if your Windows Firewall is not allowing OBS app to access the network/server for some reasons. You can allow OBS in Firewall settings in order to fix the issue.
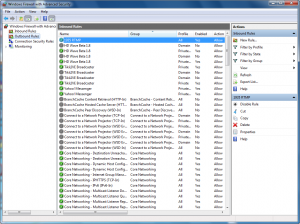
Step 1: Type ‘Firewall’ in Windows Search Box and open ‘Windows Defender Firewall with Advanced Security’
Step 2: In the opened window, in left pane, click on ‘Outbound Rules’ and ‘Inbound Rules’ tab, make sure no rule is blocking OBS app
Step 3: Now, in left pane, select ‘Outbound rules’ and click on ‘Action > new rule’
Step 4: In new rule wizard window, select ‘Program’ radio button and hit ‘Next’
Step 5: Click on ‘Browse’ button and locate the installation of OBS executable and select its executable file like OBS64.exe and open it
Step 6: Now, click on ‘Next’ and select ‘Allow the connection’ radio button
Step 7: Now, select the profile as your requirements like for testing, select all three options including Domain, Private and Public option, and then hit ‘Next’ button
Step 8: Enter the name and description of new rules you are creating and then hit ‘Next’
Step 9: Once done, restart your computer and check if the error is resolved.
Method 9: Lower MTU (Maximum Transmission Unit) size
MTU stands for Maximum Transmission Unit. MTU is used to set maximum size of network package to be sent a streaming server may drop the packets that are greater in size from configured MTU size. In such case, you can lower MTU size in order to fix the issue.
Step 1: Press ‘Windows + X’ keys on keyboard and select ‘Windows PowerShell (Admin)’
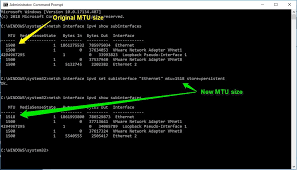
Step 2: In ‘PowerShell’ window, type the following command and hit ‘Enter’ key to execute
netsh int ipv4 show subinterface
Step 3: Note down the name of your network in ‘Interface’ column and execute the following command
netsh interface ipv4 set subinterface <subinterface name> mtu=1400 store=persistent
Step 4: Once executed, type the following command and hit ‘Enter’ key to execute. This will check MTU size of your network and check if it changed.
netsh int ipv4 show subinterface
Step 5: Once executed, restart your computer and check if the error is resolved.
Method 10: Reset your router/networking equipments to factory default
This issue can be occurred due to misconguration in your router settings. You can perform router reset operation in order to fix the issue. Resetting router will reset everything including credentials details and instructions and all other settings made by you in router to original default.
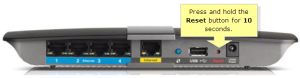
Step 1: Turn ON your router if it is turned OFF and hit ‘Reset’ button on router using sharp objects like paperclip and hold the ‘Reset’ button for about 30 seconds
Step 2: Release the reset button after 30 seconds and wait till the router is fully reset and powered ON
Step 3: Once resetting is finished, turn ON your router and establish the connection with your computer, then re-launch OBS application and check if error is resolved.
Conclusion
I am sure this post helped you on How to fix OBS failed to connect to server error in Windows 10 with several easy steps/methods. You can read & follow our instructions to do so. That’s all. For any suggestions or queries, please write on comment box below.


