
What is ‘AMD Driver timeout has occurred’ error in Windows 10?
In this post, we are going to discuss on “How to fix AMD Driver timeout has occurred error in Windows 10/11”. You will be guided with easy steps/methods to resolve the issue. Let’s starts the discussion.
‘AMD Driver timeout has occurred’ error: It is common Windows Problem usually occurred when your start your computer or after successful boot into Windows desktop. This issue is occurred on Windows 10/11 OS based devices with AMD graphics card driver installed whereby in course of normal use of computer or during gaming, out of blue, the Windows PC screen goes black and then reloads and display ‘AMD Driver timeout has occurred ‘ error. Let’s take a look at error message.
“AMD Bug Report Tool
We detected a driver timeout has occurred on your system. A bug report has been generated. This report could help AMD find a solution. Would you like to report this issue?”
This error is usually appeared when your Windows 10/11 computer successfully boots to Windows desktop – AMD Bug Report prompt popup on your screen. There could be several reasons behind the issue including corrupted/outdated or incompatible AMD graphics card driver, outdated Windows OS, unstable overclocking/overheating, issue with hardware and other system issues. You should make sure AMD graphics card driver is properly installed and is up-to-date in computer. AMD Graphics card driver update is necessary in this case.
This error can also be occurred due to incorrect configuration of AMD Radeon settings in your Windows computer. You can configure and correct the AMD Radeon settings in order to fix the issue. It is possible to resolve the issue with our instructions to do so. Let’s go for the solution.
How to fix AMD Driver timeout has occurred error in Windows 10/11?
Method 1: Fix ‘AMD Driver timeout has occurred’ error with ‘PC Repair Tool’
‘PC Repair Tool’ is easy & quick way to find and fix BSOD errors, DLL errors, EXE errors, problems with programs/applications, malware or viruses issues, system files or registry issues, and other system issues with just few clicks.
Method 2: Update Windows 10 OS
Updating Windows 10 OS to latest version can resolve any issues in computer. Let’s try.
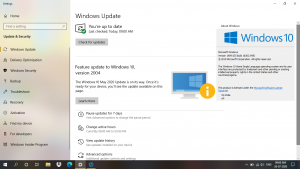
Step 1: Open ‘Settings’ App in Windows 10 via Windows Search Box and go to ‘Update & Security > Windows Update’ and click ‘Check for updates’ button
Step 2: Download and install the available updates in computer and once updated, restart your computer and check if the issue is resolved.
Method 3: Disable and re-enable AMD graphics card driver
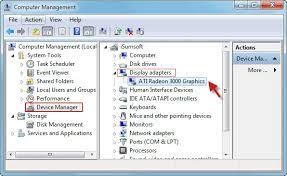
Step 1: Open ‘Device Manager’ in Windows PC via Windows Search Box and expand ‘Display Adapters’ category
Step 2: Right-click on your AMD graphics card driver and select ‘Disable Device’ to disable it and after few seconds, right-click on it again and select ‘Enable Device’ to restart the AMD graphics card driver.
Step 3: Once done, restart your computer and check if it works.
Method 4: Update AMD Graphics card driver
Updating graphics card driver to latest update version can resolve the issue. Let’s try.
Step 1: Open ‘Device Manager’ using above method and expand ‘Display Adapters’ category
Step 2: Right-click on your AMD graphics card driver and select ‘Update Driver’, and follow on-screen instructions to finish update and once updated, restart your computer and check if the issue is resolved.
Download or reinstall AMD graphics card driver update in Windows 10/11 [Automatically]
You can also get latest updates for all Windows drivers including AMD graphics card driver using Automatic Driver Update Tool. You can get this tool through button/link below.
Method 5: Change Power Plan and adjust Visual Effects
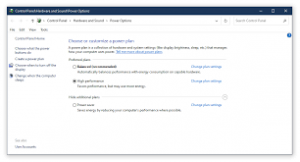
Step 1: Type ‘Power plan’ in Windows Search Box and open ‘Power & Sleep settings’ window. In the opened window, click on ‘Additional Power settings’ in right pane
Step 2: In next window, select ‘High Performance’ radio button and save the changes
Step 3: Now, Open ‘Control Panel’ and go to ‘System > Advanced System settings > System proper rites Advanced Tab > Performance settings > Visual Effects’, and select adjust for best performances and click ‘Apply’ and exit. Once done, please check if the issue is resolved.
Method 6: Increase Virtual memory
One possible way to fix the issue is to increase virtual memory.
Step 1: Open ‘Control Panel’ and go to ‘System > Advanced System > View Advanced System Settings’
Step 2: In System Properties, click Advanced tab
Step 3: In Performance section click Settings button
Step 4: Performance Options will open. Click Advanced tab
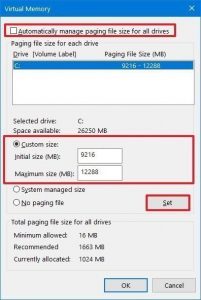
Step 5: Here, under Virtual memory, select Change
Step 6: Uncheck Automatically manage paging file size for all drives
Step 7: Highlight your Windows system drive
Step 8: Select Custom size
Step 9: Change the Initial size value and the Maximum size value to a higher value
Step 10: Click Set
Step 11: Finally, Click Apply/OK all the way.
Method 7: Change Display Refresh Rate
Step 1: Open ‘Settings’ App in Windows 10 and go to ‘System > Display > Advanced Display’
Step 2: Locate ‘Choose a refresh rate’ settings and select the one of your choice from desktop menu. Once done, check if it works for you.
Method 8: Disable ‘Fast Startup’
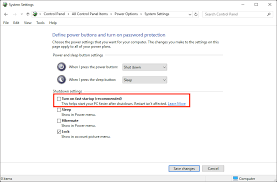
Step 1: Open ‘Power Options’ in Windows 10 via Windows Search Box and click ‘Choose what the power buttons do’
Step 2: Deselect ‘Turn ON fast startup (recommended)’ checkbox and click ‘Ok’ button to save the changes and check if the issue is resolved.
Method 9: Disable ‘AMD Driver Issue Reporting’
Step 1: Open ‘AMD Adrenaline software’ in Windows computer and go to ‘Settings’
Step 2: Toggle the button for ‘Issue Reporting’ to ‘OFF’ and restart your computer and check if it works for you.
Method 10: Clear AMD card shader cache
The shader cache is AMD cards is used to boost loading times of gaming by compiling and storing frequently used game shaders, rather than having to generate the shaders every time a game launches. However, if shader cache of card is corrupted or damaged, it may cause issues. You can clear shader cache of AMD card in order to fix the issue.
Step 1: Open ‘AMD Adrenalin Application’ and go to ‘Settings > Graphics > Perform Reset’ in ‘Shader Cache’ front
Step 2: Confirm the resetting process and once done, please check if the issue is resolved.
Method 11: Disable FreeSync and Virtual Super Resolution in AMD Settings
Step 1: Open ‘AMD Radeon Settins’ and click ‘Display’ tab and select the display
Step 2: Toggle the button for AMD FreeSync and Virtual Super Resolution option to OFF and check if it works
Method 12: Edit Frequency and Voltage Settings of AMD card
Step 1: Open ‘AMD Radeon’ software and go to ‘Performance > Manual > GPU Settings > Advanced Control’
Step 2: Set ‘Maximum GPU frequency to 2 times lower’ and apply the changes, and check if it works for you.
Method 13: Increase Power limit of AMD card
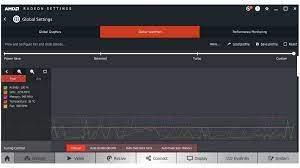
Step 1: Open ‘AMD Radeon’ software and click ‘Performance > Tuning > Manual’
Step 2: Enable ‘Power Tuning’ and increase ‘Power Limit’ by ‘50%’
Step 3: Save the changes and restart your computer and check if it works for you.
Method 14: Find Tune System’s fan
Step 1: Open ‘AMD Radeon’ software and click ‘Performance > Tuning’ and enable ‘Fan Tuning’
Step 2: Increase ‘Max-fan temperature’ to ‘100 degrees’ and save the changes, and check if it works
Method 15: Modify registry settings
Step 1: Press Windows key + R to invoke the Run dialog.
Step 2: In the Run dialog box, type regedit and hit Enter to open Registry Editor.
Step 3: Navigate or jump to the registry key path below:
Computer\HKEY_LOCAL_MACHINE\SYSTEM\CurrentControlSet\Control\GraphicsDrivers
Step 4: At the location, right-click on the blank space on the right pane and then select New > DWORD (32-bit) Value to create the registry key and then rename the key as TdrDelay and hit Enter.
Step 5: Double-click on the new entry to edit its properties.
Step 6: Input 8 or 30 in the Value data field.
Step 7: Click OK or hit Enter to save the change.
Step 8: Again, right-click on the blank space on the right pane and then select New > QWORD (64-bit) Value to create the registry key and then rename the key as TdrDelay and hit Enter.
Step 9: Input 8 or 30 in the Value data field.
Step 10: Click OK or hit Enter to save the change. Once done, reboot your computer and check if it works
Method 16: Reset Windows 10
If the issue is still persist, then you can try to fix the issue by performing Windows 10 reset operation.
Step 1: Open ‘Settings’ App and go to ‘Update & Security > Recovery > Reset This PC’ and click ‘Get Started’ button
Step 2: Follow on-screen instructions to finish resetting and check if the issue is resolved.
Conclusion
I am sure this post helped you on How to fix AMD Driver timeout has occurred error in Windows 10/11 with several easy steps/methods. You can read & follow our instructions to do so. That’s all. For any suggestions or queries, please write on comet box below.


