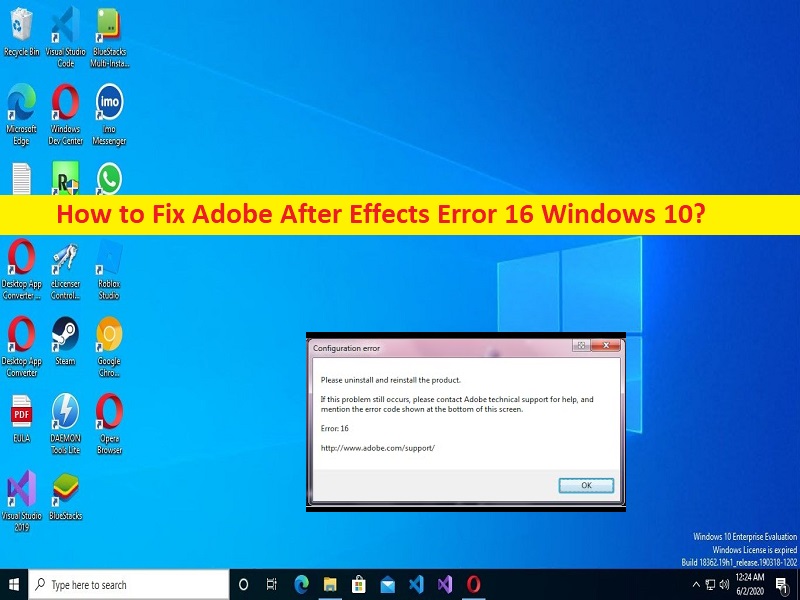
What is ‘Adobe After Effects Error 16’ issue in Windows 10?
In this article, we are going to discuss on How to fix Adobe After Effects Error 16 Windows 10. You will be guided with easy steps/methods to resolve the issue. Let’s starts the discussion.
‘Adobe After Effects Error 16’ issue:
It is common error relating to Adobe Creative Cloud app in your Windows 10 computer. If you are not aware, Adobe After Effects is important component of Adobe Creative Cloud app which has been extremely useful to you working on creative content. However, several users reported they faced Adobe After Effects Error 16 Windows 10 or Adobe After Effects Error 16 while using Adobe Creative Cloud app on Windows 1o computer. This error prevents you from using Adobe After Effects components and using Adobe Creative Cloud in Windows 10 comfortably.
The possible reasons behind the issue can be outdated/corrupted Adobe Creative Cloud (Adobe CC) app, required permission not given to the app, issue with internet settings and other settings relating to the app, interference of other conflicting apps, and other issues. If you are facing the same issue and searching for ways to fix, then you are in right-place for the solution. One possible way to fix the issue is to update Adobe CC app to latest version, but there is also some other possible solutions to fix as mentioned in the web. Let’s go for the solution.
How to fix Adobe After Effects Error 16 Windows 10?
Method 1: Fix Adobe After Effects Error 16 with ‘PC Repair Tool’
‘PC Repair Tool’ is quick & easy ways to find and fix BSOD errors, DLL errors, EXE errors, problems with programs/applications, malware or viruses infections in computer, system files or registry issues, and other system issues with just few clicks.
Method 2: Restart Adobe CC app
You can close Adobe CC app completely and its processes and then re-launch the app to fix the issue.
Step 1: Press ‘CTRL + SHIFT + ESC’ keys on keyboard to open ‘Task Manager’ app
Step 2: Find and right-click on each process relating to ‘Adobe CC app’, and background apps, and select ‘End Task’ to kill their processes. Once done, re-launch Adobe CC app and check if the issue is resolved.
Method 3: Run Disk Cleanup tool
You can run Disk cleanup tool to remove temporary files or unnecessarily files in computer to fix the issue.
Step 1: Open ‘Disk Cleanup Tool’ via Windows Search Box and select ‘C: Drive’ or Windows installation drive from dropdown, and hit ‘Ok’ button
Step 2: Select all the checkboxes including temporary files, and hit ‘Clear files’ or similar button to proceed. Once done, check if it works for you.
Method 4: Create SLStore Folder
SLStore folder is prime folder of configuration of Adobe apps. You can create this folder in the correct location to fix the issue.
Step 1: Open ‘File Explorer’ in Windows PC and go to following path
C:\Program Files\Adobe
Step 2: Right-click on empty space and select ‘New > Folder’ and name the folder to ‘SLStore’. Once done, check if it works.
Method 5: Change Attribute of SLStore folder
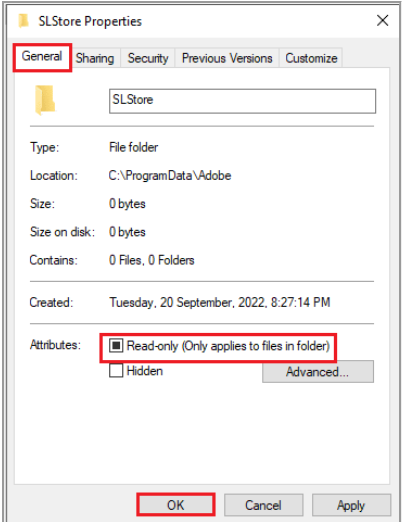
You can change the attribute of SLStore folder in order to fix the issue.
Step 1: Go to ‘SLStore’ folder using following path
C:\Program Files\Adobe > SLStore
Step 2: Right-click on ‘SLStore’ folder, and select ‘Properties’
Step 3: Click ‘General’ tab, ensure ‘Read-Only’ option in Attributes section is selected, and click ‘Ok’ button, and check if it works.
Method 6: Run Adobe CC app as administrator
You can provide administrator permission to Adobe CC app in computer to fix.
Step 1: Find and right-click ‘Adobe CC app’, and select ‘Properties’
Step 2: Click ‘Compatibility’ tab, tick ‘Run the program as an administrator’ checkbox, and then hit ‘Apply > Ok’ button to save the changes. Once done, restart Adobe CC app and check if the issue is resolved.
Method 7: Update Anti-Virus software
You can update your antivirus software to latest & compatible version in order to fix the issue, and then check if the issue is resolved.
Method 8: Copy DLL file to installation folder
This issue can be occurred due to corrupted/missing important DLL file in installation folder. You can copy DLL file to installation folder to fix.
Step 1: At first, you need to plug a external storage media into another computer and Open ‘File Explorer’ on that Windows PC and go to following path
C:\Program Files\Adobe\Creative Cloud Files
Step 2: Right-click ‘adbeape.dll’ file and select ‘Copy’ option and paste the file into external storage device your plugged, and then remove this storage.
Step 3: Now, plug this external device into your computer and go to same path you followed above, and paste the copied DLL file there. Once done, check if the issue is resolved.
Method 9: Change permission for AdobePCD and SLStore folders
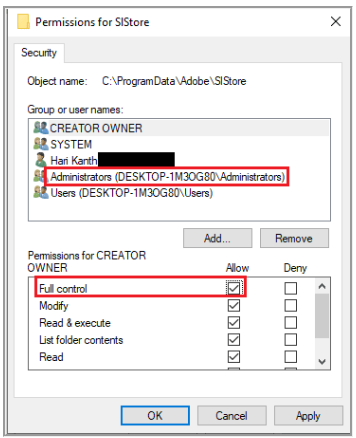
Step 1: Open ‘File Explorer’ in Windows PC and click ‘View’ tab and tick ‘Hidden Items’ checkbox
Step 2: Now go to SLStore folder by going to ‘C:\Program Files\Adobe\Creative Cloud Files’ path
Step 3: Right-click ‘SLStore’ folder and select ‘Properties’. Click ‘Security’ tab and click ‘Edit’ button
Step 4: Select ‘Administrators’ account and tick ‘Full Control’ option in ‘Allow’ section
Step 5: Similarly, Select System username and tick ‘Full Control’ option next to it. Select Users account and tick ‘Read’ and ‘Special Permissions’ option, and then hit ‘Apply > ok’ button. Once done, check if the issue is resolved.
Method 10: Change Internet Options
Reset browser:
Step 1: Open ‘Internet Options’ window via Windows Search Box and click ‘Advanced’ tab
Step 2: Click ‘Reset…’ button in ‘Reset Internet Explorer Settings’ section and confirm resetting. Once finished, check if the issue is resolved.
Disable Script Debugging and Error Notifications:
Step 1: Open ‘Internet Options’ window and click ‘Advanced’ tab, tick the following settings in Browsing section
Disable script debugging (Internet Explorer)
Disable script debugging (Other)
Display a notification about every script error
Step 2: Hit ‘Apply > Ok’ button to save the changes and check if the issue is resolved.
Method 11: Install Adobe Application Manager
Another way to fix the issue is to install Adobe Application Manager in computer.
Step 1: Open your browser and visit official site of Adobe Application Manager and download it
Step 2: Double-click the downloaded setup and follow on-screen instructions to finish installation and once installed, check if the issue is resolved.
Method 12: Update Adobe Creative Cloud (CC) app
Update Adobe CC app to latest & compatible version can resolve the issue.
Step 1: Open ‘Adobe Creative Cloud’ app in Windows PC and click ‘Three horizontal lines’ icon at top-left corner
Step 2: Select ‘Help > Check for updates’. If the update is available, click ‘Update’ and follow on-screen instructions to finish update. Once updated, check if it works.
Method 13: Uninstall problematic applications
Interference of some problematic applications installed in computer could be a reason behind the issue. You can uninstall the problematic applications to fix.
Method 14: Reinstall Adobe products
If the issue is still persist, you can try to fix the issue by uninstalling Adobe products installed in your device, and then reinstall it in your computer, and then check if it works for you toward resolving the issue.
Conclusion
I hope this post helped you on How to fix Adobe After Effects Error 16 Windows 10 with easy ways. You can read & follow our instructions to do so. That’s all. For any suggestions or queries, please write on comment box below.


