Tips to create macOS Big Sur bootable USB on Windows 10/11 PC:
In this article, we are going to discuss on How to create macOS Big Sur bootable USB on Windows 10/11 PC. You will be guided with easy steps/methods to resolve the issue. Let’s starts the discussion.
‘Create / Make macOS Big Sur bootable USB on Windows 10/11 PC’:
‘macOS Big Sur’: MacOS Big Sur (Version 11) is 17th major release of MacOS, Apple Inc.’s operating system for Macintosh computers. It was announced at Apple’s Worldwide Developers Conference (WWDC) on June 2020. It is successor to macOS Catalina and was succeeded by macOS Monterey. MacOS Big Sur features a user interface redesign that features new blurs to establish a visual hierarchy and also includes a revamp of Time Machine backup mechanism, among other changes.
MacOS Big Sur is now most up-to-date MacOS and it requires more advanced hardware to run it. It means this OS is compatible with more advanced hardware and no all Mac models are eligible to install MacOS Big Sur on it. According to Apple official document, Macbook 2015 or later can run macOS Big Sur OS on it with ease. Although there are some tricks to install macOS Big Sur on unsupported Macs. Let’s take a look at Mac hardware that supports MacOS Big Sur.
- MacBook: 2015 or later.
- MacBook Air: 2013 and later.
- MacBook Pro: Late 2013 or after.
- iMac: 2014 and later.
- Mac Pro: 2013 and later.
- iMac Pro: 2017 and later.
MacOS Big Sur installation on your Mac hardware can be done using a MacOS Big Sur bootable USB. To do so, you need to just insert bootable macOS Big Sur Installation USB into your computer and proceed to install it on your Mac computer. If you are looking for easy ways to make macOS Big Sur bootable USB on Windows 10/11 PC, then you are in right-place for this. Here, you are provided with easy ways to make macOS Big Sur bootable USB on Windows PC.
Before performing this operation, you should make sure you have USB flash drive with 16GB or storage space or above, macOS Big Sur DMG file and DMG File Editor Tool to finish creating macOS Big Sur Installation USB in your Windows PC and once you have created this, you can use this bootable USB to install MacOS Big Sur on your Mac computer or on supported virtual machines. Let’s go for the steps.
How to create macOS Big Sur bootable USB on Windows 10/11 PC?
Download MacOS Big Sur DMG file:
Step 1: At first, you need to download MacOS Big Sur DMG file. To do so, you need to visit ‘Apple App Store’ official page and download MacOS Big Sur DMG file from there in your device. You can also try third-party sources to get this DMG file. For example, you can directly download MacOS Big Sur DMG file by opening ‘http://s2.mac2x.com/macos/11.x/USB.Flash.Install.macOS.Big.Sur.11.4.20F71.K3.dmg’ link or ‘https://www.mediafire.com/file/2a4w8t97ytcm5s8/BigSur13-3-1.dmg/file’ link in your browser and download MacOS Big Sur DMG file.
Create MacOS Big Sur Installation bootable USB on Windows 10/11 PC:
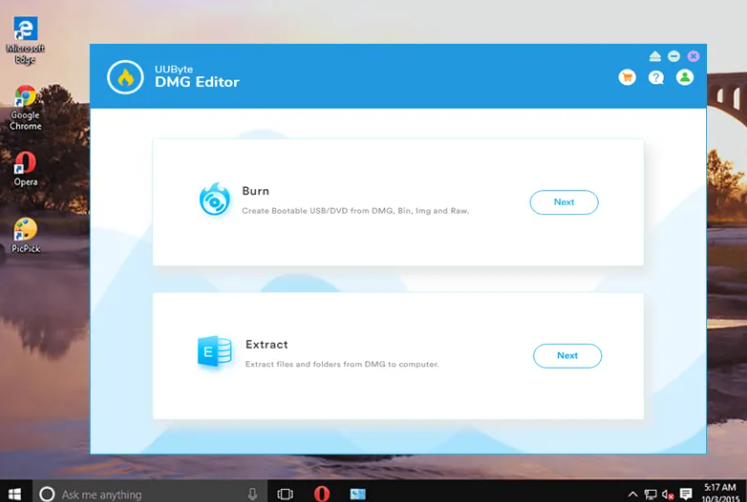
Once macOS Big Sur DMG file downloaded, you have to burn this DM file to USB. To do so, you can use UUByte DMG Editor – a professional disk authoring and disk image management tool. It is an one of simplest yet most powerful tools for managing DMG and other disk image file formats and is available for both Windows and Mac.
Step 2: Download and install UUByte DMG Editor Software for Windows 10 using official ISO Installation file which you can download from UUByte official site or visit ‘https://www.uubyte.com/download/dmg-editor.exe’ page in browser
Step 3: Now, insert USB drive into your computer and launch UUByte DMG Editor Software. Select ‘Burn’ option on welcome page, select the DMG file using File Explorer and click ‘browse’ button to import macOS Big Sur DMG file into software. Make sure the correct drive is selected in appropriate section.
Step 4: Name the USB drive volume label as ‘Big Sur Installer’ or something similar, then click ‘Burn’ tab to format the drive and create a bootable macOS Big Sur USB installer.
Step 5: Wait to finish and once you see the completion message on screen, you can use that USB to macOS on target computer.
Conclusion
I am sure this post helped you on How to create macOS Big Sur bootable USB on Windows 10/11 PC with several easy ways. You can read & follow our instructions to do so. That’s all. For any suggestions or queries, please write on comment box below.