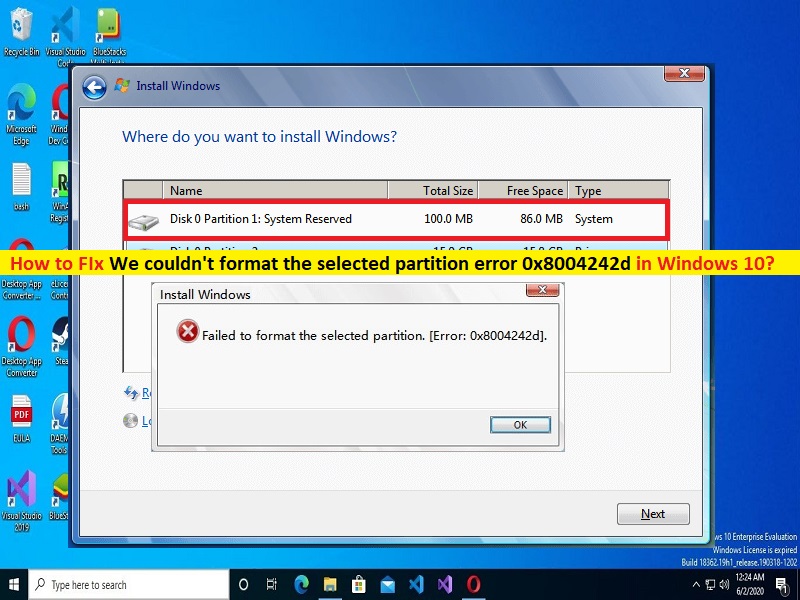
What is ‘We couldn’t format the selected partition error 0x8004242d’ in Windows 10/11?
In this article, we are going to discuss on How to fix We couldn’t format the selected partition error 0x8004242d in Windows 10/11. You will be guided with easy steps/methods to resolve the issue. Let’s starts the discussion.
‘We couldn’t format the selected partition error 0x8004242d’: It is common Windows Problem considered Drive Partition format issue. This error is usually appeared when you try to format a drive or partition in your Windows 10/11 computer. This issue indicates you are unable to finish drive or partition formatting on your computer’s internal hard disk drives or external hard disk drive, or USB flash drive. The error message says Windows computer is unable to finish the format the selected drive or partition for some reasons.
There could be several reasons behind the issue including the issue with data cable of your computer, corrupted file system in setup disk, corrupted/outdated mass storage controller driver or mass storage driver of computer, your Windows PC is not compatible with a mass storage controller or mass storage driver, hard disk to install Windows OS on is a dynamic disk, and other Windows issues.
You should make sure mass storage controller driver or mass storage driver of your computer is up-to-date to latest & compatible version in computer and if not, you can try updating its driver to latest & compatible version in order to resolve the issue. You should also make sure and check if there is no issue with data cable or hard drive cables of your computer if you don’t want this type of issue while formatting or using the drive. Let’s go for the solution.
How to fix We couldn’t format the selected partition error 0x8004242d in Windows 10/11?
Method 1: Fix We couldn’t format the selected partition error 0x8004242d with ‘PC Repair Tool’
‘PC Repair Tool’ is easy & quick way to find and fix BSOD errors, EXE errors, DLL errors, problems with programs/applications, malware or viruses issues, system files or registry issues, and other system issues with just few clicks.
Method 2: Convert a Dynamic Disk to Basic Disk
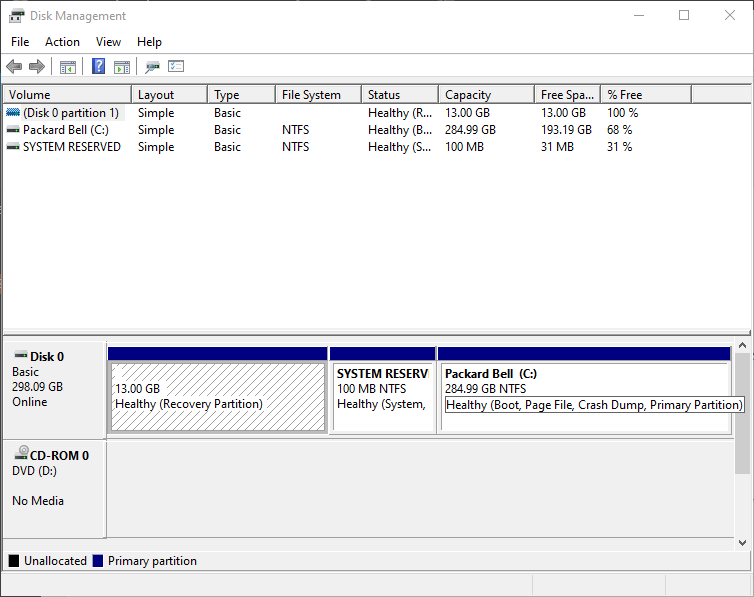
Some users reported the issue can be fixed by converting a Dynamic Disk to Basic Disk on the disk drive that is causing issue.
Step 1: Press ‘Windows + R’ keys on keyboard, type ‘diskmgmt.msc’ in ‘Run’ window and hit ‘Ok’ button to open ‘Disk Management’ app
Step 2: Find and right-click on each Dynamic Volume there, and select ‘Delete Volume’ to delete them
Step 3: Right-click disk drive and select ‘Convert to Basic Disk’. You can also convert dynamic disk to basic disk with drive partition software without data loss. Once done, check if the issue is resolved.
Method 3: Clean the drive with Diskpart
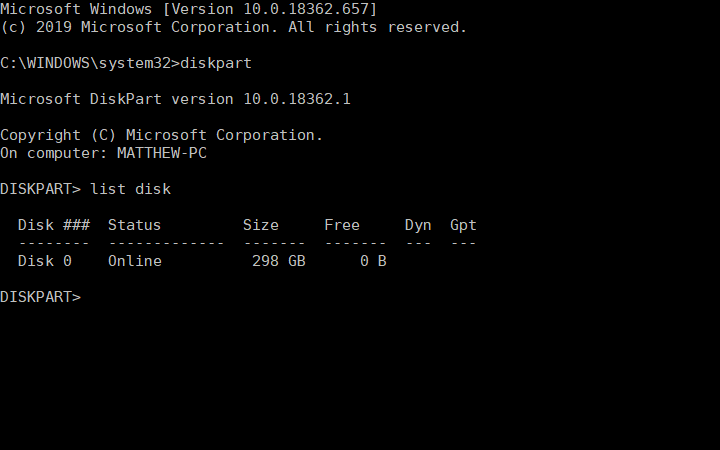
Step 1: Type ‘cmd’ in Windows Search Box and press ‘SHIFT + ENTER’ keys on keyboard to open ‘Command Prompt as Administrator’. Or you can also open Command Prompt from Windows Setup window by clicking ‘Repair your computer > Troubleshoot > Command Prompt’
Step 2: Type ‘diskpart’ command and hit ‘Enter’ key to execute. Now, execute ‘List Disk’ command, then execute ‘Select disk X’. Here, replace ‘X’ with the an actual disk number
Step 3: Now, execute ‘Clear All’ command and once executed, check if it works for you.
Method 4: Disable UEFI Boot Support
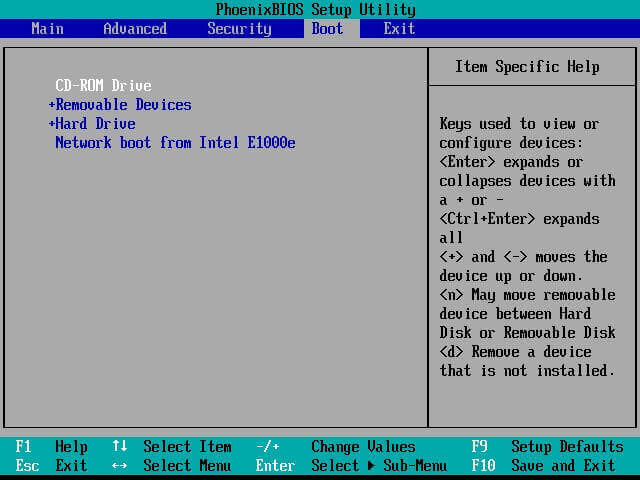
This issue can be occurred due to enabled UEFI Boot Support in your BIOS or UEFI mode of your computer. You can disable this option in order to fix.
Step 1: Restart your computer and when booting initiates, press ‘F2‘, ‘Delete’ or supported BIOS key to open ‘BIOS/UEFI Mode’
Step 2: Now, select ‘Boot’ tab and select UEFI/BIOS mode option to select Legacy BIOS instead of UEFI, and save the changes and exit BIOS/UEFI. Once done, restart your computer and check if the issue is resolved.
Method 5: Format the drive or partition during Windows Installation process
Step 1: Insert Windows Installation Media Disk/USB into your computer and boot your computer with it
Step 2: Run Windows Installation setup program, click ‘Install Now’ button, tick ‘I accept the terms of the license’ and hit ‘Next’
Step 3: Click ‘Custom (Advanced)’, choose the partition and click ‘Delete’
Step 4: Delete the present partition on the end disk. Click ‘Create new partition’ to generate a new one, select the new partition and click ‘Format’.
Conclusion
I am sure this post helped you on How to fix We couldn’t format the selected partition error 0x8004242d in Windows 10/11 with several easy steps/methods. You can read & follow our instructions to do so. That’s all. For any suggestions or queries, please write on commute box below.


