What is ‘Unable to start DCOM server event id 10001’ error in Windows 10?
In this post, we are going to discuss on How to fix DistributedCOM error 10001 Windows 10, Unable to start DCOM server event id 10001. You are provided with easy steps/methods to resolve the issue. Let’s starts the discussion.
‘DistributedCOM error 10001 Windows 10’:
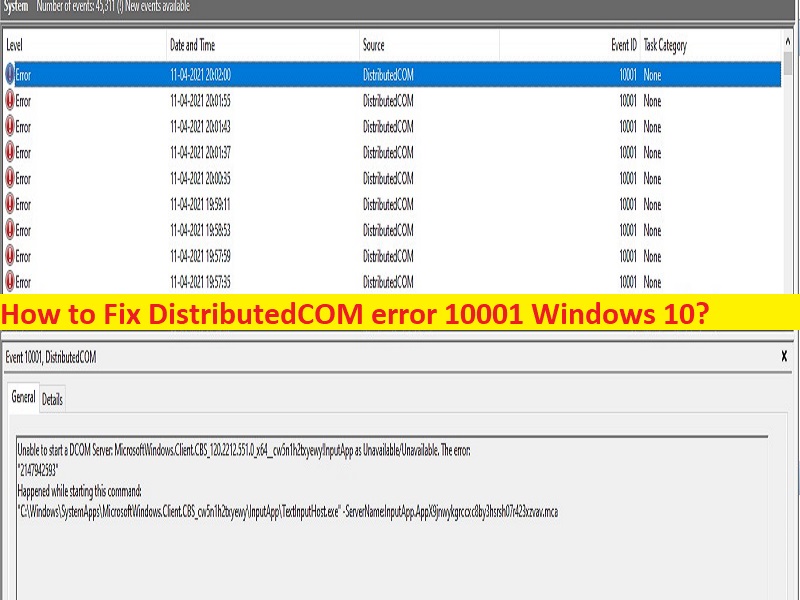
DCOM or Distributed Component Object Model is service that allows computers to run the programs on network as if they are running locally. This is sensitive service because it is closely relating to proper working of Windows operating system. However, several users reported they faced DistributedCOM error 10001 or Unable to start DCOM server event id 10001 error on their Windows 10 computer when they open Windows built-in Event Viewer app.
This error appears when folks try to run scripts or change certain functionality in Windows operating system. This error is also appeared usually when you try to run apps that is downloaded & installed from Microsoft Store. The error is appeared with message saying ‘Event ID 10001, DistributedCOM, Unable to start a DCOM Server’ in Windows Event Viewer app in Windows 10 computer.
The possible reasons behind the QliikView permission issue, Office suite causes DCOM error, Active account doesn’t have full permissions over WscBrokerManager and WscDataProtection, interference of antivirus/firewall, overprotective AV suite, corruption in system files or registry, and other issues. It is possible to fix the issue with our instructions. Let’s go for the solution.
How to fix DistributedCOM error 10001 Windows 10?
Method 1: Fix Unable to start DCOM server event id 10001 with ‘PC Repair Tool’
‘PC Repair Tool’ is easy & quick way to find and fix BSOD errors, DLL errors, EXE errors, problems with programs/applications, malware or viruses infections in computer, system files or registry issues, and other system issues with just few clicks.
Method 2: Fix permission issues [For QlikView users only]
Step 1: Open ‘File Explorer’ in Windows PC and go to following path
C:\Program Files\QlikView\Distribution Service\
Step 2: Once you are in right path, find and double-click ‘qvb.exe’ and this is required to create the necessary Windows registry keys and GUIDs, and then restart your computer
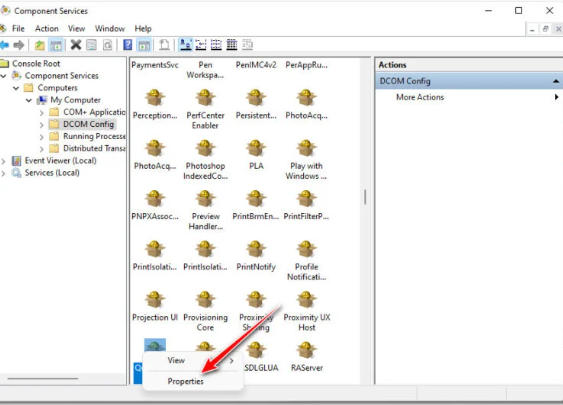
Step 3: After restart, press ‘Windows + R’ keys on keyboard, type ‘dcomfng.exe’ in ‘Run’ window and hit ‘CTRL + SHIFT + ENTER’ keys on keyboard to open Component Services tool
Step 4: Now go to following path: Component Services > Computers > My Computer > DCOM Config
Step 5: Move over to center pane, right-click on ‘QlikViewBatch Application’ and choose ‘Properties’ from context menu
Step 6: Click ‘Security’ tab and click ‘Customize’ and click ‘Edit’
Step 7: Go ahead and add the account that needs launch permissions and check the allow box for following options
Local Launch
Remote Launch
Local Activation
Remote Activation
Step 8: Once done, click ‘Ok’ button to save the changes. Now, repeat the same steps with Access Permissions and Configuration Permissions, and finally start QlikView Distribution service and check if the issue is resolved.
Method 3: Repair Office Suite Installation
Step 1: Open ‘Control Panel’ in Windows PC via Windows Search Box and go to ‘Uninstall a Program > Programs & Features’
Step 2: Find and right-click ‘Office Suite’, and select ‘Change’ and click ‘Quick Repair’ or ‘Online Repair’ option and confirm repairing. Once finished, restart your computer and check if the issue is resolved.
Method 4: Grant full control to WscBrokerManager and WscDataProtection
Step 1: Open ‘Registry Editor’ app in Windows PC via Windows Search Box and look for ‘Windows.SecurityCenter.WscDataProtection’ key using Find dialog box (press ‘CTRL + F’ keys to open Find dialog box), or go to following path
Computer\HKEY_LOCAL_MACHINE\SOFTWARE\Microsoft\WindowsRuntime\ActivatableClassId\Windows.SecurityCen ter.WscDataProtection
Step 2: Right-click ‘Windows.SecurityCenter.WscDataProtection’ key, and select ‘Permissions’
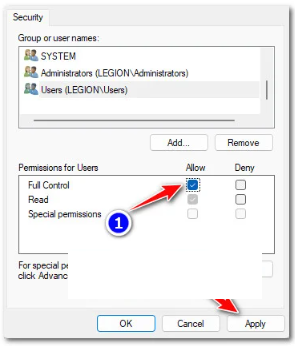
Step 3: Click ‘Security’ tab and select Users to Account under ‘Group or User names’
Step 4: Check the allow box relating to ‘Full Control’ and click ‘Apply > Ok’ button to save the changes
Step 5: Repeat the same steps for ‘WscDataProtection’ key and WscBrokerManager, and once done, restart your computer and check if the issue is resolved.
Method 5: Disable antivirus/firewall
Interference of antivirus/firewall program could be reasons behind the issue. You can fix the issue by disabling your antivirus/firewall program in computer and done, check if the issue is resolved.
Method 6: Perform Clean Boot
If the issue is still persist, you can perform clean boot operation in computer in order to fix the issue.
Step 1: Open ‘System Configuration’ app in Windows PC via Windows Search Box
Step 2: Click ‘Services’ tab, tick ‘Hide all Microsoft services’ checkbox, and hit ‘Disable All’ button
Step 3: Click ‘Startup’ tab and click ‘Open Task Manager’, right-click each startup item, and select ‘Disable’ to disable them and then close Task Manager app
Step 4: Finally, click ‘Apply > Ok’ button on System Configuration app to save the changes and then restart your computer, and check if the issue is resolved.
Method 7: Run SFC scan and DISM scan
You can run SFC scan and DISM scan in computer to repair corruption in system files and system image in order to fix the issue.
Step 1: Type ‘cmd’ in Windows Search Box and press ‘CTRL + SHIFT + ENTER’ keys on keyboard to open ‘Command Prompt as Administrator’
Step 2: Type the following commands and hit ‘Enter’ key after each to execute.
sfc /scannow
DISM.exe /Online /Cleanup-image /Restorehealth
Step 3: Once executed, restart your computer and check if the issue is resolved.
Method 8: Clean Windows Installation
If the issue is still persist, you can try to fix the issue by performing clean Windows installation in computer. To do so, you need to insert bootable Windows OS Installation media into computer and boot your computer with it, and follow on-screen instructions to finish installation and once finished, check if the issue is resolved.
Conclusion
I hope this post helped you on How to fix DistributedCOM error 10001 Windows 10, Unable to start DCOM server event id 10001 with easy ways. You can read & follow our instructions to do so. That’s all. For any suggestions or queries, please write on comment box below.


