In our earlier blogs, we have discussed about several BSOD Errors such as APC Index Mismatch Windows Error & CLOCK_WATCHDOG_TIMEOUT Error.
BSOD Errors are considered as a critical Windows Error. The occurrence of such errors implies pathetic condition of your system’s files and hardware. It’s pertinent to mention these errors many vary in severity. Some BSOD Errors may lead to system crashes while some may lead to profound system failure or other irreversible damage. The whole objective of BSOD Error is to prevent other components from further damage. Once it occurs it halts all the on-going tasks and operations and hence it prevents your machine from further damage. But as we have earlier mention BSOD Errors connotes a lot about the system, it implies a lot of flaws.
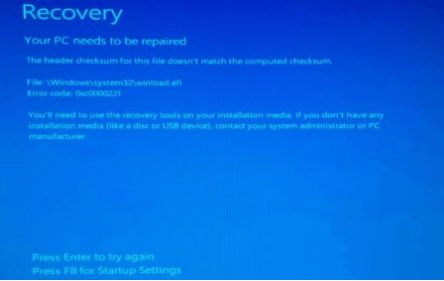
Well here in this article we will specifically discuss about one of the frequently reported BSOD Errors named Status_Image_Checksum_Mismatch Error. Like other BSOD Errors, the error message contains an error code 0xC0000221. The error message indicates corrupted system files or incompatibility at the system level. Apart from these two factors there could be a number of reasons, some of them are as follows:
#. Malware or Virus Infections
If you are system if infected with malicious programs it may lead to the above mention error.
#. Outdated BIOS or firmware
Obsolete Versions of BIOS can be a probable reason to face the above mention error.
#. Faulty Hardware
Malfunctioning of your hardware such as hard drive, RAM or even motherboard it may lead to the above mention error.
#. Corrupted page file or disk errors
Disk errors may also trigger the above mention error
There were some of the possible reasons but thankfully it is solvable. We have collected a number of solutions to get past the error.
Solutions to fix Status_Image_Checksum_Mismatch Error
Method 1: Start Windows in Safe Mode
In the first method we suggest you to start Windows in Safe Mode. Safe Mode will load the Windows with minimal drivers.
In order to get started with the method, follow the below mention guidelines:
To boot the PC in Safe Mode with Networking:
Step 1: Repetitively Restart your Windows System ( approx 2-3 times) until Automatic Repair Mode is triggered
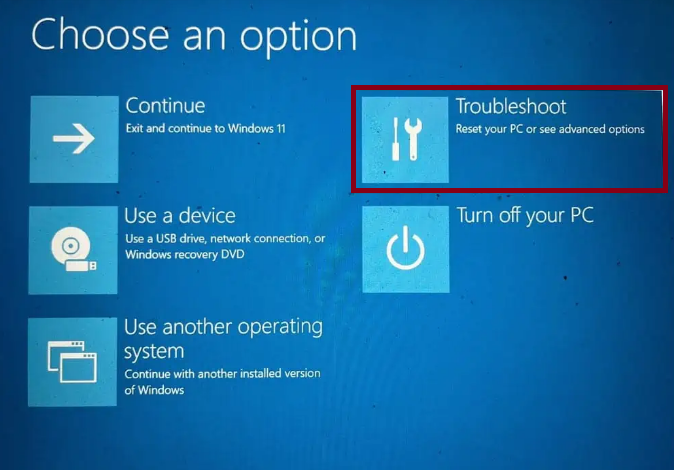
Step 2: In the new menu, select Troubleshoot
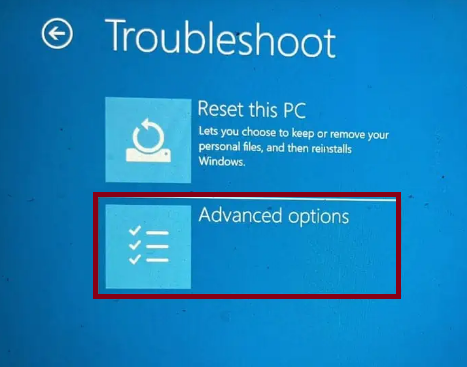
Step 3: Now search for Advanced Options
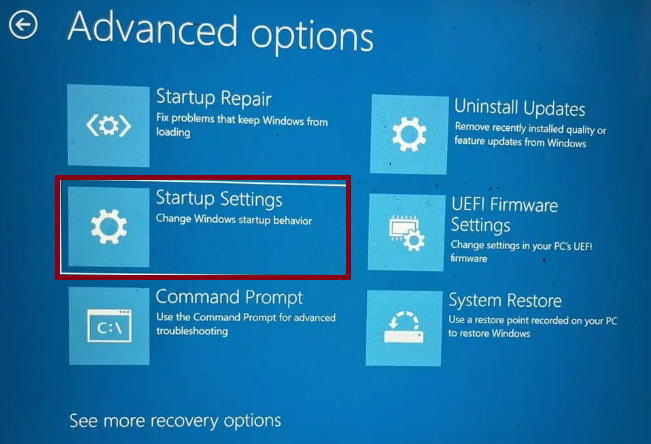
Step 4: Then, choose Startup Settings in the subsequent menu
Step 5: Click Restart to proceed
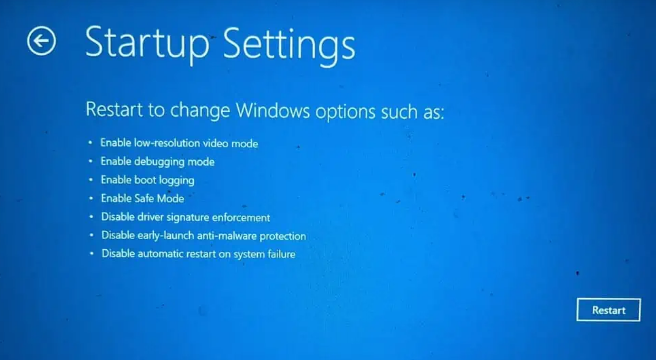
Step 6: Once your System has restarted, press F5 to start Windows in Safe Mode with Networking

Step 7: Your PC will be booted in Safe Mode. Now you can perform further troubleshooting methods
Method 2: Run Windows Memory Diagnostic Tool
You are most likely to face the above mention error due to issues with the RAM. In order to test your RAM, run the Windows Memory Diagnostic Tool.
Here’s how:
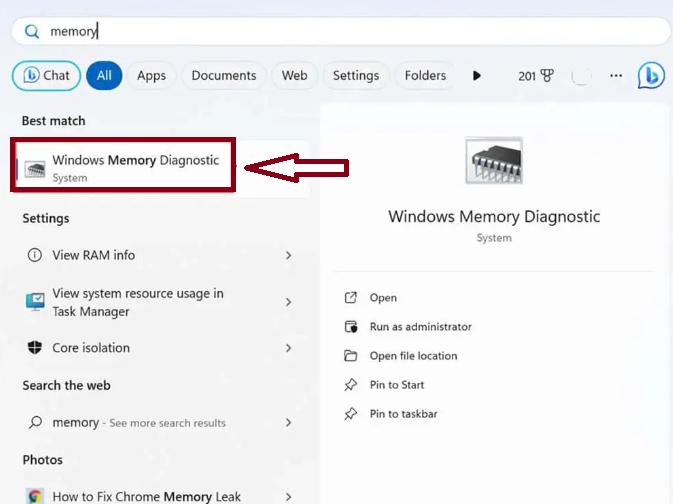
Step 1: In the Start Menu, search for Windows Memory Diagnostic and open it
Step 2: Now choose to Restart Now and Check for problems
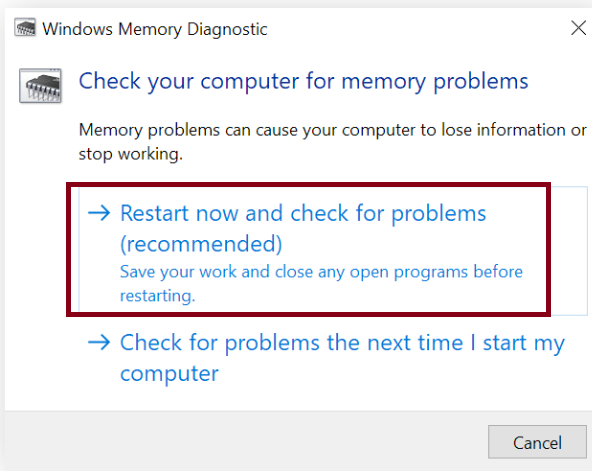
Step 3: The tool will test your RAM and report any issues found
Method 3: Uninstall Corrupted Drivers
If your drivers are corrupted, you need to uninstall them immediately. Corrupted drivers are incompatible and create nuisance for the users.
Here’s how:
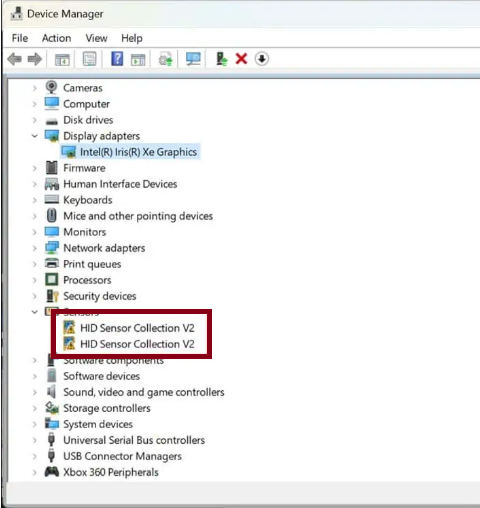
Step 1: Right-click the Start button and choose Device Manager from the menu that appears
Step 2: Look for devices marked with yellow exclamation mark, indicating potential issues.
Step 3: Right-click on them and choose Uninstall device
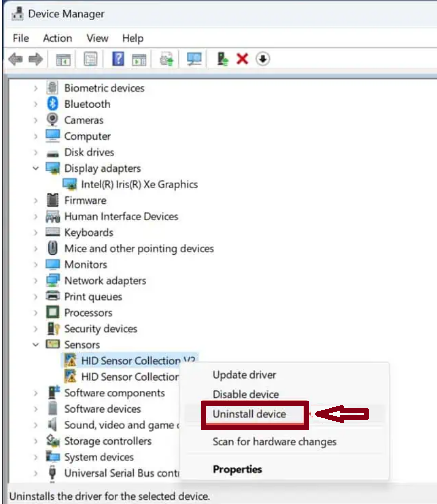
Step 4: Once the process is completed, reboot your PC. Windows will then automatically reinstall the requisite drivers.
Method 4: Run Check Disk (chkdsk) Command
You may face the above mention error due to disk errors, so ensure to run (chkdsk) utility. To do so follow the below mention guidelines:
Step 1: Right-click the Start button and choose ‘Terminal (Admin) from the options provided.
Step 2: In the terminal, you need to type and press Enter to execute the command:
chkdsk /f /r
Step 3: Now wait for some time to execute the command and restart your computer
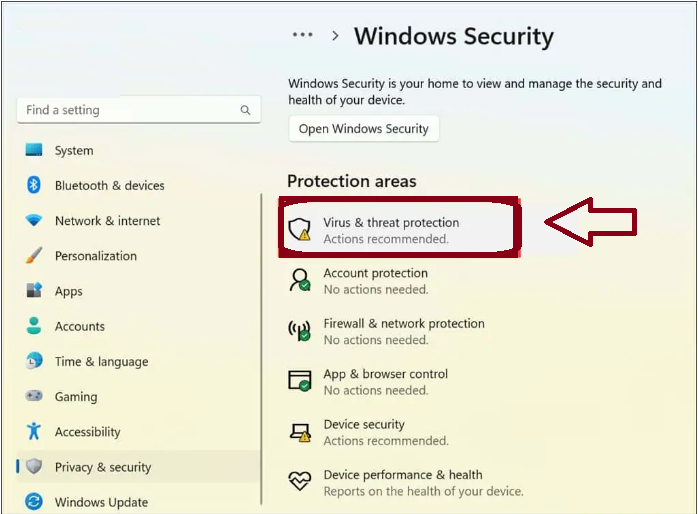
Method 5: Scan your PC for Malware
You are most likely to face the face the above mention error if your PC is infected with malware. To proceed use the following steps:
Step 1: Use Windows + I keys to open Windows Settings > Then go to Privacy & Settings section on the left, then select Windows Security on the right.

Step 2: In the Windows Security menu, click on Virus & threat protection
Step 3: Select Scan Options
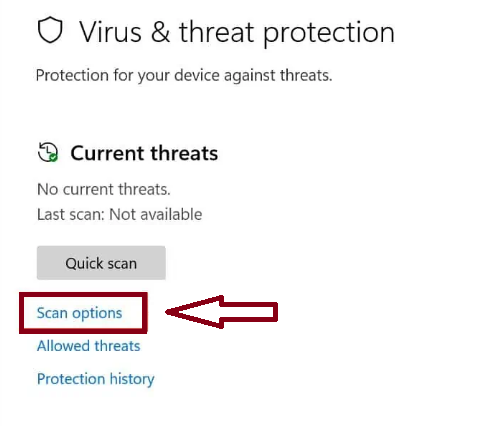
Step 4: Now opt for the Full Scan choice and press the Scan Now button

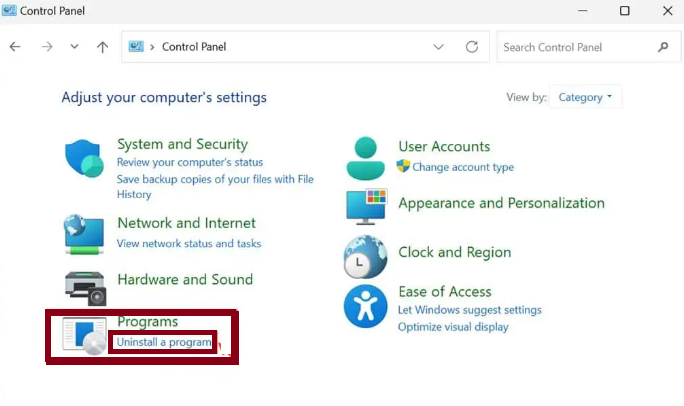
Method 6: Uninstall Recent Windows Updates
If you are facing the above mention error after installing a Windows Update, it is suggested to uninstall the recent Widows Updates.
Here’s how:
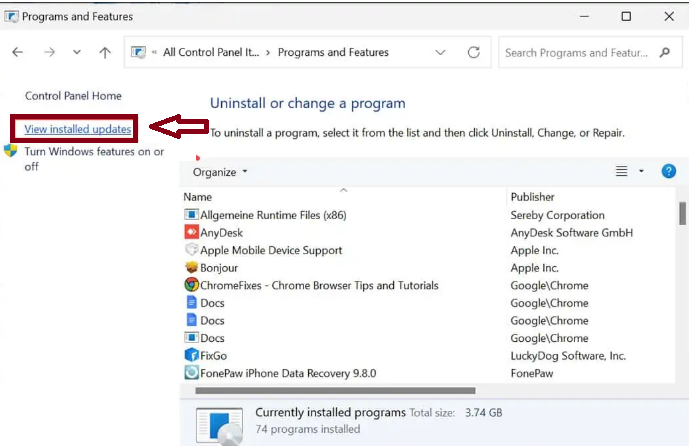
Step 1: In the Search field enter Control Panel and open it by clicking the icon > Search for the “Programs” area and click on Uninstall a Program
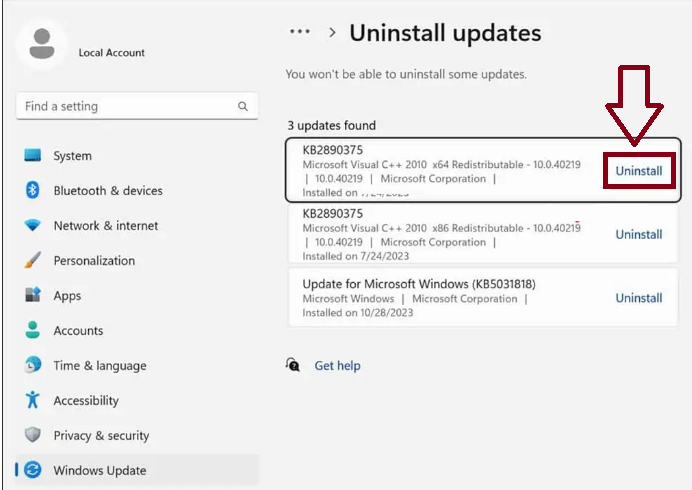
Step 2: In the last sidebar, select View Installed Updates
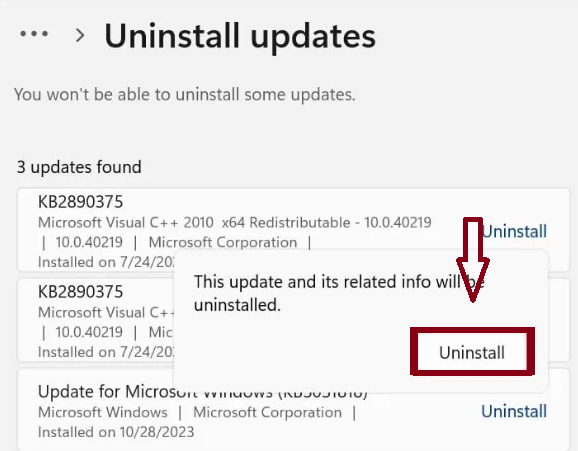
Step 3: Now identify the last updates and select Uninstall for each one
Step 4: Confirm each update’s un-installation as instructed.
Step 5: Finally Reboot your PC and see if the issue still persists
Method 7: Unplug External Hardware and Restart
External devices sometimes create nuisance which nay eventually lead to system-level errors. To check if an external hardware is the issue.
Step 1: First of all shut down your PC > disconnect all the external devices such as printers, fax, machines, USBs, external hard drives etc.
Step 2: Now Restart your PC and see if the error persists > if it’s resolved, reconnect each device one at a time to identify the problematic one.
Method 8: Check System Log in Event Viewer
The Event Viewer in Windows Provides detailed information about System events and errors. To get started with the troubleshooter:
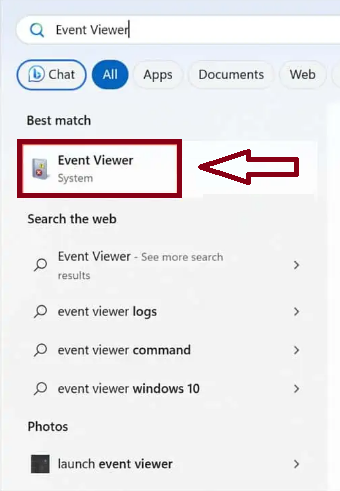
Step 1: In the Window Search bar, type in Event Viewer and click on its icon
Step 2: Now search for errors and logs that are connected to the BSOD event
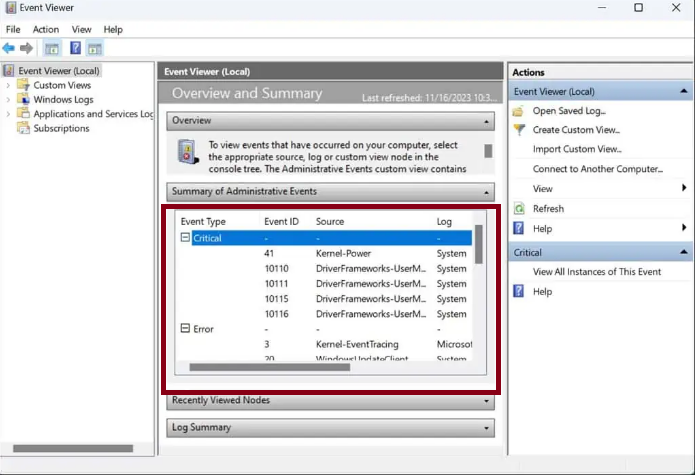
Step 3: Note any drivers or applications referenced in these logs
Method 9: Run DISM and SFC Command
If you are still struggling with Status_Image_Checksum_Mismatch Error, you can run SFC and DISM Scans to verify the integrity of the files.
Here’s how:
Step 1: Open Terminal (Admin) by right-clicking the Start button and choosing it from menu
Step 2: In the terminal, type in the following and press Enter key
DISM /Online /Cleanup-image /Restorehealth
Step 3: Once the DISM Command finishes successfully, execute
sfc /scannow
Step 4: Once the process is completed, restart your PC
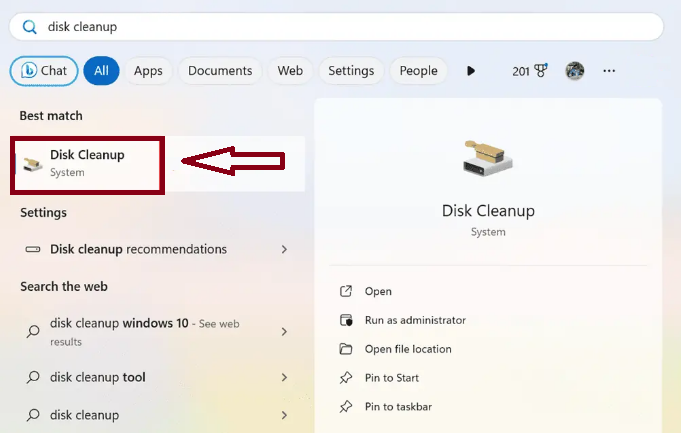
Method 10: Clean Junk from your Device
Sometimes the junk accommodated in your PC may create troubles, so it’s better to clean junk from your device.
Use the following step to use Disk Cleanup on Windows:
Step 1: In the Search bar, type in Disk Cleanup and launch it by clicking the icon
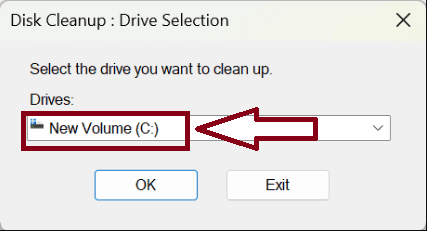
Step 2: Choose your main drive from the dropdown list and click OK
Step 3: Now sincerely tick the boxes for items you consider redundant and safe for deletion
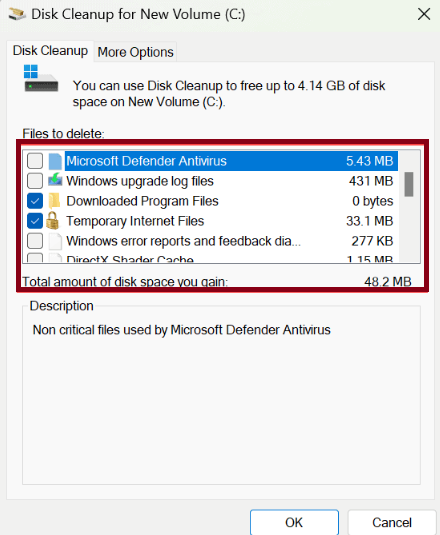
Step 4: Now press OK to initiate Disk Cleanup and then wait as it clears the chosen files from your system disk
Method 11: Check for BIOS or Firmware Updates
You are likely to face the above mention error due to outdated BIOS or firmware. So ensure to update it to the latest version.
Here’s how:
Step 1: Visit your PC or motherboard manufacturer’s website > look for the latest BIOS or firmware updates compatible with your model.
Step 2: Now follow the manufacturer’s instructions to update your BIOS or firmware.
Method 12: Use Windows Restore Feature
Windows provides a Restore feature which revert your PC to the earlier state. To proceed with the method follow the below mention guidelines:
Here’s how:
Step 1: Activate Automatic Repair Mode by repeatedly force restarting your PC > Select Troubleshoot
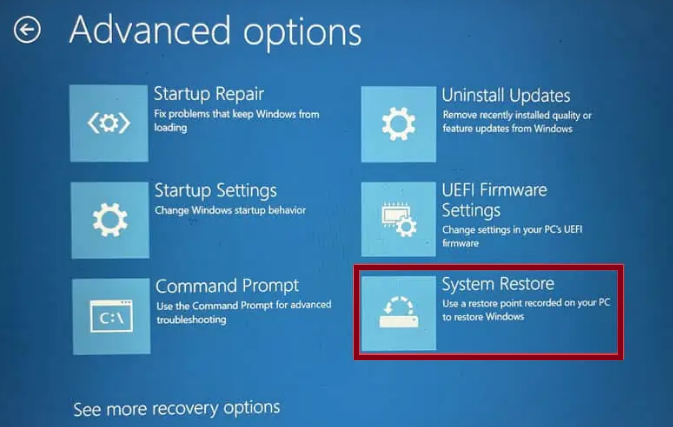
Step 2: Within the “Troubleshoot” menu proceed to Advanced Options
Step 3: Now look for and choose System Restore
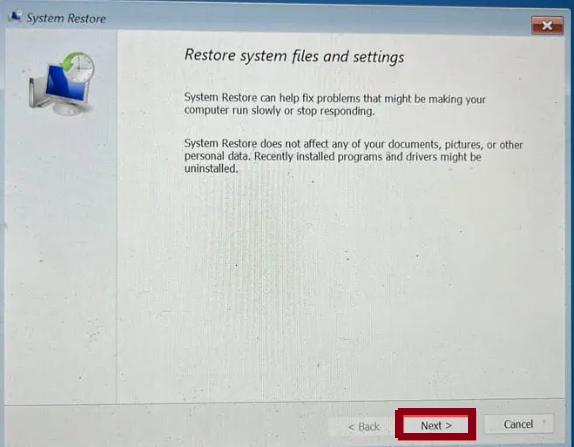
Step 4: Now click Next to begin
Step 5: Choose a restore point from the list, ideally the oldest one available
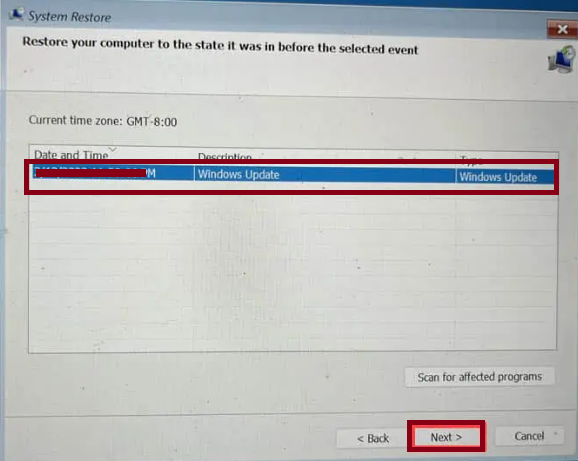
Step 6: Confirm by clicking Finish

Method 13: Reset Windows
If none of the above mentioned methods works for you it is suggested to reset Windows. To get started with the method, follow the below mention guidelines:
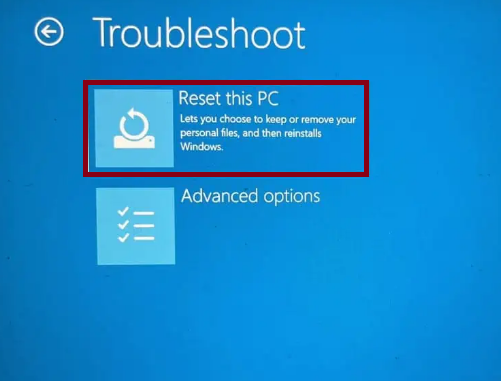
Step 1: Initiate Automatic Repair Mode by restarting your device multiple times > Once in Automatic Repair Mode, select Troubleshoot
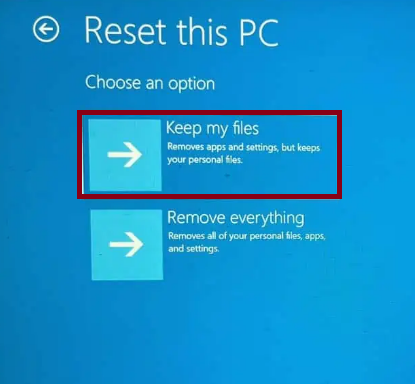
Step 2: On the next screen, choose Reset This PC
Step 3: Now decide whether to keep your files or remove them all > For a complete Reset, choose Remove Everything
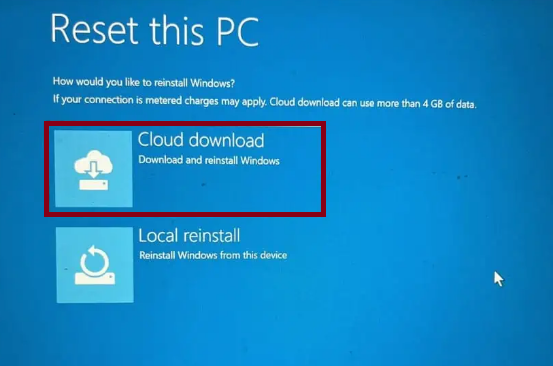
Step 4: Select how you wish to reinstall Windows, whether through a Cloud download or a Local reinstall
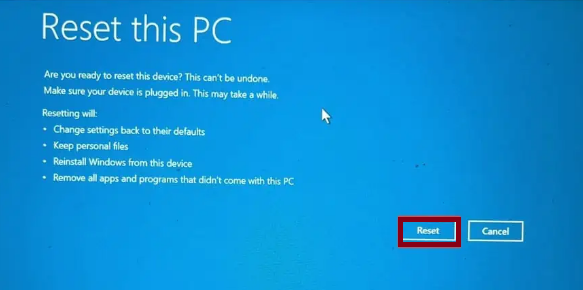
Step 5: Now click the Reset button
Final Thoughts
Here we conclude the article; we have tried to mention all the possible methods to resolve Status_Image_Checksum_Mismatch Error. It’s pertinent to mention all the above discussed methods are tried and tested but if you are looking for a quick solution, you can try an automatic Repair Tool. This PC Repair Tool is capable for resolving errors originated due to system corruption.


