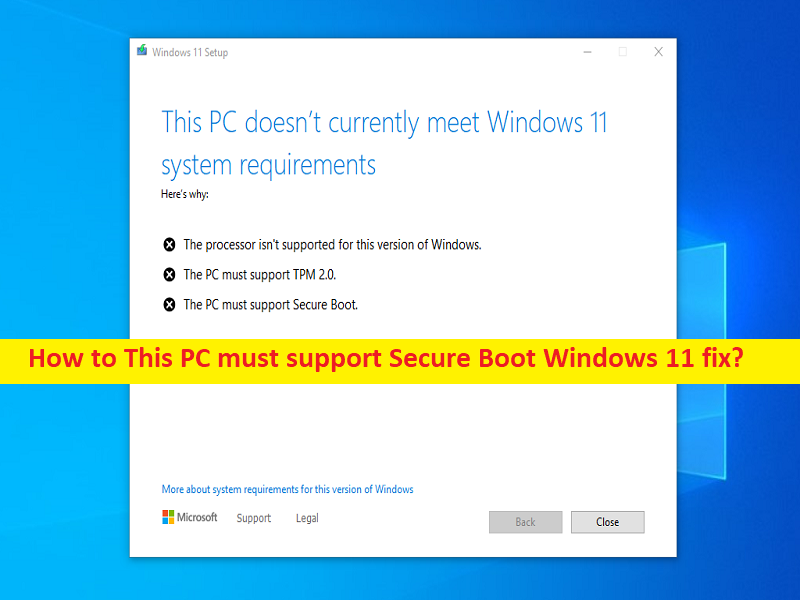
What is ‘This PC must support Secure Boot’ error Windows 11?
In this article, we are going to discuss on How to This PC must support Secure Boot Windows 11 fix, How to fix This PC must support Secure Boot Windows 11. You are provided with easy steps/methods to resolve the issue. Let’s starts the discussion.
‘This PC must support Secure Boot’ in Windows 11:
It is common Windows 11 Installation error usually appeared during Windows 11 installation and setup. When you try to upgrade your Windows PC to Windows 11 or try to perform Clean Windows 11 Installation and setup, you may experience Windows Installation/upgrade files with ‘This PC can’t run Windows 11’ error with message saying ‘This PC must support Secure Boot’ on screen. This error indicates you are unable to finish Windows 11 installation/upgrade possibly due to issue with Secure Boot feature in your computer.
If you are not aware, Secure Boot is a security feature that blocks malware or unwanted programs from loading when your computer starts up. It is required feature to have enabled in your Windows computer if you want to install Windows 11 computer. You should make sure your PC supports Secure Boot feature and is enabled in your computer properly if you don’t to face This PC must support Secure Boot Windows 11. If you are look for ways to fix on the web, then you are in right-place for the solution. Let’s go for the solution.
How to This PC must support Secure Boot Windows 11 fix?
Method 1: Check if Secure Boot is enabled without entering BIOS
Step 1: Press ‘Windows + R’ keys on keyboard, type ‘msinfo32’ in ‘Run’ window and hit ‘Ok’ button to open ‘System Information’ window
Step 2: Find and select ‘Secure Boot State’ option in right-pane, and check if it is ON or OFF. If it is OFF, Secure Boot is disabled.
Method 2: Enable Secure Boot feature through BIOS
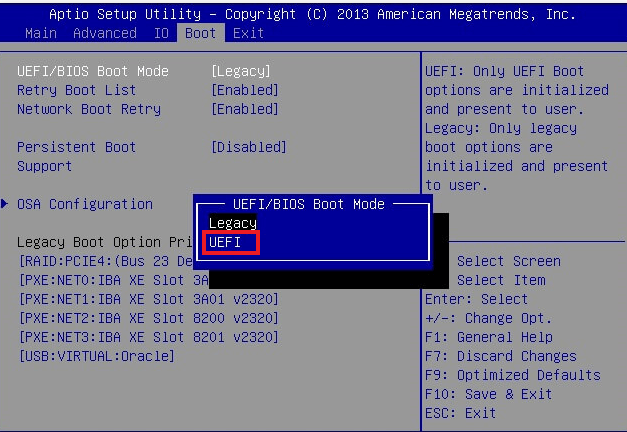
If you investigate Secure Boot feature is not enabled using above method, then you can follow the below steps to enable it.
Step 1: Open ‘Settings’ app in Windows PC via Windows Search Box and go to ‘Update and Security > Recovery > Advanced Startup’ and click ‘Restart Now’ button
Step 2: Select ‘Troubleshoot > Advanced Options > UEFI Firmware Settings’ option. Your PC will then restart in BIOS mode. Now, click ‘Security’ tab and select ‘Secure Boot’ option
Step 3: Enable Secure Boot by toggling the option to ‘ON’ and accept the changes. Once done, save and exit BIOS settings, and then restart your computer normally, check if you can install Windows 11 without error.
Method 3: How to bypass the Secure Boot requirement? [Windows Insider account needed]
You can also avoid or bypass Secure Boot requirement to fix This PC must support Secure Boot Windows 11.
Step 1: Login into your Windows Insider account and go to ‘Microsoft’s dedicated webpage’, and download ‘Windows 11 Preview Build’. You have to log into your Insider account and set into Dev Channel
Step 2: Choose ‘Windows 11’ under ‘Select Edition’ and click ‘Confirm’. The download will start and you will get Windows 11 ISO
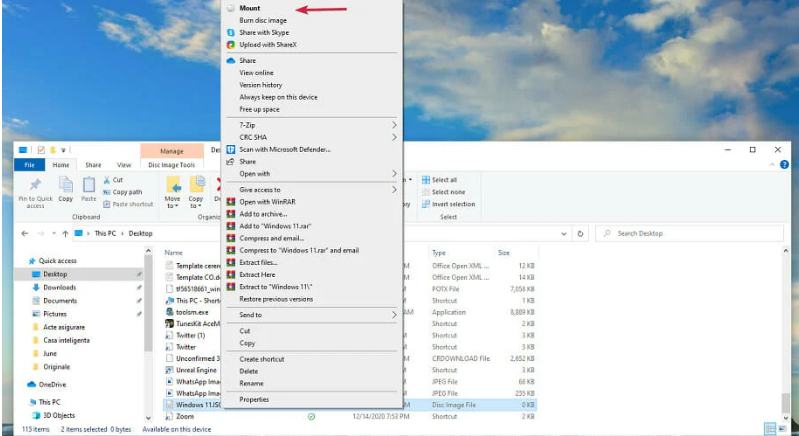
Step 3: Open ‘File Explorer’ in Windows PC and locate the Windows 11 ISO you just downloaded, right-click it and select ‘Mount’. Go to ‘Windows 11 Image’ and select all files, and copy all them into a new folder like Windows 11 folder
Step 4: Now, access ‘Sources’ folder within your Windows 10 Image and locate ‘appraiserres.dll’, and copy and then paste it into ‘Sources’ folder of ‘Windows 11’ folder you created, and confirm replacement.
Step 5: Once done, double-click on Windows 11 setup and follow on-screen instructions to finish installation, and check if the issue is resolved.
Fix Windows PC Issues with ‘PC Repair Tool’:
‘PC Repair Tool’ is easy & quick way to find and fix BSOD errors, DLL errors, EXE errors, problems with programs/applications, malware or viruses infections in computer, system files or registry issues, and other system issues with just few clicks.
Conclusion
I hope this article helped you on How to This PC must support Secure Boot Windows 11 fix with easy ways. You can read & follow our instructions to do so. That’s all. For any suggestions or queries, please write on comment box below.


