When you boot your computer and see a black screen with Fixing (C:) Stage 1 message, this means that your system is Disk Error Checking which detects hard drive issues and fix them. It usually takes a long time to finish or even get stuck at certain percent.
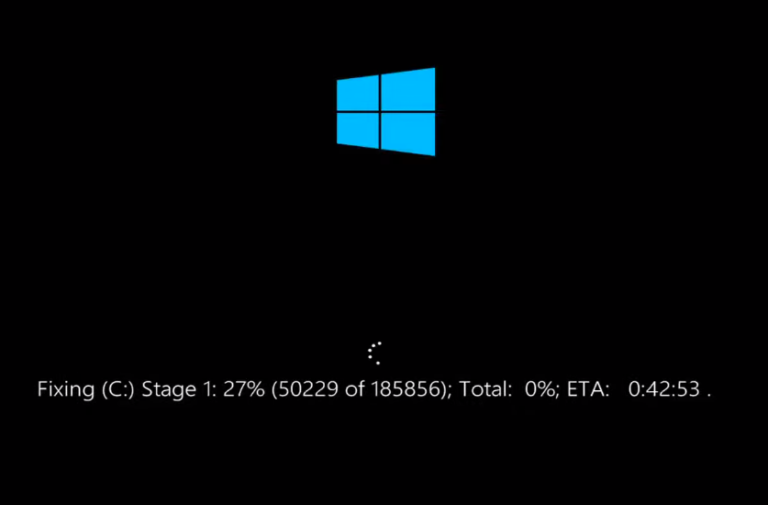
If you have a very old computer or hard drive then that might be the issue. ChkDsk or Disk Error Check display C Drive or D Drive then you have to stop the process otherwise it will keep happening whenever you boot your computer.
Other reasons for this error to occur includes
- Damaged Hard Drive
- Improper Shut Down of Computer
- Corrupted Hard Drive
- Too many junk files and heavy load.
You can stop this process by various different methods and we have given all of them below.
Using Registry Editor
Step 1: Press Win + R key to open RUN dialogue box.
Step 2: Type regedit and press Enter and click the Yes option.
Step 3: Find the path given below
HKEY_LOCAL_MACHINE\SYSTEM\CurrentControlSet\Control\SessionManager
Step 4: Find a file named Multi-String and double click on it.
Step 5: Change the value to
autocheck autochk /k:C
Replace the C with the drive letter you have problem with.
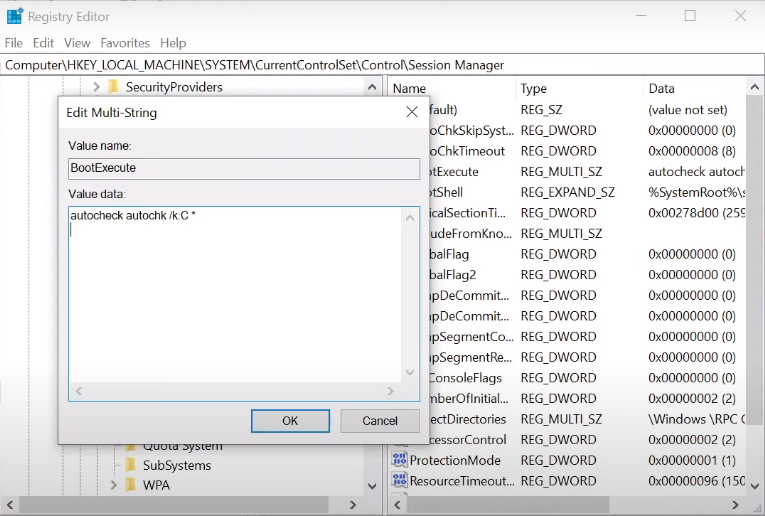
Step 6: Click Ok to confirm. Restart your computer and see if the message pop-up or not.
Note – Always make a backup of the registry files that you intend to modify just to make sure if anything goes wrong you can fix it with the recovery files.
Using Chkdsk Command
By using Command Prompt and command line you can somewhat prevent this error from happening. To do so, follow the steps along
Step 1: Press Windows start icon and type Command Prompt in the search bar.
Step 2: Right click on Command Prompt, then click Run as Administrator.
Step 3: Press yes button if User Account Control prompt is shown. This will give your Command Prompt administrative privileges, which is needed for further steps.
Step 4: Type chkdsk c: /r and press Enter key.
Step 5: If it asks you to confirm anything then type”y” for yes and hit Enter.
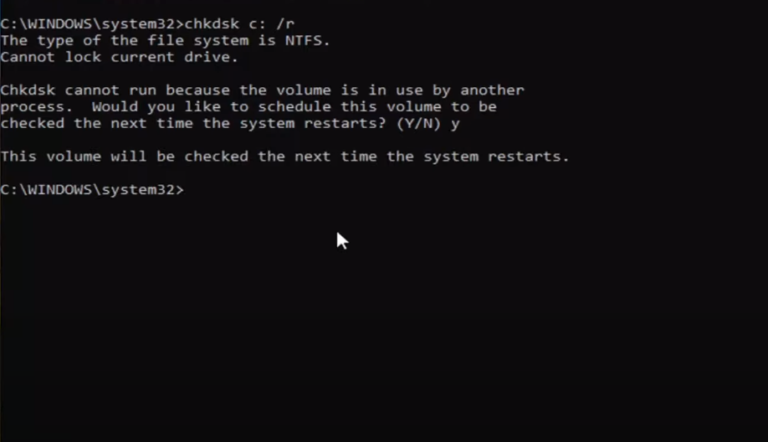
Step 6: Reboot your computer.
Using Chkntfs Command
Step 1: Open Command Prompt with administrative privileges. The steps are mentioned above.
Step 2: Type the following and press Enter.
chkntfs /x c:
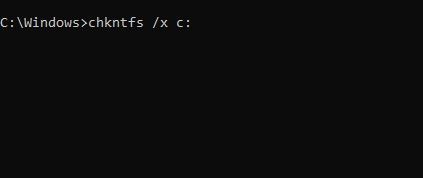
Step 3: Restart your computer to save the changes.
If Fixing C Stage 1 Windows 10 error still shows then you have either a very old hard drive or damaged/corrupted hard disk drive. This error is very common and quite popular among older or older generation devices.
If your hard drive content or system files is either damaged or corrupted then this can become the reason by are greeted by this error while booting up your computer for that reason we suggest you to perform a full system scan. Manually scanning your complete system consumes a large amount of time therefore use Advance System Repair Tool. It scans the whole system thoroughly looking for errors, damaged registries or missing dll files and fixing them automatically.


