
Tips to reinstall DirectX in Windows 11/10:
In this article, we are going to discuss on How to reinstall DirectX Windows 11/10. You will be guided here with easy steps/methods to do so. Let’s starts the discussion.
‘Reinstall DirectX’ in Windows 11/10:
DirectX or Microsoft DirectX is software package interface capable of allowing software to communicate with Windows computer’s hardware. It is designed & developed to be used for multiple purposes like audio or video, for rendering video and audio for the game, or for rendering video or audio for the video file. DirectX Software allows Microsoft Platforms like Windows Operating System to communicate with a graphics card and sound card in Windows computer smoothly and effectively, to provide all the users with best multimedia experience.
DirectX has been constant throughout all different forms the Windows OS has taken, with different, newer versions of DirectX being bundled with newer iterations of Windows. Depending on Windows OS and system hardware architecture, or the video and audio files or the game you want to play, you may require different DirectX versions accordingly. If you investigate DirectX version is not compatible in your device, or DirectX is corrupted, then in such case, you can try to fix the issue by reinstalling DirectX of compatible version in computer. Let’s go for the steps to get DirectX of correct versions.
How to reinstall DirectX Windows 11/10?
Method 1: Download and install DirectX from official site
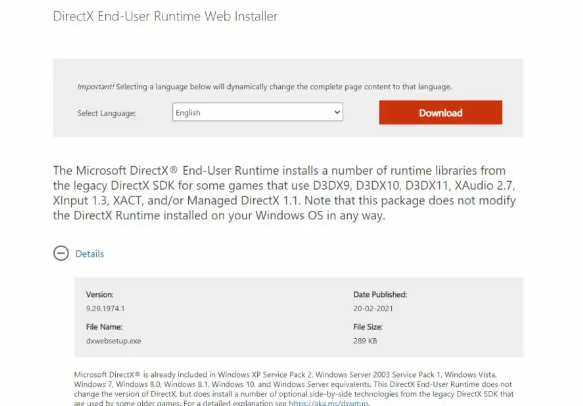
You can get DirectX installer from Microsoft Official site.
Step 1: Open your browser and visit ‘Microsoft Official’ site to get DirectX End-User Runtime Web Installer. Make sure to download DirectX of correct version.
Step 2: Once downloaded, double-click on downloaded setup and follow on-screen instructions to finish installation. Once installed, restart your computer
Method 2: Check for Windows Update
Updating Windows OS to latest version can reinstall DirectX of correct version in computer.
Step 1: Open ‘Settings’ app in Windows PC and go to ‘Update & Security > Windows Update’ and click ‘Check for updates’ button
Step 2: Download and install all available updates in computer and once updated, restart your computer and check if the issue is resolved.
Method 3: Disable third-party apps and services
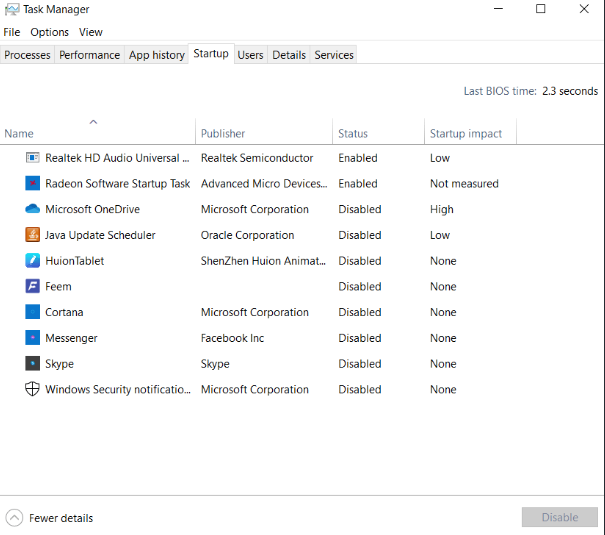
Interference of third-party apps and services could be a reason behind the issue with DirectX version. You can disable third-party apps and services in computer to fix the issue.
Step 1: Press ‘CTRL + SHIFT + ESC’ keys on keyboard to open ‘Task Manager’ app
Step 2: Click ‘Startup’ tab, right-click on all unnecessary services/app, and select ‘Disable’ to disable them, and then close ‘Task Manager’ app
Step 3: Now, open ‘System Configuration’ app in Windows PC via Windows Search Box, and click ‘Services’ tab
Step 4: Select ‘Hide all Microsoft Services’ checkbox, and hit ‘Disable All’ button to disable them, and then hit ‘Apply > Ok’ button to save the changes and check if the issue is resolved.
Method 4: Run SFC scan
Corruption in Windows system files could be a reason behind the issue with DirectX installer or installation. You fix the issue or reinstall DirectX by running SFC scan in computer to repair system files.
Step 1: Type ‘cmd’ in Windows Search Box and press ‘CTRL + SHIFT + ENTER’ keys on keyboard to open ‘Command Prompt as Administrator’
Step 2: Type ‘sfc /scannow’ command and hit ‘Enter’ key to execute. Once executed, restart your computer and check if the issue is resolved.
Conclusion
I hope this post helped you on How to reinstall DirectX Windows 11/10 with easy ways. You can read & follow our instructions to do so. That’s all. For any suggestions or queries, please write on comment box below.


