Tips to fix WMI Provider Host high CPU usage Windows 11:
In this article, we are going to discuss on How to fix WMI Provider Host high CPU usage Windows 11. You will be guided here with easy ways to resolve the issue. Let’s starts the discussion.
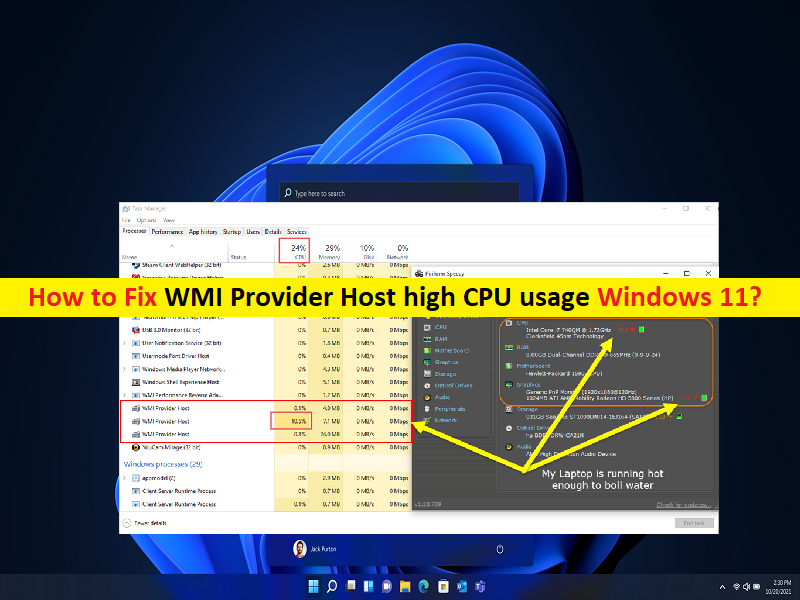
‘WMI Provider Host high CPU usage issue in Windows 11’:
‘WMI Provider Host’: WMI Provider Host or WmiPrvSE.exe is legitimate Windows process/program. WMI stands for Windows Management Instrumentation Provider Service. It is components of Microsoft Windows OS that provides management information and control. It allows applications to run, meaning that it’s necessary to be on your computer. WMI Provider Host also used to provide management information and control in an enterprise environment.
However, several users reported they faced WMI Provider Host high CPU usage Windows 11 or WMI Provider Host high CPU usage issue on their Windows 11 computer. When you open Task Manager apps in order to check which program/process is causing system performance slowdown issue, you may experience WMI Provider Host process is showing higher percentage under CPU usage section.
There could be several reasons behind the issue including the corruption in system files or registry, malware or viruses infections in computer, interference of third-party applications/services, corruption in Windows computer, and other issues. It is possible to fix the issue with our instructions. Let’s go for the solution.
How to fix WMI Provider Host high CPU usage Windows 11?
Method 1: Fix ‘WMI Provider Host high CPU usage’ with ‘PC Repair Tool’
‘PC Repair Tool’ is easy & quick way to find and fix BSOD errors, DLL errors, EXE errors, problems with programs/applications, malware or viruses infections in computer, system files or registry issues, and other system issues with just few clicks.
Method 2: Perform Clean Boot
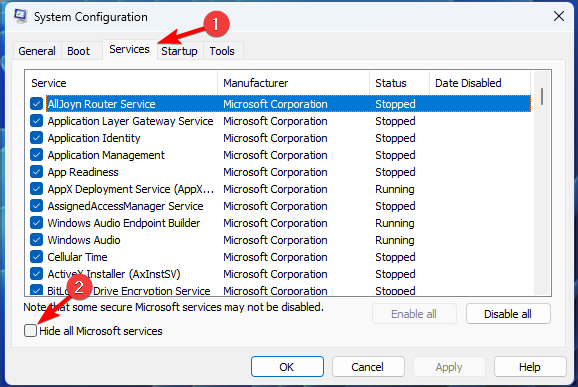
One possible way to fix the issue is to perform Clean Boot in computer.
Step 1: Open ‘System Configuration’ app in Windows PC via Windows Search Box
Step 2: Go to ‘Services’ tab, select ‘Hide all Microsoft Services’ checkbox, and hit ‘Disable All’
Step3: Click ‘Startup’ tab, click ‘Open Task Manager’ button. Disable the first application in the list using right-click menu and select ‘Disable’ to disable it and repeat the same steps to disable all applications and close Task Manager
Step 4: Finally, click ‘Apply > Ok’ button on System Configuration app to save the changes and then restart your computer, and check if the issue is resolved.
Method 3: Run System Maintenance troubleshooter
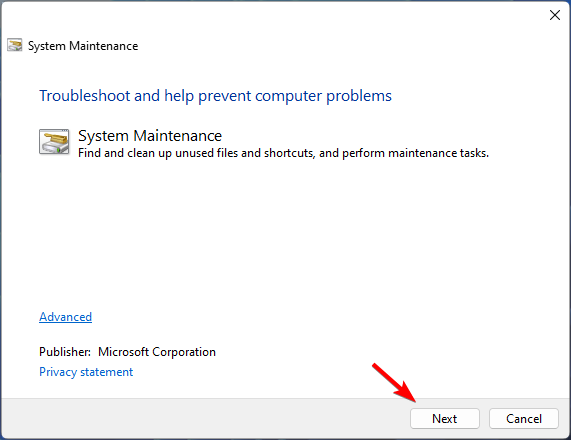
Step 1: Press ‘Windows + R’ keys on keyboard, type ‘msdt.exe -id MaintenanceDiagnostic’ in ‘Run’ window and hit ‘Ok’ button
Step 2: In the opened ‘System Maintenance’ window, click ‘Next’ and follow on-screen instructions. After running the system maintenance tool, verify that the issue has been resolved.
Method 4: Use Event Viewer
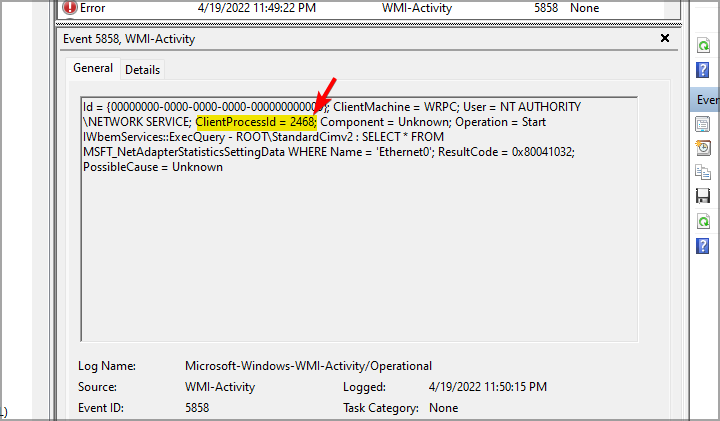
Step 1: Press ‘Windows +X’ keys on keyboard, select ‘Event Viewer’ form the list
Step 2: Upon launching Event Viewer, click on View from menu at top and select ‘Show Analytic and Debug Logs’
Step 3: Select ‘Applications and Service Logs’ and then Microsoft. Navigate to ‘Windows’ and expand ‘WMI Activity’ and select ‘Operational’
Step 4: Click on any available error to find out more information
Step 5: Locate ‘PrcessID’ and remember its value.
Step 6: Now, press ‘CTRL + SHIFT + ESC’ keys on keyboard to open ‘Task Manager’ app
Step 7: Click ‘Services’ tab and check each services’ PID, once you find the service that corresponds to value you noted down, you need to uninstall the application relating to that service or stop the service, and once done, check if the issue is resolved.
Method 5: Restart associated services
Step 1: Press ‘Windows + X’ keys on keyboard and select ‘Windows Terminal (Admin)’
Step 2: Type the following commands and hit ‘Enter’ key after each to execute.
net stop iphlpsvc
net stop wscsvc
net stop winmgm
net start winmgmt
net start wscsvc
net start iphlpsvc
Step 3: Once executed, restart your computer and check if the issue is resolved.
Conclusion
I am sure this post helped you on How to fix WMI Provider Host high CPU usage Windows 11 with easy ways. You can read & follow our instructions to do so. That’s all. For any suggestions or queries, please write on comment box below.


