Microsoft Store or Windows Stores one of the prominent applications which enables the users to install new applications and games. The store enables the users to purchase an array of applications and games. It’s provides a sense of reliability and prevents users from trusting unreliable sources.
But unfortunately, despite being one of the most resourceful in-built apps, it’s not error free. Time and again users have reported a number of errors related to this app. One instance of such errors is “Windows Store Error Code 0x80072EFD” This error is quite common in all the version of the Windows. It usually occurs while trying to use or open Windows Store, installing updates. And some users have also reported it while attaching new printer cameras or other devices to the PC for the first time. And once this error occurs, it prevents the users form accessing Microsoft Store normally.
Usually, the error message states “Check your connection. The store needs to be online”. Also the code behind the message is not limited to 0x80072EFD, sometimes it is 0x80072EE7, 0x801901F7 and 0x80072EFF. The error message itself implies that the user’s internet connection is unstable. But apart from this there are a number of factor that are capable for throwing the error. Some of the culprits are as follows:
#. Interference of Firewall or local Networks
Sometimes users receive this error because firewall or local networks prevents the PC from connecting to the Windows update site.
#. Proxy Server Settings
You are likely to face this error due to improper Proxy Server Configuration.
#. Outdated Windows version
Another prominent reason for receiving the above mention error is obsolete Windows version. Outdated Windows Versions often interrupt while accessing applications.
#.Corrupted Windows Store Cache
Cache are essential data which helps in enhancing the user’s experience but sometimes it gets corrupted and create such nuisance.
#. Lack of Permissions
If you have lack of permission in Windows Registry., you may get stuck with the above mention error.
There were some of the possible causes that lead to the above mention error. But don’t worry you can use the following tried and tested measures to deal with the trouble.
Method 1: Run the Windows Update Troubleshooter
You may face the above mention error due to Windows Update error. To tackle it, you can use the in-built tool to troubleshoot the Windows Update related issues.
Here’s how:
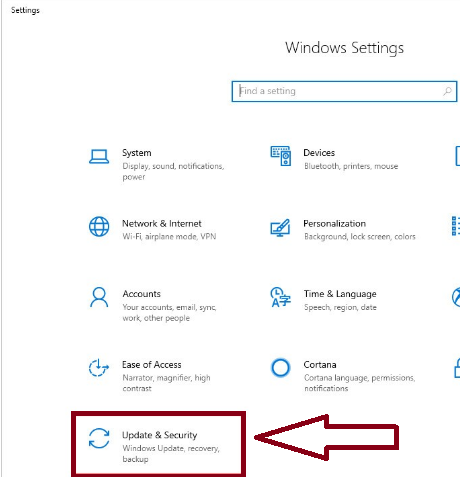
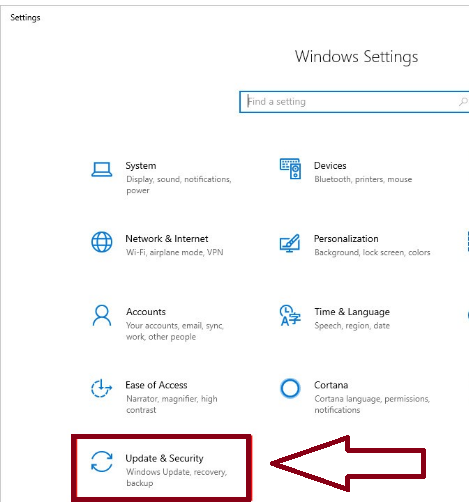
Step 1: Use Windows logos and I keys simultaneously> Click Update & Security
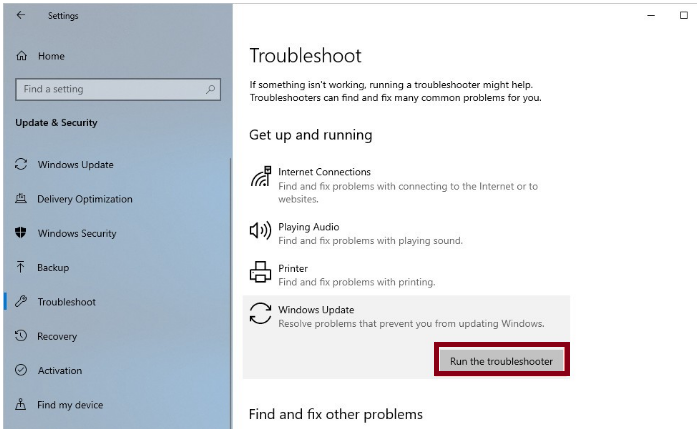
Step 2: Under Troubleshoot tab click Windows Update and then click Run the troubleshooter
Step 3: After finishing the troubleshooting process, restart your PC and see if the error resolved or not
Method 2: Run Windows Store Troubleshooter
In this method you are suggested to run Windows Store troubleshooter, to do so follow the below mention guidelines:
Step 1: Download Windows Store Apps Troubleshooter > double click the download file to run the Troubleshooter
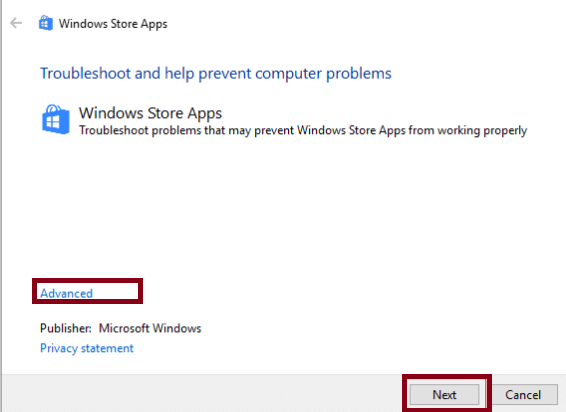
Step 2: Ensure to click on Advanced and checkmark “Apply repair automatically” > let the troubleshooter run
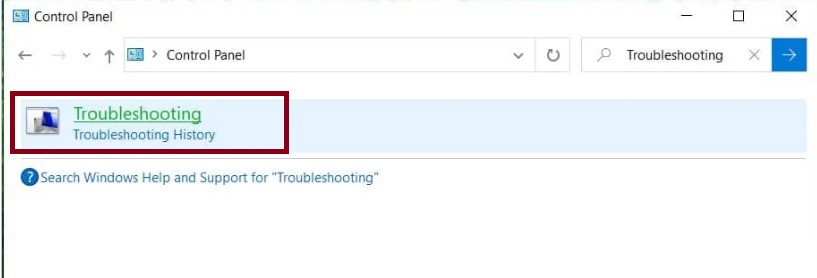
Step 3: Open Control Panel and search Troubleshooting in the Search Bar on the top right side and click on Troubleshooting
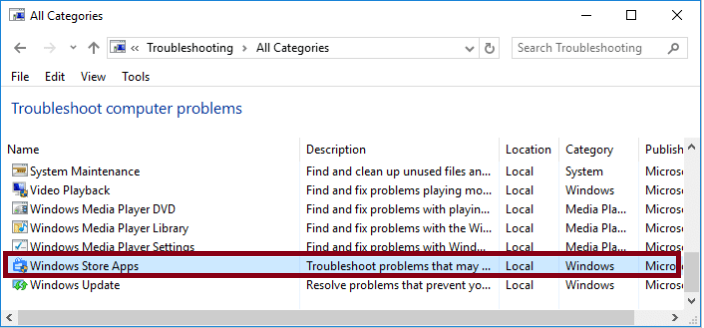
Step 4: Next, from the left Windowpane, select View all > then, from the Troubleshot PC issues list choose Windows Store Apps
Step 5: Follow the on-screen instructions and let the Windows Update troubleshoot run > Finally Restart PC to save the changes
Method 3: Update Windows
Outdated Windows Versions may lead to the above mention error; ensure to update our Windows to the latest version.
Here’s how:
Step 1: Use Windows + I Keys together > Click Update & Security
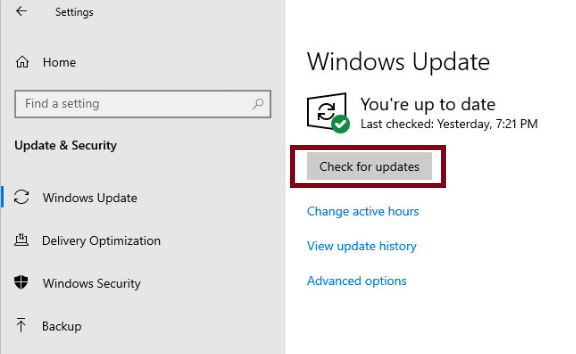
Step 2: Click Check for Updates first, then click Install Now
Step 3: Follow the instructions and then see if the issue resolved or not
Method 4: Reset Windows Store Cache
Several users have claimed that resetting Windows Store Cache resolved their error, so it is recommended to reset the Windows Store Cache:
Here’s how:
Step 1: Use Windows + R keys to open Run dialog box > In the prompted box, type in wsreset.exe and press Enter key.
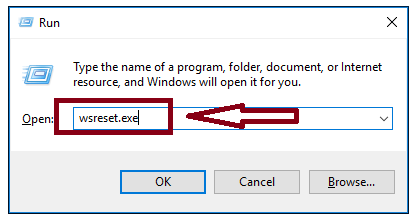
Step 2: Then, Command will run to reset the Store Cache> after that, restart your PC and see if the issue resolved or not
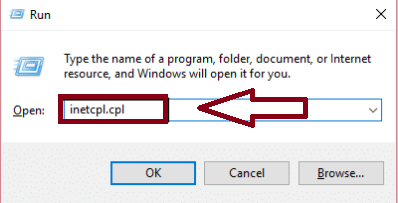
Method 5: Uncheck Proxy
If you are still struggling with Windows Store Error Code 0x80072EFD, it is suggested to uncheck the proxy. To do so use the following steps:
Step 1: Press Windows + R keys to open Run dialog box > In the prompted box, “inetcpl.cpl” and press Enter key to open Internet Properties.
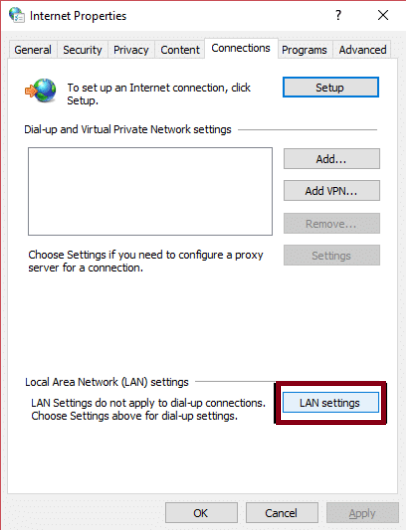
Step 2: Then go to Connections tab and then click on LAN Settings
Step 3: Uncheck Use a Proxy Server for your LAN and ensure “Automatically detect settings” is checked
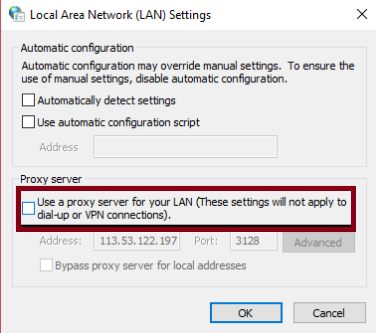
Step 4: Finally click OK then Apply and reboot your PC
Method 5: Turn Off Windows Firewall and Antivirus
Sometimes Windows Firewall or Antivirus Program can interfere with your connection when using MS Store. So you are suggested to disable them properly.
Here’s how:
Step 1: Navigate to Control Panel (view by large icons) and click Windows Defender Firewall
Step 2: Then Click the Turn Windows Defender Firewall on or off link from the left panel
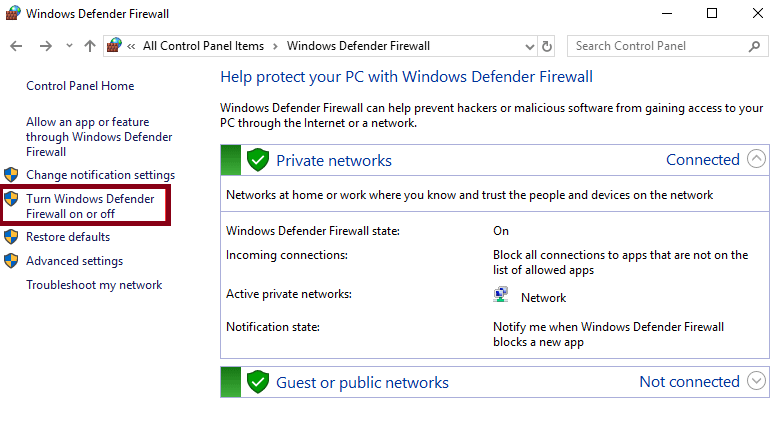
Step 3: Check the corresponding option to disable the firewall
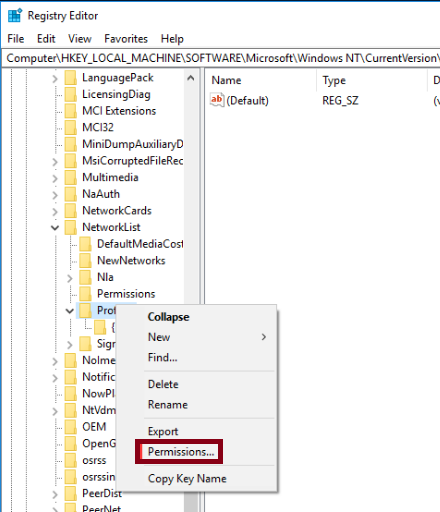
Method 6: Fix Permission Issues
Error Code 0x80072EFD may also get triggered if there is lack of permission in Windows Registry. So ensure to give proper permissions to resolve the error.
Note: Ensure to backup registry keys to avoid system issues.
Step 1: To open Run dialog box, use Windows + R keys > In the promoted box, type in regedit and click OK
Step 2: Navigate to this path:
Computer\HKEY_LOCAL_MACHINE\SOFTWARE\Microsoft\WindowsNT\CurrentVersion\NetworkList\Profiles
Step 3: Right-click on Profiles and select Permissions
Step 4: Click Advanced in the new window and check the option- Replace all child object permission entries with inheritable permission entries from this object.
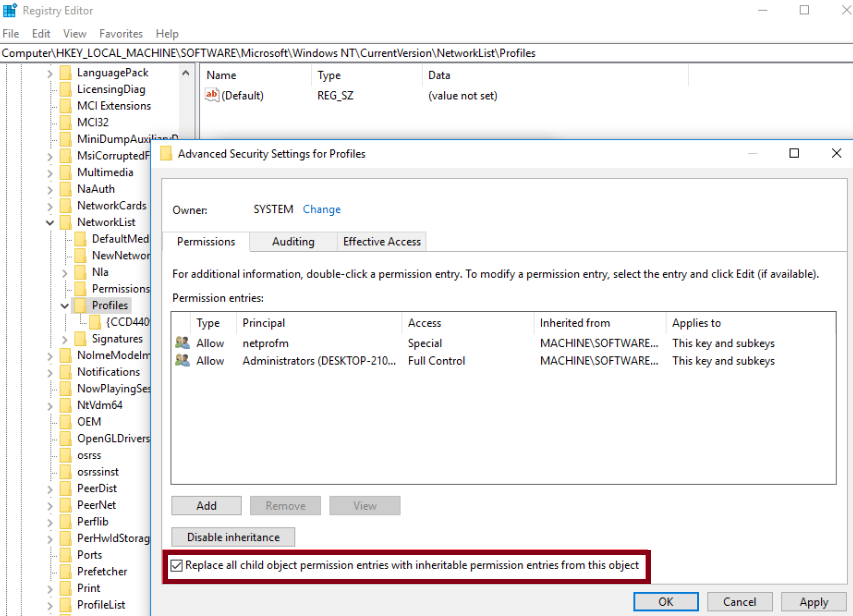
Step 5: Click Apply and OK
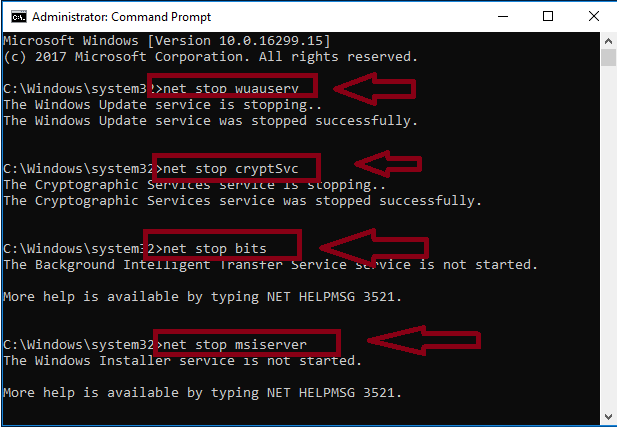
Method 7: Rename the Software Distribution Folder
In order to resolve the above mention error it is suggested to rename the Software Distribution folder that locates in the root folder of your PC’s HDD/SSD. To proceed us the following steps:
Step 1: Run Command Prompt with admin privileges > Run these commands one by one and type Enter after each one:
net stop wuauserv
net stop cryptSvc
net stop bits
net stop msiserver
Step 2: Use the Command:
ren X:\Windows\SoftwareDistribution SoftwareDistribution.old
Here, X means the drive letter of the partition which Windows is installed on, generally it is C.
Step 3: Type the following commands and don’t forget to press Enter key after each:
net start wuauserv
net start cryptSvc
net start bits
net start msiserver
Step 4: Close Exit Command Prompt and Restart your PC
Method 8: Reset Windows Update Component
Resetting Windows Update Component is also a prominent way to resolve the error. To do so follow the below mention guidelines:
But before proceeding with this method, it is suggested to create backups.
Step 1: Open Command Prompt > Press and right-click (or hold) Windows button on the Taskbar > Select Command Prompt (Admin) and when the User Account Control box shows up, Select Yes.
Step 2: Now you have to stop the BITS Service, Windows Update Service, and the Cryptographic services. At a Command Prompt type the commands below and click enter after entering each of them:
net stop bits
net stop wuauserv
net stop appidsvc
net stop cryptsvc
Step 3: Then you have to delete qmgr*.dat files by following this command at a command prompt > don’t forget to click Enter:
Del “%ALLUSERSPROFILE%\Application Data\Microsoft\Network\Downloader\qmgr*.dat”
Step 4: Now at a Command Prompt, type and click enter this command:
cd /d %windir%\system32
Step 5: Below you can see the list of Commands > You have to type them all and click enter after typing each of them > This step allows re-register the BITS files and the Windows Update Files.
regsvr32.exe atl.dll
regsvr32.exe urlmon.dll
regsvr32.exe mshtml.dll
regsvr32.exe shdocvw.dll
regsvr32.exe browseui.dll
regsvr32.exe jscript.dll
regsvr32.exe vbscript.dll
regsvr32.exe scrrun.dll
regsvr32.exe msxml.dll
regsvr32.exe msxml3.dll
regsvr32.exe msxml6.dll
regsvr32.exe actxprxy.dll
regsvr32.exe softpub.dll
regsvr32.exe wintrust.dll
regsvr32.exe dssenh.dll
regsvr32.exe rsaenh.dll
regsvr32.exe gpkcsp.dll
regsvr32.exe sccbase.dll
regsvr32.exe slbcsp.dll
regsvr32.exe cryptdlg.dll
regsvr32.exe oleaut32.dll
regsvr32.exe ole32.dll
regsvr32.exe shell32.dll
regsvr32.exe initpki.dll
regsvr32.exe wuapi.dll
regsvr32.exe wuaueng.dll
regsvr32.exe wuaueng1.dll
regsvr32.exe wucltui.dll
regsvr32.exe wups.dll
regsvr32.exe wups2.dll
regsvr32.exe wuweb.dll
regsvr32.exe qmgr.dll
regsvr32.exe qmgrprxy.dll
regsvr32.exe wucltux.dll
regsvr32.exe muweb.dll
regsvr32.exe wuwebv.dll
Step 6: Type the following Command at a Command Prompt and press Enter key to reset Winsock:
netsh winsock reset
Step 7: Then type the program below and click Enter key:
netsh winhttp reset proxy
Step 8: Now it’s time to restart the BITS Service, the Windows Update Service, and the Cryptographic services that were stopped at first. At a command prompt type these Commands and don’t forget to click enter after each of them.
net start bits
net start wuauserv
net start appidsvc
net start cryptsvc
Step 9: Now install the latest Windows Update Agent > Finally Restart the Computer
Method 9: Re-Register Windows Store
Re-registering the Window Store my also resolve the above mention error. To do so use the following guidelines:
Step 1: Use Windows Logo key + X keys to open WinX Menu > In the WinX Menu, locate and click on Command Prompt (Admin) to launch an elevated Command Prompt with admin privileges
Step 2: Now type the following into the elevated Command Prompt and press Enter key:
PowerShell -ExecutionPolicy Unrestricted -Command “& {$manifest = (Get-AppxPackage Microsoft.WindowsStore).InstallLocation + ‘\AppxManifest.xml’ ; Add-AppxPackage -DisableDevelopmentMode -Register $manifest}
Step 3: Once the Command have been fully executed, close the elevated Command Prompt
Step 4: Finally Restart the PC and wait for it to boot up > Once the PC boots up, try launching the Windows Store and see if the issue resolved or not.
Method 10: Set Time & Date
Setting the correct date & time may also help you in getting past the error. To try this solution, use the following:
Step 1: Press Windows & I keys together > Select Time & Language
Step 2: Toggle off Set Time automatically > Click Change under Change date and time
Step 3: Then select correct time & date after that click Change to confirm
Final Thoughts!
That’s all folks! We have provided ample solutions to resolve Windows Store Error Code 0x80072EFD. We have tied our best to mention all the simple methods to deal with the error. But if you don’t want to struggle with manual methods you can use an automatic PC Repair Tool. This professional tool is capable for dealing with any kind Windows Errors. So if you are looking for a hassle free solution, you can rely on this automatic solution.


