What is ‘Windows Store Error 0x80240024’ in Windows 10?
In this article, we are going to discuss on How to fix Windows Store Error 0x80240024 in Windows 10. You are provided with easy steps/methods to resolve the issue. Let’s starts the discussion.
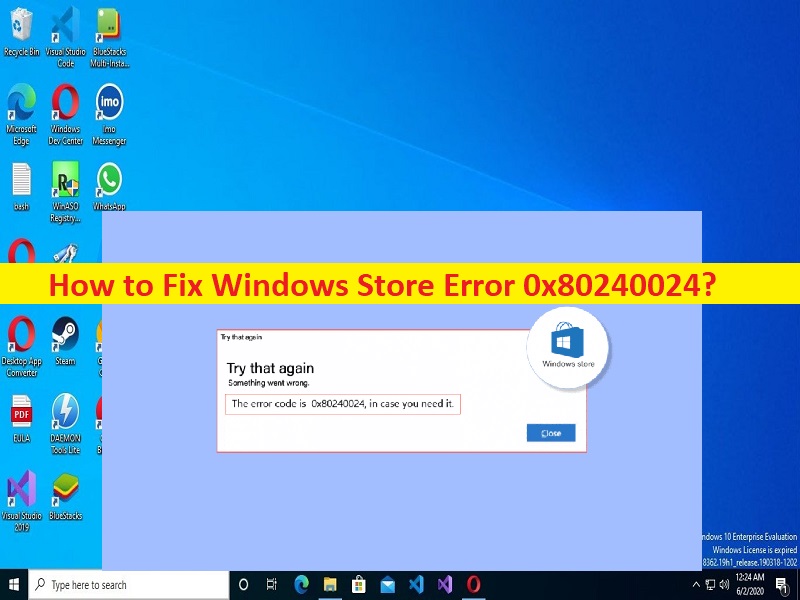
‘Windows Store Error 0x80240024’:
Microsoft Windows Store is app store from Microsoft allows you to download games and apps with a free Microsoft account. It is safe way to download applications and games without any danger of malware or unwanted programs. In Windows 10 computer, it is quite simple & easy to download and install apps and games using Microsoft Store. However, several users reported they faced Windows Store Error 0x80240024 when they tried to install games/apps from Microsoft Store in computer.
This issue indicates you are unable to download and install games/apps from Microsoft Store for some reasons. There could be several reasons behind the issue including corrupted/outdated cache of Microsoft Store app, corrupted Microsoft Store app itself, interference of some conflicting software, corruption in system files or registry or in system image, malware or viruses infections in computer, and other issues. If you are facing same issue and looking ways to fix, then you are in right-place for the solution. Let’s go for the solution.
How to fix Windows Store Error 0x80240024 in Windows 10/11?
Method 1: Fix Windows Store Error 0x80240024 with ‘PC Repair Tool’
‘PC Repair Tool’ is quick & easy ways to find and fix BSOD errors, EXE errors, DLL errors, problems with programs/applications, malware or viruses infections in computer, system files or registry issues, and other system issues with just few clicks.
Method 2: Run Windows Store Apps Troubleshooter
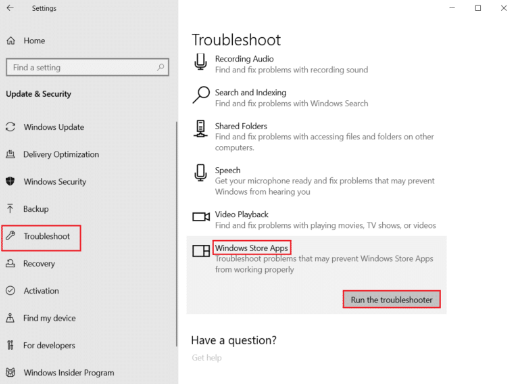
Windows built-in Windows Store Apps troubleshooter can resolve the issue.
Step 1: Open ‘Settings’ app in Windows PC via Windows Search Box and go to ‘Update and Security > Troubleshoot’
Step 2: Find and select ‘Windows Store Apps’ troubleshooter, and click ‘Run the troubleshooter’ button, and follow on-screen instructions to finish troubleshooting. Once finished, check if the issue is resolved.
Method 3: Logout of Windows Store and login again
Temporary issue with your Windows Store could be a reason behind the issue. You can logout of your Windows Store account and login again in order to fix.
Step 1: Open ‘Microsoft Store’ app in Windows PC and click your profile picture at top-right corner, and click ‘Sign Out’ under account you are currently logged into
Step 2: After logout, restart your computer and open ‘Windows Store’ again, and sign-in into your account, and then check if the issue is resolved.
Method 4: Clear Window Store Cache
Another way to fix the issue is to clear Windows Store cache in computer.
Step 1: Press ‘Windows + R’ keys on keyboard, type ‘wsreset.exe’ in ‘Run’ window and hit ‘Enter’ key to reset Windows Store
Step 2: Wait to finish the process and once done, check if the issue is resolved.
Method 5: Check for downloads in queue and stop it
Step 1: Open ‘Microsoft Store’ app and go to ‘Library’ in left pane
Step 2: Click ‘Stop’ button next to download in queue if any, and then check if the issue is resolved.
Method 6: Disable Sideload apps
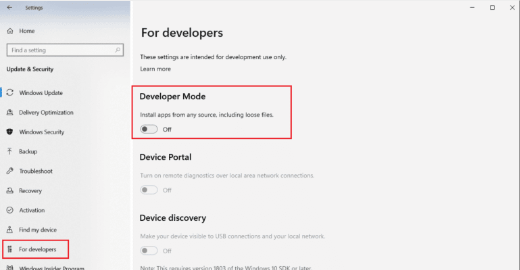
Step 1: Open ‘Settings’ app in Windows PC via Windows Search Box and go to ‘Update and Security > For Developers’
Step 2: Toggle off ‘Install apps from any source, including loose files’ option.
Method 7: Change region settings
This issue can be occurred due to some issue in your region. It might possible apps/games you are trying to install is not allowed to get in your region. You can set region correctly in order to fix.
Step 1: Open ‘Settings’ app and go to ‘Time & Language > Region’
Step 2: Make sure region dropdown box is set correctly on right-side, and check if the issue is resolved.
Method 8: Run BITS troubleshooter
Step 1: Open ‘Control Panel’ app in Windows PC via Windows Search Box and go to ‘Troubleshooting’ via search in control panel
Step 2: Find and double-click ‘Background Intelligent Transfer Service’ and follow on-screen instructions to finish troubleshooting. Once done, check if the issue is resolved.
Method 9: Run SFC Scan and DISM Scan
You can run SFC scan and DISM scan in computer to repair corruption in system files and system image in order to fix.
Step 1: Type ‘cmd’ in Windows Search Box and press ‘CTRL + SHIFT + ENTER’ keys on keyboard to open ‘Command Prompt as Administrator’
Step 2: Type the following commands and hit ‘Enter’ key after each to execute.
sfc /scannow
DISM /Online /Cleanup-Image /CheckHealth
DISM /Online /Cleanup-Image /ScanHealth
DISM /Online /Cleanup-Image /RestoreHealth
Step 3: Once executed, restart your computer and check if the issue is resolved.
Method 10: Enable necessary Windows services
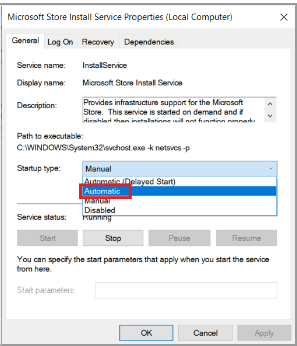
Step 1: Open ‘Services’ app in Windows PC via Windows Search Box
Step 2: Find and double-click ‘Windows Update’ service to open its Properties.
Step 3: Select ‘Automatic’ from ‘Startup Type’ dropdown, and hit ‘Start’ under ‘Service Status’ section, and then hit ‘Apply > Ok’ button to save the changes.
Step 4: Repeat the same steps for ‘Microsoft Store Install Services’, ‘Background Intelligent Transfer Service’. Once done, restart your computer and check if the issue is resolved.
Method 11: Postpone Windows updates
Another way to fix the issue is to postpone Windows updates in computer.
Step 1: Press ‘Windows + R’ keys on keyboard, type ‘gpedit.msc’ in ‘Run’ window and hit ‘Ok’ button to open ‘Local Group Policy Editor’ app, and go to following path
Computer Configuration > Administrative Templates > Windows Components > Windows Update
Step 2: Search for ‘Defer Upgrades and updates’ and double-click on it
Step 3: Select ‘Disabled’ radio option, and hit ‘Apply > Ok’ button to save the changes. Once done,e check if the issue is resolved.
Method 12: Perform Microsoft Store app reset
If the issue is still persist, you can try to fix the issue by performing Microsoft Store app reset in computer.
Step 1: Open ‘Settings’ app in Windows PC via Windows Search Box and go to ‘Apps > Apps & Features’
Step 2: Find and select ‘Microsoft Store’, and click ‘Advanced Options’ and click ‘Reset’, and confirm resetting. Once done, restart Microsoft Store and check if the issue is resolved.
Method 13: Reinstall Microsoft Store
Another way to resolve the issue is to reinstall Microsoft Store in computer.
Step 1: Right-click on ‘Start’ menu and select ‘Windows Powershell (Admin)’
Step 2: Type the following command and hit ‘Enter’ key to execute.
get-appxpackage –allusers
Step 3: Search for Microsoft.WindowsStore name and copy the entry of packagefullname. Now, execute the following command by adding line you have copied to ‘remove-appxpackage’
remove-appxpackage Microsoft.WindowsStore_22202.1402.2.0_x64__8wekyb3d8bbwe
Step 4: Once executed, restart your computer
Step 5: After restart, execute the following commands in Powershell window
Add-AppxPackage -register “C:\Program Files\WindowsApps\Microsoft.WindowsStore_11804.1001.8.0_x64__8wekyb3d8bbwe\AppxManifest.xml” –DisableDevelopmentMode
Step 6: Once executed, restart your computer again and check if the issue is resolved.
Conclusion
I hope this post helped you on How to fix Windows Store Error 0x80240024 in Windows 10/11 with easy ways. You can read & follow our instructions to do so. That’s all. For any suggestions or queries, please write on comment box below.


