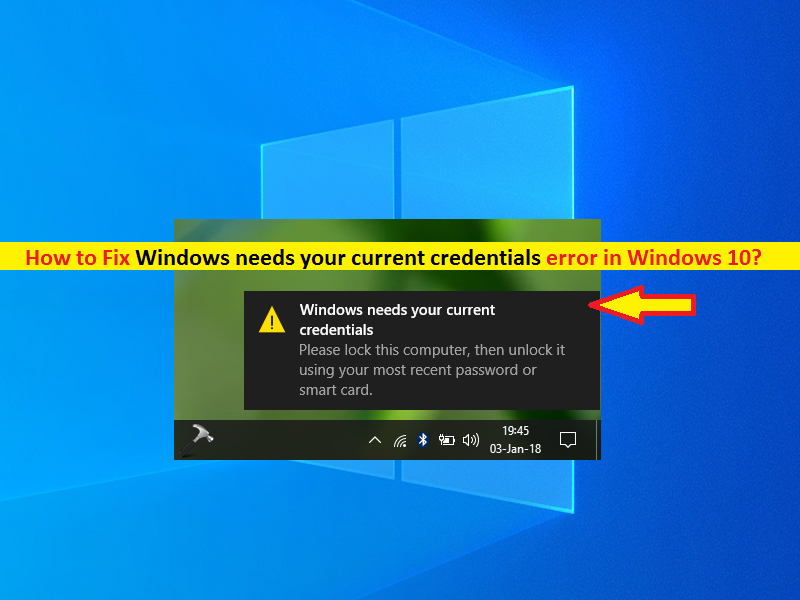
What is ‘Windows needs your current credentials’ error in Windows 10?
If you are experiencing ‘Windows needs your current credentials’ error while you login to your Windows 10 computer, then you are in right place for the solution. Here, you will be guided with easy steps/methods to resolve the error. Let’s starts the discussion.
‘Windows needs your current credentials’ error: It is common Windows Problem related to Windows login issue. This error is appeared in lower-right corner of Windows desktop in taskbar usually after login into your Windows 10 computer. Several users reported about this issue and explained they faced this error ever time when they logged-in into Windows 10 PC/laptop. But if you login with your password, lock the screen and repeat the login attempt, it just appears again, out of the blue. This can be rather annoying and it can make you wish you never pressed the start button on your machine altogether.
This issue indicates you need to enter current credentials in order to login into your Windows PC/laptop. This error is occurred with account that have password or PIN requirement login. Misconfigured Group Policy settings in your computer could be reason behind the issue and you can fix the issue just by applying certain changes in group policy settings. Another possible reasons behind this issue can be corruption in system files, hard disk system image, malware or viruses infections in computer, and unsupported your User Account. Let’s go for the solution.
How to fix Windows needs your current credentials error in Windows 10?
Method 1: Fix ‘Windows needs your current credentials’ error with ‘PC Repair Tool’
‘PC Repair Tool’ is easy & quick way to find and fix BSOD errors, DLL errors, EXE errors, problems with programs/applications, malware or viruses issues, system files or registry issues, and other system issues with just few clicks.
Method 2: Run SFC Scan and DISM scan in Windows 10

You can repair system files and hard disk system image by running SFC scan and DISM scan tool in Windows 10 in order to fix the error.
Step 1: Press ‘Windows + X’ keys on keyboard and select ‘Command Prompt as Administrator’
Step 2: Run SFC Scan. Type ‘sfc /scannow’ command and hit ‘Enter’ key to execute.
Step 3: Once executed, run DISM scan. Type the following command and hit ‘Enter’ key to execute
Dism /Online /Cleanup-Image /RestoreHealth
Step 4: Once executed, restart your computer and check if the error is resolved.
Method 3: Apply certain changes in Group Policy Settings in Windows 10
One possible way to fix the issue is to make certain changes to Group Policy Settings in your Windows 10 computer.
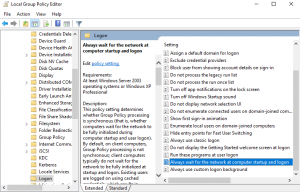
Step 1: Press ‘Windows + R’ keys on keyboard, type ‘gpedit.msc’ in the opened ‘Run’ window and hit ‘Ok’ button to open ‘Local Group Policy Editor’
Step 2: In the opened window, navigate to following path in left pane
Computer Configuration > Administrative Templates > System > Logon
Step 3: Once you select ‘Logon’, in right-pane, find and double-click on ‘Always wait for the network at computer startup and logon’ option to open its ‘Properties’
Step 4: In the opened window, if this option is Enabled, click ‘Disable’ or ‘Not Configured’ option, and then hit ‘Apply’ and ‘OK’ button to save the changes
Step 5: Close Group Policy Editor and restart your computer, and check if the error is resolved.
Method 4: Verify your User Account in Windows 10
Another possible way to fix the issue is to just verify your User Account in Windows 10 computer.
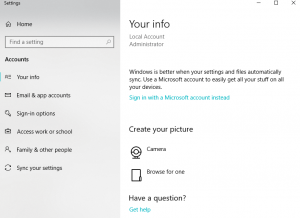
Step 1: Press ‘Windows + I’ keys on keyboard to open ‘Settings’ App in Windows 10
Step 2: In ‘Settings’ App, go to ‘Accounts > Your Info’ and hit ‘Verify Link’ next to your User Account. You will be lead to series on-screen instructions that you will need to follow to complete the process
Step 3: Once done, restart your computer to see the changes and check if it works for you.
Method 5: Activate Windows 10 trial version
Step 1: Open ‘Settings’ App in Windows using above method and go to ‘Update & Security > Activation > Change Product key’ option
Step 2: In the prompt appear, enter the following product key in required field and hit ‘Enter’ key. This will only activate the trail version
VK7JG_NPHTM_C97JM_9MPGT_3V66T
Step 3: Complete the installation until a login screen for upgraded OS appears with ‘Edition Upgrade completed’ message. Once done, check if the error is resolved.
Method 6: Perform System Restore
If the issue is still persist, you can try to fix the issue by performing system restore operation in computer. You can restore your computer to restore point according to date & time when there was no issue in your computer at all.
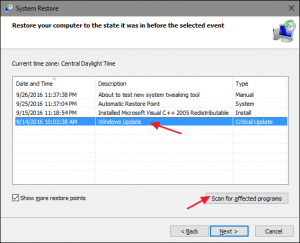
Step 1: Press ‘Windows + R’ keys on keyboard, type ‘rstrui’ in the opened ‘Run’ window and hit ‘Ok’ button to open ‘System Restore’
Step 2: In the opened window, click ‘Next’, select a valid restore point according to date & time when there was no issue in your computer, and select ‘Next > Finish’ to start restoring process
Step 3: Once done, restart your computer and check if the error is resolved.
Conclusion
I am sure this post helped you on How to fix Windows needs your current credentials error in Windows 10 with several easy steps/methods. You can read & follow our instructions to do so. That’s all. For any suggestions or queries, please write on comment box below.


