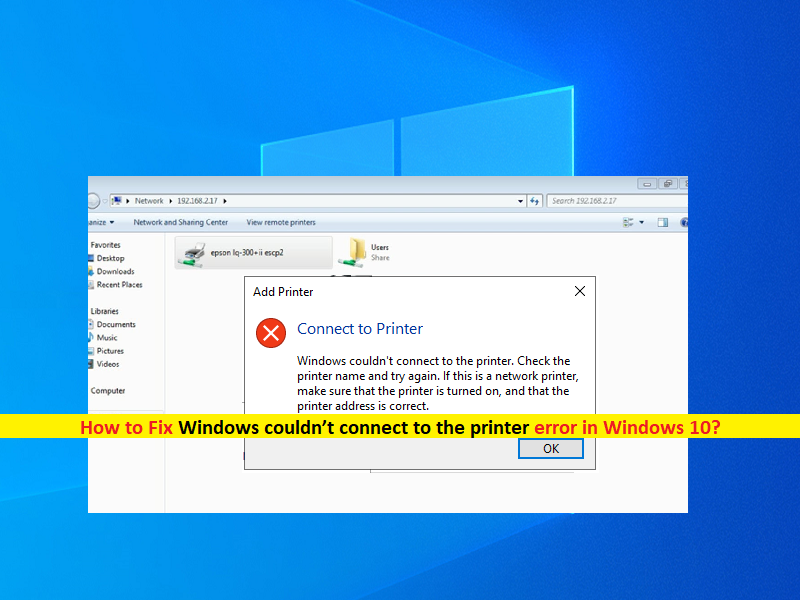
What is ‘Windows couldn’t connect to the printer’ error in Windows 10?
If you are facing ‘Windows couldn’t connect to the printer’ error in your Windows 10 computer while trying to add a network shared printer, then you are in right place for the solution. Here, you will be guided with easy steps/methods to resolve the error. Let’s starts the discussion.
‘Windows couldn’t connect to the printer’ error: It is common Windows Problem considered as Printer error. This printer error is usually appeared when you try to add a network shared printer in your Windows 10 computer. This issue is usually occurred in Windows 7 64-bit computer. However it is not limited and many, around 30% of users running 32-bit have also reported this. The same error is also appeared on Windows 10 computer where Windows 10 users reported that they were unable to add a network shared printer. Let’s take a look at error message.
“Windows cannot connect to the printer 0x0000007e”
This printer error is appeared with some error code like 0x0000007e. However, this error code may vary according to types of printer error you face. The possible reason behind the issue can be the stucked print spooler service, has a document pending in que locked, corruption or update and improper installation of printer driver, incorrect installation pushes the printer and system to lock for files in subfolder different then windows\system32 subfolder. Let’s go for the solution.
How to fix Windows couldn’t connect to the printer error in Windows 10?
Method 1: Fix ‘Windows couldn’t connect to the printer’ error with ‘PC Repair Tool’
‘PC Repair Tool’ is easy & quick way to find and fix BSOD errors, DLL errors, EXE errors, problems with programs/applications, malware or viruses issues, system files or registry issues with just few clicks. You can get this tool through button/link below.
Method 2: Create a new Local Port
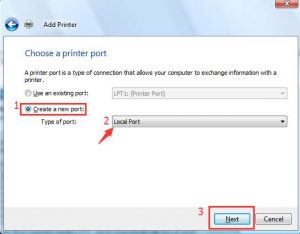
One possible way to fix the issue is to create new local port for your printer in your Windows 10 computer.
Step 1: Open ‘Control Panel’ in Windows 10 via Windows Search Box and go to ‘Devices and Printers’
Step 2: In the opened page, click ‘Add a printer’ option at top of window, select ‘Add a local printer’, and select ‘Create New port’ radio option, and select ‘Local Printer’ from ‘Type of port’ dropdown
Step 3: Type your printer’s P address in ‘Port Name’ field in following pattern
\\IP address or the Computer Name\Printer’s Name
Step 4: Finally, click ‘Ok’ button
Step 5: If you don’t known IP address of computer where printer is physically connected to, type ‘cmd’ in Windows Search Box and press ‘SHIFT + ENTER’ keys on keyboard to open ‘Command Prompt as Admisntrator’. In Command Prompt, type ‘ipconfig’ and hit ‘Enter’ key. Local for ‘IPv4 address’ for computer’s IP address, and then you can use this address in above steps.
Step 6: Now, continue with creating new local port means continue with step 5, select your printer model from folder to install its driver and hit ‘Next’
Step 7: After that, click ‘Next > Finish’ option to finish creating new local port. Once done, please check if the error is resolved.
Method 3: Copy mscms.dll file manually
This issue can be occurred if mscms.dll file is not placed in its destination folder. You can manually place the file in correct path in order to fix the issue.
Step 1: Open ‘File Explorer’ in Windows 10 and go to ‘System32 folder’ in your main drive, type ‘mscms.dll’ for search, right-click on the file, and select ‘Copy’ option
Step 2: Now, navigate to following path and paste the copied file
C:\windows\system32\spool\drivers\w32x86\3\
Or
C:\windows\system32\spool\drivers\x64\3\
Step 3: Once done, retry connecting network shared printer and check if the issue is resolved.
Method 4: Remove unnecessary printer drivers
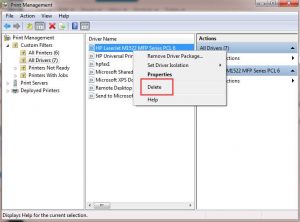
Step 1: Press ‘Windows + R’ keys on keyboard, type ‘printmanagement.msc’ in ‘Run’ window and hit ‘Ok’ button to open Print Management window
Step 2: In the opened window, double-click on ‘All Printers’, and delete the printer’s driver that is unnecessary or questionable by right-click on it and select ‘Delete’ option. Once done, please check if the error is resolved.
Download or reinstall printer drivers update in Windows 10 [Automatically]
You can also try to update all Windows drivers including printer driver using Automatic Driver Update Tool. You can get this tool through button/link below.
Method 5: Fix Windows couldn’t connect to the printer error using Registry Editor [For HP Printers]
Step 1: Press ‘Windows + R’ keys on keyboard, type ‘regedit’ in ‘Run’ window and hit ‘Ok’ button to open ‘Registry Editor’ and navigate to following path
HKEY_LOCAL_MACHINE\SYSTEM\CurrentControlSet\Control\Print\Printers\PRINTERNAME\CopyFiles\BIDI
Step 2: Locate entry for ‘spool\DRIVERS\W32X86\3\hpcpn6de.dll’ and delete it. Once done, retry connecting and check if the error is resolved.
Method 6: Delete Pre-existing driver files from registry
Step 1: Open ‘Registry Editor’ using above method and navigate the following path
HKEY_LOCAL_MACHINE\SYSTEM\ControlSet001\Control\Print\Printers\*YOUR PRINTER’S NAME*\CopyFiles
Step 2: Find and delete ‘ICM’ folder which is under ‘CopyFiles’ folder in registry editor and once done, please check if the error is resolved.
Method 7: Run Microsoft’s Automated Printer Troubleshooter
You can also try to fix the issue by running Microsoft’s Automated Printer Troubleshooter.
Step 1: Open your browser and download this troubleshooter from ‘https://download.microsoft.com/download/F/E/7/FE74974A-9029-41A0-9EB2-9CCE3FC20B99/PrinterDiagnostic.diagcab’ link
Step 2: Once downloaded, open the file with troubleshooting wizard and follow on-screen instructions to finish troubleshooting process and check if the error is resolved.
Method 8: Restart Print Spooler service
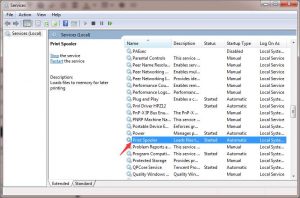
Step 1: Press ‘Windows + R’ keys on keyboard, type ‘services.msc’ in ‘Run’ window and hit ‘Ok’ button to open ‘Services’ window
Step 2: In the opened window, find and double-click on ‘Print Spooler’ service to open its ‘Properties’. In ‘Properties’ window, click on ‘Stop’ button to stop the service and after few seconds, select ‘Automatic’ option from ‘Startup Type’ dropdown and hit ‘Start’ button
Step 3: Finally, click ‘Apply’ and ‘OK’ button to save the changes and check if the error is resolved.
Conclusion
I am sure this post helped you on How to fix Windows couldn’t connect to the printer error in Windows 10 with several easy steps/methods. You can read & follow our instructions to do so. That’s all. For any suggestions or queries, please write on comment box below.


