
What is ‘Windows Camera error code 0xa00f4244’ issue?
In this post, we are going to discuss on “How to fix Windows Camera error code 0xa00f4244”. You will be guided with easy steps/methods to resolve the issue. Let’s starts the discussion.
‘Camera error code 0xa00f4244’ in Windows 10: It is common Windows Problem considered as Microsoft Windwos Camera App error. This error is appeared usually when you try to open Camera App in your Windows 10 computer. This error is appeared with NoCamerasAreAttached along with error code 0xa00f4244 when you try to open image file with Windows 10 build-in Camera App. This camera error also states it is being blocked by antivirus, and that you camera drivers are up-to-date. Let’s take a look at error message.
“We can’t find your camera. Check to make sure that it’s connected and installed properly, that it isn’t being blocked by anti-virus software, and that your camera drivers are up to date. If you need it, here’s the error code: 0xA00F4244 (0xC00DABE0)”
There could be several reasons behind the issue including the issue with camera/webcam driver, interference of your third-party antivirus/firewall program, issue with webcam/camera hardware and other issues in your Windows computer. You should make sure webcam/camera driver is properly installed in your computer and is up-to-date. Camera/webcam driver update is necessary in this case.
Also, you should make sure webcam (external) is properly connected to correct port of your computer and there is no issue with webcam device connection. It is possible to resolve the issue with our instructions. Let’s go for the solution.
How to fix Windows Camera error code 0xa00f4244?
Method 1: Fix NoCamerasAreAttached error 0xa00f4244 with ‘PC Repair Tool’
‘PC Repair Tool’ is easy & quick way to find & fix BSOD errors, EXE errors, DLL errors, problems with programs/applications, malware or viruses issues, system files or registry, and other system issues with just few clicks.
Method 2: Check if your webcam is properly connected/installed
Before troubleshooting the issue, you should make sure your webcam (external) is properly connected/installed in your computer and check if the webcam is connected to correct port of computer. You can disconnect and reconnect your webcam into correct port in order to fix the issue.
Method 3: Update webcam driver
Updating webcam driver can resolve the issue.
Step 1: Open Device Manager’ in Windows 10 via Windows Search Box and expand ‘Cameras’ or similar category to find your webcam
Step 2: Right-click on your webcam device driver and select ‘Update Driver’, and follow on-screen instructions to finish update process. Once done, restart your computer and check if it works for you.
Download or reinstall webcam driver update in Windows 10 [Automatically]
You can also try to update all windows drivers including webcam/camera driver using Automatic Driver Update Tool. You can get this tool through button/link below.
Method 4: Uninstall webcam/camera driver and then reinstall it
This issue can be occurred if webcam/camera driver is not properly installed in your computer. You can uninstall camera driver and then reinstall it in order to fix the issue.
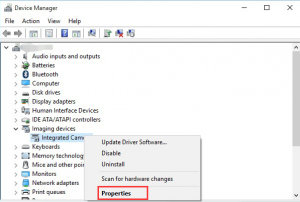
Step 1: Open ‘Device Manager’ in Windows 10 and expand ‘Cameras’ category or similar to find your webcam/camera device driver
Step 2: Right-click on your webcam/camera and select ‘Properties’. In Properties window, click ‘Driver’ tab and click ‘Uninstall Device’ and follow on-screen instructions to finish uninstall.
Step 3: After that, restart your computer. Restarting your computer can reinstall all necessary drivers including webcam/camera drivers in your computer, and check if the issue is resolved.
Method 5: Rollback webcam driver
You can rollback your camera/webcam driver to previous driver version in order to fix the issue.
Step 1: Open ‘Device Manager’ in Windows 10, right-click on your camera/webcam driver and select ‘Properties’
Step 2: Click on ‘Drivers’ tab, and click ‘Roll Back Driver’ button and follow on-screen instructions to install previous version of webcam/camera driver in computer and once done, restart your computer and check if the issue is resolved.
Method 6: Detect outdated webcam driver
Step 1: Open ‘Device Manager’, right-click on webcam driver and select ‘Properties’ and click ‘Drivers’ tab and select ‘Driver Details’
Step 2: You will find some driver files on your screen. Now, check whether you have any stream.sys file or not. If you see such a file in the list, your webcam/camera may not work with Windows 11/10. You need to buy a new one.
Method 7: Disable your antivirus software
It might possible your third-party antivirus/firewall programs installed in your computer is blocking camera application for some security reasons. You can disable your third-party antivirus/firewall temporarily in computer in order to fix the issue. If disabling antivirus didn’t work for you, you can uninstall your antivirus completely in computer in order to fix the issue.
Method 8: Reset Camera App
This issue can be occurred due to corrupted or outdated cache of Camera App in your computer. You can reset Camera App in order to fix the issue.
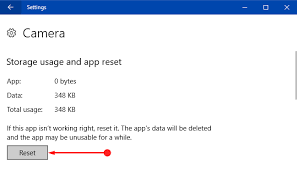
Step 1: Open ‘Settings’ App in Windows 10 and go to ‘Apps > Apps & Features’, find and select ‘Camera’ app and click ‘Advanced Settings’
Step 2: Click ‘Reset’ button and confirm the resetting process. Once done, restart your computer and please check if the issue is resolved.
Conclusion
I am sure this post helped you on How to fix Windows Camera error code 0xa00f4244 with several easy steps/methods. You can read & follow our instructions to do so. That’s all. For any suggestions or queries, please write on comment box below.


