What is ‘VMware does not support the user level monitor of this host’ error in Windows 10/11?
In this article, we are going to discuss on How to fix VMware does not support the user level monitor of this host error in Windows 10/11. You will be guided with easy steps/methods to resolve the issue. Let’s starts the discussion.
‘VMware does not support the user level monitor of this host’ error:
It is common error relating to VMware Workstation Pro error. This error is usually appeared when you can’t turn ON VMware Workstation Pro on Windows 10/11 computer. This issue is usually occurred due to compatibility issue between your Windows computer and VMware Workstation Pro software.
If you are not aware, you are unable run VMware Workstation Pro Software on Hyper-V enabled Windows 10/11 host computer possibly due to some features like VBS (Virtualization Based Security). Let’s take a look at error message.
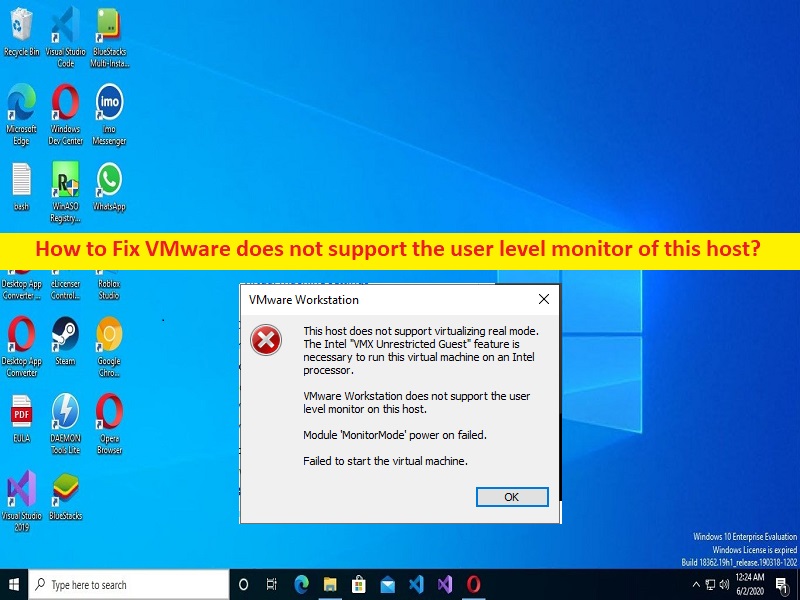
“This host does not support Intel VT-x.
This host does not support “Intel EPT” hardware assisted MMU virtualization.
This host appears to be running in a virtual machine with VHV disabled. Ensure that VHV is enabled in the virtual machine configuration file.
VMware Workstation and Device/Credential Guard are not compatible.”
As mentioned, this error can be occurred if you are trying to run VMware Workstation Pro on Hyper-V enabled Windows host computer. It means you can fix the issue by disabling Hyper-V feature and its relating services in computer, and check if it works for you. It is possible to fix the issue with our instructions. Let’s go for the solution.
How to fix VMware does not support the user level monitor of this host error in Windows 10/11?
Method 1: Fix VMware does not support the user level monitor of this host error with ‘PC Repair Tool’
‘PC Repair Tool’ is quick & easy ways to find and fix BSOD errors, DLL errors, EXE errors, problems with programs/applications, malware or viruses infections in computer, system files or registry issues, and other system issues with just few clicks.
Method 2: Disable Hyper-V feature

One possible way to fix the issue is to disable Hyper-V feature in Windows computer.
Step 1: Open ‘Control Panel’ app in Windows PC via Windows Search Box and select ‘Category’ from ‘View By’ dropdown at top-right corner
Step 2: Go to ‘Programs > Programs & Features’ and go to ‘Turn Windows Features ON or OFF’ in left pane
Step 3: Check ‘Windows Hypervisor Platform’ and ‘Virtual Machine Platform’, ‘Hyper-V’ checkboxes, and then hit ‘Ok’ button to save the changes. Once done, restart your computer and check if the issue is resolved.
Method 3: Stop all Hyper-V relating services
Another way to fix the issue is to disable all Hyper-V relating services in computer.
Step 1: Open ‘Services’ app in Windows PC via Windows Search Box
Step 2: Find and right-click on ‘Hyper-V’ and relating services one-by-one, and hit ‘Stop’ to stop the services, and once done, restart your computer and check if the issue is resolved.
Step 3: Or Double-click on each service one-by-one to open its Properties. Select ‘Manual’ from ‘Startup Type’ dropdown, and hit ‘Apply > Ok’ button to save the changes. Once done, check if the issue is resolved.
Method 4: Disable VBS (Virtualization based security)
This issue can occurred due to enabled Virtualization based Security in computer. You can fix the issue by disabling this feature in computer.
Step 1: Open ‘System Information’ app via Windows Search Box
Step 2: Select ‘System Summary’ in left pane and scroll down on right-side and check for ‘Virtualization based Security’.
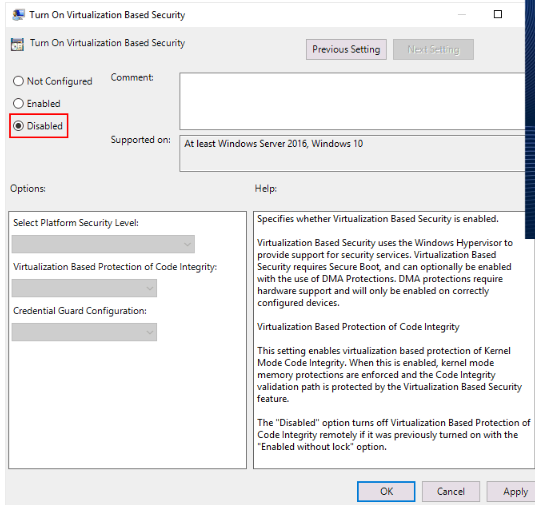
Step 3: If you see VBS technology is running, you need to disable it. To do so, you need to press ‘Windows + R’ keys on keyboard, type ‘gpedit.msc’ in ‘Run’ window and hit ‘Ok’ button to open Local Group Policy Editor app
Step 4: Go to ‘Computer configuration > Administrative Templates > System > Device Guard’
Step 5: Double-click ‘Virtualization Based Technology’ in right-pane to open its Properties, and select ‘Disabled’ radio option and hit ‘Ok’ button to save the changes. Once done, restart your computer and check if the issue is resolved.
Method 5: Disable Virtualization Based Security (VBS) via Registry Editor
Step 1: Open ‘Registry Editor’ app in Windows PC via Windows Search Box and go to following path
HKEY_LOCAL_MACHINE > SYSTEM > CurrentControlSet > Control > DeviceGuard
Step 2: Create ‘EnableVirtualizationBasedSecurity’ entry in right-pane. To do so, right-click on empty space in right pane and select ‘New > DWORD (32-bit) Value’ and name the registry value to ‘EnableVirtualizationBasedSecurity’
Step 3: Double-click on created value to edit, set its value data to ‘0’, and hit ‘Ok’ button to save the changes.
Step 4: Now, go to following path in Registry Editor app
HKEY_LOCAL_MACHINE > SYSTEM > CurrentControlSet > Control > Lsa
Step 5: Create ‘LsaCfgFlags’ registry value by following ‘step 2’, and double-click on created registry value to edit, and set its value data to ‘0’, and hit ‘Ok’ button to save the changes. Once done, restart your computer and check if the issue is resolved.
Method 6: Update VMware Workstation Pro
If the issue is still persist, you can try to fix the issue by updating VMware Workstation Pro Software to latest & compatible version in computer. You can get the latest update from its official site. Once updated, check if it works for you.
Conclusion
I am sure this article helped you on How to fix VMware does not support the user level monitor of this host error in Windows 10/11 with easy ways. You can read & follow our instructions to resolve the issue. That’s all. For any suggestions or queries, please write on comment box below.


