What is ‘UNCServer.exe’? Is UNCServer.exe a virus?
If you are experiencing ‘UNCServer.exe error’ or UNCServer.exe high CPU usage issue in your Windows 10 computer, then you are in right place for the solution. Here, you will be guided with easy steps/methods to resolve the issue. Let’s starts the discussion.
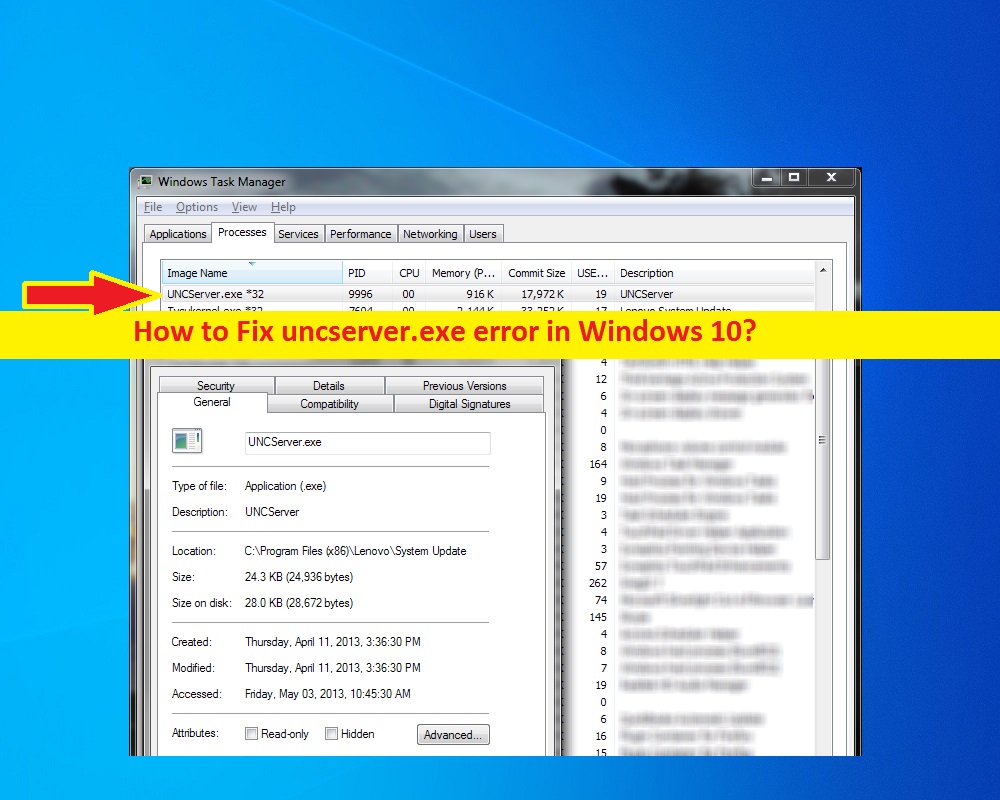
‘UNCServer.exe’: UNC stands for Universal Naming Convention. UNCServer.exe is executable file that runs as separate Windows task while System update is running. This executable is part of Lenovo System update. Usually, this module is started as soon as Windows update starts and it is responsible mainly for opening TCP and UDP ports that allow the incoming bandwidth during the update. This program runs at Windows Startup when Windows update initiates and end automatically when update has been applied.
UNCServer.exe module is required to run in your Windows computer when Windows update is running or installing new system files. However, several users reported that they faced ‘UNCServer.exe error’ or UNCServer.exe CPU Usage issue in their Windows computer. When they attempted to check which programs/processes causing high CPU usage problem, then they notice the program like UNCServer.exe is showing higher percentage in CPU usage section and indicates the program is draining system resources.
As mentioned, UNCServer.exe file is part of Lenovo System Update and doesn’t pose a security threat means it is not a virus. However, you can run system scan for malware or viruses in computer with some powerful antivirus software that could help you to find and remove all threats in computer and remove the unwanted processes or infections that causes UNCServer.exe High CPU Usage. You can try ‘PC Repair Tool’ offers you to remove malware infections and resolve PC problems.
One possible reason behind this issue can be problem with Lenovo System Update utility itself. You can fix corruption in Lenovo System Update by updating the software, or if you want to remove UNCServer.exe error or UNCServer.exe file, then you can uninstall Lenovo System update utility in computer that could help to remove UNCServer.exe file without any issue. Note that if you delete UNCServer.exe file from your computer location even when Lenovo System update utility is installed, then it might trigger several other issues in computer. So, uninstalling Lenovo System Update is way to remove UNCServer.exe file. Let’s go for the solution.
How to fix UNCServer.exe error in Windows 10?
Method 1: Fix UNCServer.exe high CPU usage issue with ‘PC Repair Tool’
‘PC Repair Tool’ is easy & quick way to find and fix BSOD errors, EXE errors, DLL errors, problems with programs, malware or viruses issues, system files or registry issues and other system issues with just few clicks. You can get this tool through link/button below.
Method 2: Uninstall Lenovo System Update
UNCServer.exe is part of Lenovo System Update. Uninstalling Lenovo System Update can resolve UNCServer.exe error.
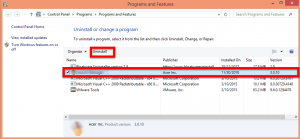
Step 1: Press ‘Windows + R’ keys on keyboard, type ‘control panel’ in the opened ‘Run’ dialog box and hit ‘Ok’ button to open ‘Control Panel’
Step 2: In ‘Control Panel’, go to ‘Uninstall a Program > Programs & Features’, find and select ‘Lenovo System Update’, and select ‘Uninstall’. Follow on-screen instruction to finish uninstall and after that, restart your computer.
Step 3: After restart, open ‘Task Manager’ by pressing ‘CTRL + SHIFT + ESC’ keys on keyboard and check UNCServer.exe is still causing high CPU usage issue in computer.
Method 3: Disable TVSUUpdateTask using Task Scheduler in Windows 10
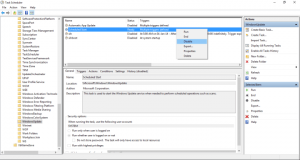
One possible way to fix the issue is to disable TVSUUpdateTask task through Windows Task Scheduler.
Step 1: Press ‘Windows + R’ keys on keyboard, type ‘taskschd.msc’ in the opened ’Run’ dialog box and hit ‘Enter’ key to open ‘Windows Task Scheduler’ utility
Step 2: In the opened window, in left pane, expand ‘Task Scheduler Library’ and select ‘TVT’ from sub-menu
Step 3: Now in right pane, find and right-click on ‘TVSUUpdateTask’ task, and select ‘Disable’ option to disable the task, and save the changes
Step 4: Once done, restart your computer and check if UNCServer.exe process is still running the system background. This way, you will be able to stop UNCServer.exe process from running and Lenovo System Update program will be able to run without UNCServer.exe process.
Method 4: Run SFC Scan and DISM scan in Windows 10
Sometime, this error can be occurred due to corruption in system files, or corruption in system image. You can run SFC Scan tool and DISM scan tool in Windows 10 in order to repair system files, and repair system image and resolve the issue.
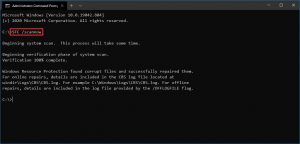
Step 1: Press ‘Windows + X’ keys on keyboard and select ‘Command Prompt as Administrator’
Step 2: In the Command Prompt window, type ‘sfc /scannow’ command and hit ‘Enter’ key to execute
Step 3: Once executed, run DISM scan. Type the following command and hit ‘Enter’ key to execute the command.
DISM.exe /Online /Cleanup-image /Restorehealth
Step 4: Once executed, restart your computer to see the changes and check if UNCServer.exe high CPU usage issue or UNCServer.exe error is resolved.
Conclusion
I am sure this post helped you on How to fix UNCServer.exe error in Windows 10 with several easy steps/methods. You can read & follow our instructions to do so. That’s all. For any suggestions or queries, please write on comment box below.


