What is ‘Status breakpoint error’ in Chrome?
In this article, we are going to discuss on How to fix Status breakpoint error in Chrome in Windows 10. You are provided with easy steps/methods to resolve the issue. Let’s starts the discussion.
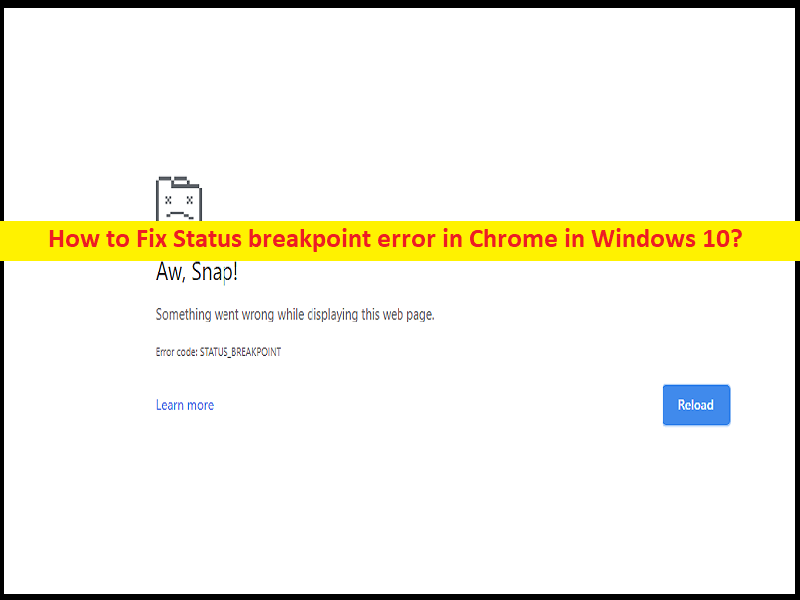
‘STATUS_BREAKPOINT error’ in Chrome:
STATUS_BREAKPOINT error is common error usually occurred on Google Chrome and Microsoft Edge browser when you try to accessing a website or when you scrolls through WebPages. This issue indicates you are unable to access websites in Chrome or Edge browser. This error prevents the page from loading. The possible reasons behind the issue can be the corrupted cache of browser, corrupted/outdated browser, incorrect browsing settings and issue with network/internet connection.
This issue can be occurred due to enabled overclocking, hardware acceleration feature and other features, interference of problematic browser extensions, and other issues. It is possible to fix the issue with our instructions. Let’s go for the solution.
How to fix Status breakpoint error in Chrome in Windows 10?
Method 1: Fix Status breakpoint error in Chrome with ‘PC Repair Tool’
‘PC Repair Tool’ is easy & quick way to find and fix BSOD errors, DLL errors, EXE errors, problems with programs/applications, malware or viruses infections in computer, system files or registry issues, and other system issues with just few clicks.
Method 2: Disable overclocking
It might possible enabled Overclocking in computer helps to boost performance of your computer. However, this feature can cause Status breakpoint error or others. In such case, you can disable this feature in computer through BIOS settings in order to fix the issue.
Method 3: Update Google Chrome browser
Updating browser software to latest version can resolve the issue.
Step 1: Open Google Chrome browser and click ‘Three-Dots’ icon at top-right corner and select ‘Help > About Google Chrome’
Step 2: This will automatically install latest browser update and once done, re-launch the browser and check if the issue is resolved.
Method 4: Disable Hardware Acceleration
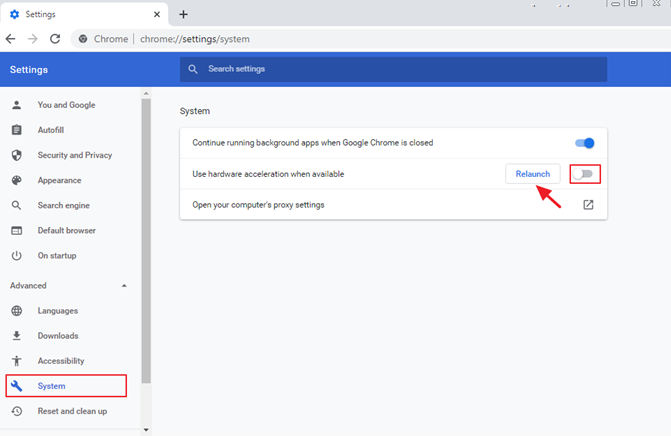
Step 1: Open ‘Google Chrome’ and click ‘Three-Dots’ icon at top-right corner and select ‘Settings’
Step 2: Expand ‘Advanced’ and select ‘System’. Disable the ‘Hardware Acceleration’ by clicking the option next to it and then re-launch the browser and check if the issue is resolved.
Method 5: Disable browser extensions
Step 1: Open Google Chrome and click ‘Three-Dots’ icon at top-right corner and select ‘More Tools > Extensions’
Step 2: Disable all extensions by switching the toggle OFF and restart your browser, and check if it works for you.
Method 6: Reset Chrome flags
Step 1: Open ‘Google Chrome’ and type ‘chrome://flags/’ in URL bar and hit ‘Enter’ key to open the page.
Step 2: Click ‘Reset All’ button, and then click ‘Relaunch’ button to restart your browser and then check if the issue is resolved.
Method 7: Run Compatibility troubleshooter
This issue can be fixed by running compatibility troubleshooter.
Step 1: Right-click on Google Chrome browser’s icon and select ‘Properties’
Step 2: Click ‘Compatibility’ tab and click ‘Run Compatibility troubleshooter’
Step 3: Click ‘Try recommended settings’ and click ‘Test the program’ and once done, check if the issue is resolved.
Method 8: Reset Chrome settings
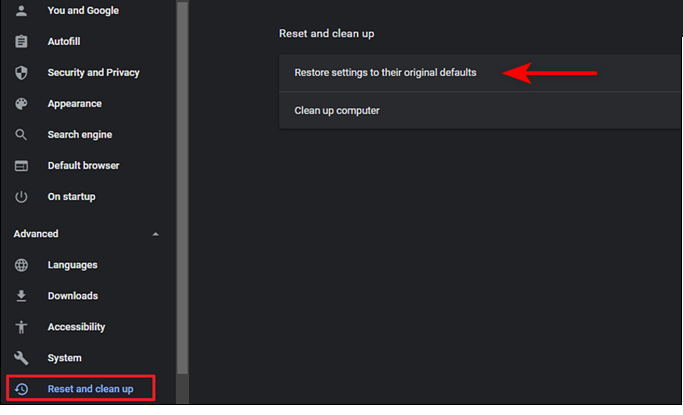
Step 1: Open ‘Google Chrome’ and open ‘Settings’ page
Step 2: Scroll down to find and expand ‘Advanced’, and click ‘Reset and cleanup’ and select ‘Restore settings to their original defaults’, and confirm resetting and once done, check if the issue is resolved.
Method 9: Uninstall and reinstall Google Chrome
If the issue is still persist, you can uninstall and then reinstall Google Chrome in computer in order to fix the issue.
Step 1: Open ‘Google Chrome’ in Windows PC and go to ‘Uninstall a Program > Programs & Features’
Step 2: Find and right-click ‘Google Chrome’, and select ‘Uninstall’ to uninstall it and after that, restart your computer
Step 3: After restart, download and install Google Chrome again from official site and once installed, launch the browser and check if the issue is resolved.
Method 10: Rename browser’s .exe file
Step 1: Close Chrome browser and open ‘File Explorer’ in Windows PC and go to ‘Google Chrome’ installation folder
Step 2: Find and right-click ‘Chrome’ file and choose ‘Rename’, rename it to ‘chrome1.exe’ and hit ‘Enter’ key to save and then re-launch the browser, and check if the issue is resolved.
Conclusion
I am sure this article helped you on How to fix Status breakpoint error in Chrome, STATUS_BREAKPOINT error in Windows 10 with easy ways. You can read & follow our instructions to do so. That’s all. For any suggestions or queries, please write on comment box below.


