
Tips to fix ssl_error_handshake_unexpected_alert error in browsers on Windows 10/8/7:
In this post, we are going to discuss on How to fix ssl_error_handshake_unexpected_alert error in Windows 10/8/7. You are provided with easy steps/methods to resolve the issue. Let’s starts the discussion.
‘ssl_error_handshake_unexpected_alert’ error in browser on Windows 10/8/7:
It is common problem usually occurred in browsers like Firefox, Chrome, Edge and others on all major desktop like Microsoft Windows, Mac, Linux, etc platforms. This error is appeared usually when you try to access a website that has to verify the legitimacy of the user access it. The error is appeared with ‘The page you are trying to view cannot be shown because the authenticity of the received data could not be verified. Please contact the web site owners to inform them of this problem’ message.
This error is also known as SSL Handshake error indicates that the communication between server and client by using SSL protocol is fails to establish that’s why you are experiencing the error. This error is occurred possibly due to some issue in your browser software and its settings, network connections, system settings and other system issues. Here, you are provided with easy ways to fix the issue in client-side.
If you investigate the issue is occurred due to some issue with server-side, then you can contact them via provided telephone number, email address, official social media handle or other contacts and ask them to resolve, or you can wait until the server issue is resolved. When we talk about client-side problem, ssl_error_handshake_unexpected_alert error is occurred due to corrupted browser data, bad configured browser’s or java security, interference from security application of system, improper installation of certificate. Let’s go for the solution.
How to fix ssl_error_handshake_unexpected_alert error in browser in Windows 10?
Method 1: Fix ssl_error_handshake_unexpected_alert error with ‘PC Repair Tool’
‘PC Repair Tool’ is easy & quick way to find and fix BSOD errors, DLL errors, EXE errors, problems with programs/applications, malware or viruses infections in computer, system files or registry issues, and other system issues with just few clicks.
Method 2: Update browser to latest version
Outdated browser could be a reason behind the issue. You can update browser to latest version can resolve the issue.
Step 1: For Chrome, open ‘Google Chrome’ browser and click ‘Three-Dots’ icon at top-right corner and select ‘Help > About Google Chrome’
Step 2: This will install available Google Chrome update in computer and once done, restart your browser and check if the issue is resolved.
Method 3: Delete problematic certificate in browser’s certificate manager
This issue can be occurred due to some problematic certificates installed in browser. You can uninstall them in order to fix.
Step 1: Open ‘Google Chrome’ and go to ‘Settings’ using ‘Three-Dots’ icon at top-right corner
Step 2: Go to ‘Privacy and Security’, scroll down to ‘Certificates’ section, click ‘View Certificates’ button
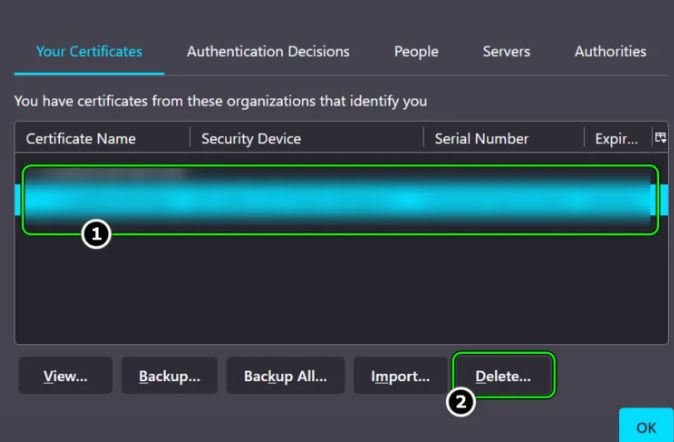
Step 3: Go to ‘Your Certificates’ tab and select ‘Problematic website’s certificate’
Step 4: Click ‘Delete’ and confirm to delete the certificate. Make sure there is no certificate from problematic website in server’s tab and any relevant CA in Authorities tab.
Step 5: If didn’t work, check if using Another network or network type solves the issue.
Method 4: Clear browser’s cache, cookies and data
Clearing browser cookies, cache and data can fix the issue.
Step 1: Open ‘Google Chrome’ and click ‘Three-Dots’ icon and click ‘More Tools > Clear Browsing Data’
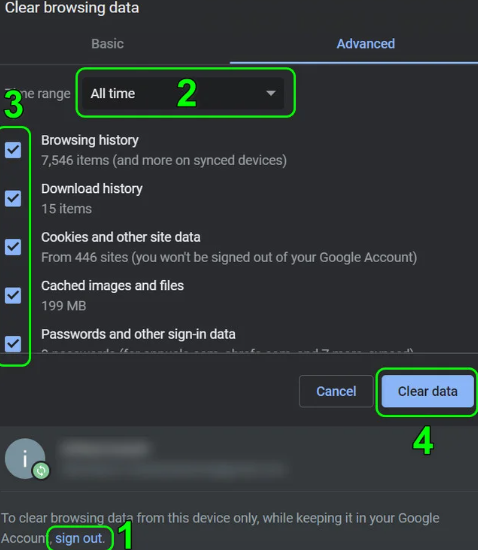
Step 2: Click ‘Advanced’ tab, click ‘Sign out’ to keep the data in Google Account
Step 3: Select ‘Time Range’ of ‘All Time’ and checkmark all categories.
Step 4: Click ‘Clear Data’ button and once done, restart your browser and check if the issue is resolved.
Method 5: Try another browser
If you are facing this error on Google Chrome, then you can try another browser to access the website that is giving error and check if it works. You can try Firefox, Safari, Edge or other browsers.
Method 6: Reset System’s Internet Options to defaults
Another possible way to fix the issue is to reset Internet Options to default in computer.
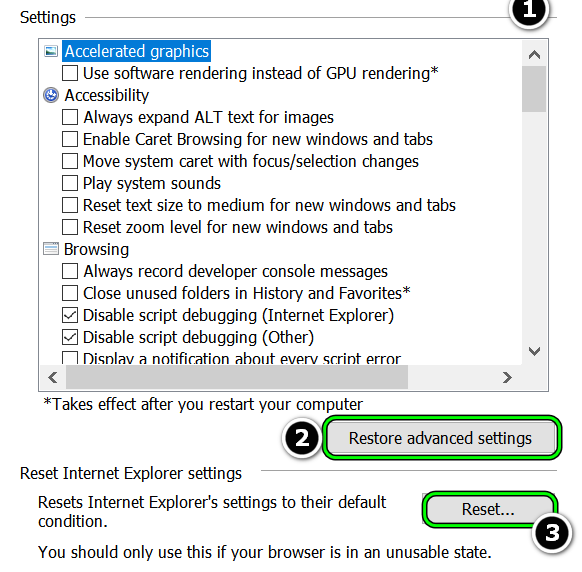
Step 1: Open ‘Internet Options’ in Windows PC via Windows Search Box and go to ‘Advanced’ tab and click ‘Restore Advanced Settings’
Step 2: In ‘Reset Internet Explorer Settings’, click ‘Reset’ and check ‘Delete Personal Settings’ checkbox and hit ‘Reset’ to reset.
Step 3: Once done, restart your computer and then check if the issue is resolved.
Method 7: Add the website as Trusted in browser
Another way to resolve the issue is to add the website to trusted in your browser.
Step 1: Open Firefox browser and go to website that is giving error
Step 2: Now, copy the complete URL of website from address bar and enter the following in address bar.
about:config
Step 3: Click ‘Accept Risk and Continue’ and enter the following ‘Search Preference Name’ box
tls.insecure_fallback_hosts
Step 4: Click ‘Edit’ icon and enter URL of problematic website and click ‘Tick’ icon and click ‘Re-launch’ Firefox. Once re-launch, check if the issue is resolved. Keep in mind you may need a yellow warning popup on top of site from Firefox not to enter credentials information on site.
Method 8: Edit browser’s security settings
Step 1: Open ‘Firefox’ and enter ‘about:config’ in URL bar
Step 2: Click ‘Accept the Risk and Continue’ and enter the following in ‘Search Preference Name‘
tls.enable_0rtt_data
Step 3: Click the toggle button to set the above settings to ‘False’ and re-launch the Firefox browser to check if the error is resolved.
Method 9: Reinstall Burp Suite
If you are company is using Burp suite to safely test and analyse its web applications, then a misconfiguration of Burp Suite may lead to SSL Handshake failure alert. Reinstlalign Burp Suite may resolve the issue.
Step 1: Back up the Jar file from previous Burp file and loader
Step 2: Right-click ‘Windows’ and select ‘Apps & Features’, expand ‘Burp Suite’ and click ‘Uninstall’
Step 3: Now, confirm to uninstall Burp Suite and then restart your computer
Step 4: After restart, download and install latest version of Burp suite and make sure Burp suite is being installed.
Step 5: Copy the backed-up Burp file and loader to following path
C:\Burp_Suite\jre\bin
Step 6: Now, type ‘cmd’ in Windows Search Box and press ‘SHIFT + ENTER’ keys on keyboard to open ‘Command Prompt as Administrator’
Step 7: Execute the following command
C:\Burp_Suite\jre\bin\java.exe -javaagent:BurpSuiteLoader_v.XXX.jar -noverify -jar burpsuite_pro_vXXX.jar
Step 8: Now, launch the browser and check if the issue is resolved.
Method 10: Use the certificate in Program files Directory for Gemalto/Thales DIS CMS
If your company is using Gemalto or Thales DIS application/CMS, using its certificate from the program files, not from program files may solve the issue.
Step 1: Open Firefox browser and go to ‘Settings > Privacy & Security > Security Devices’, click ‘Load’ in ‘Module name’ and type:
Gemalto PKCS#11 Module
Step 2: Click ‘Browse’ and navigate to following path to select gclib.dll
C:\Program Files\Gemalto\Classic Client\BIN\gclib.dll
Step 3: Click ‘Open’ and click ‘OK’, and re-launch Firefox and check if the issue is resolved.
Method 11: Add Exception for the website in java’s security
Step 1: Open ‘Configure Java’ via Windows Search Box in Windows PC
Step 2: Click ‘Security’ tab and click ‘Edit Site List’, and click ‘Add’ and enter URL of problematic certificate
Step 3: Click ‘Ok’ and then restart your computer and check if the issue is resolved.
Method 12: Disable or uninstall third-party antivirus/firewall
This issue can be occurred due to interference of third-party antivirus/firewall program installed in computer. You can fix the issue by disabling your third-party antivirus/firewall program in computer. If disabling didn’t work, then you can uninstall third-party antivirus/firewall in computer in order to fix and check if it works for you.
Method 13: Re-add the problematic certificate
One possible way to fix the issue is to remove the certificate that is causing error and then re-add it.
Step 1: Press ‘Windows + R’ keys on keyboard, type ‘certmgr.msc’ in ‘Run’ window and hit ‘Ok’ button to open it
Step 2: Go to ‘Personal > Certificates’ tab and check if the certificate is present there. If certificate issuer requires a certificate in another tab, make sure the certificate is present in relevant tab
Step 3: If the certificate is present in relevant tab, double-click on it and check if its property/validity.
Step 4: if everything is fine, click ‘Windows’ and open ‘Internet Options’ via search
Step 5: Now, steer to ‘Content’ tab on Internet Options and click ‘Certificates’
Step 6: Check if ‘Certificate’ from problematic site is shown in Relevant tab, double-click ‘Certificate’ and check if ‘Properties/validity’
Step 7: Make sure certificate has a valid public key associated with it. You may find it in Details tab of certificate properties
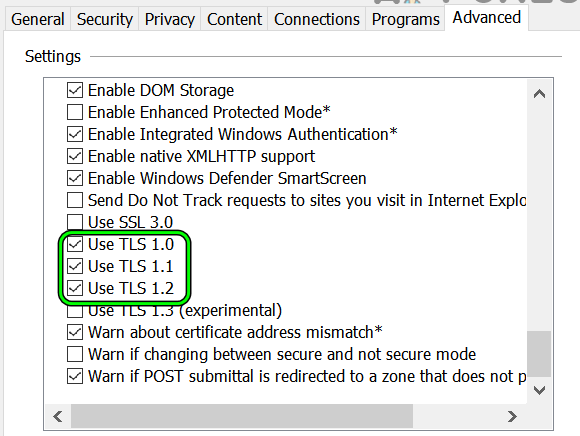
Step 8: Click ‘Advanced’ tab on Internet Options and make sure to enable ‘TLS entries’ and uncheck SSL boxes and once done, save the changes and check if the issue is resolved.
Method 14: Import certificate to Firefox
If the issue is still persist, you can fix the issue by importing the certificate to Firefox.
Step 1: Open ‘Firefox’ and go to ‘Settings > Privacy and Security > View Certificates’
Step 2: In ‘Your Certificates’, click ‘Import’ and ‘Browse’ to certificate and select the certificate and apply your changes
Step 3: Once done, restart Firefox and check if the issue is resolved.
Conclusion
I am sure this post helped you on How to fix ssl_error_handshake_unexpected_alert eror on browser in Windows 10/8/7 with easy ways. You can read & follow our instructions to do so. That’s all. For any suggestions or queries, please write on comment box below.


