
What is ‘Some settings are managed by your organization Windows Update’ in Windows 10?
In this article, we are going to discuss on How to fix Some settings are managed by your organization Windows Update in Windows 10. You are provided with easy steps/methods to resolve the issue. Let’s starts the discussion.
‘Some settings are managed by your organization Windows Update’:
It is common Windows Problem considered as Windows Update error. This error is appeared usually when you try to update Windows 10 OS to latest version using Windows built-in Settings app. This error is also appeared when you try to change some settings using Settings application after Windows 10 upgrade, or when changing background or lock screen of your computer. The error message might seen in almost all places like Cortana, Windows update, etc.
‘Some settings are managed by your organization Windows Update’ error is mainly occurred when you try upgrading to Windows 10. This is a setting in Windows for quite some time now which enables organizations to limit the access of computer settings by their employees. If you didn’t configure the options properly during the update process, you might face this error. It might possible your access to settings/features might be limited by a non-existent origination. It is possible to fix the issue with our instructions. Let’s go for the solution.
How to fix Some settings are managed by your organization Windows Update in Windows 10?
Method 1: Fix ‘Some settings are managed by your organization Windows Update’ error with ‘PC Repair Tool’
‘PC Repair Tool’ is easy & quick way to find and fix BSOD errors, DLL errors, EXE errors, problems with programs/applications, malware or viruses infections in computer, system files or registry issues, and other system issues with just few clicks.
Method 2: Fix Some settings are managed by your organization Windows Update error by modifying Local Group Policy Editor
Step 1: Press ‘Windows + R’ keys on keyboard, type ‘gpedit.msc’ in ‘Run’ window and press ‘CTRL + SHIFT + ENTER’ keys on keyboard to open ‘Local Group Policy Editor’ with administrator, and go to following path
Computer Configuration/Administrative Templates/Windows Components/Data Collection and Preview Build
Step 2: Now, in right-pane, find the item named ‘Allow Telemetry’, double-click it to edit, select ‘Enabled’ radio option, from dropdown, select ‘Third option (Full)’, and click ‘Apply’ to save the changes and exit the window
Step 3: Open the item again and select the option of ‘Not Configured’ and save the changes. Once done, check if the issue is resolved.
Method 3: Grant access to applications manually
You can also try to fix the issue by granting accessing to applications manually.
Windows Update:
Step 1: Open ‘Local Group Policy Editor’ as Administrator using above method, and go to following path
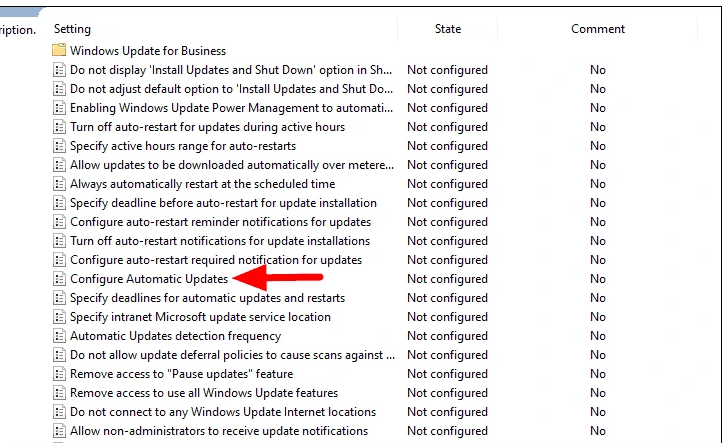
Computer Configuration/ Administrative Templates/ Windows Components/ Windows Update
Step 2: Find and double-click ‘Configure Automatic updates’ to edit, select ‘Not Configured’ radio option and then hit ‘Apply > Ok’ button to save the changes. Once done, check if it works for you.
Desktop Background Change and LockScreen:
Step 1: Open ‘Local Group Policy Editor’ app and go to following path
Computer Configuration/ Administrative Templates/ Control Panel/ Personalization
Step 2: Find and double-click ‘Prevent changing start menu background’ to edit, select ‘Not Configured’ or ‘Disabled’ radio option, and then hit ‘Apply > Ok’ button to save the changes.
Step 3: Repeat the same steps for ‘Prevent changing lock screen and logon image’. Once done, check if the issue is resolved.
Notifications:
Step 1: Open ‘Local Group Policy Editor’ as administrator using above methods and go to following path
User Configuration/ Administrative Templates/ Start Menu and Taskbar/ Notifications
Step 2: Find and double-click ‘Turn OFF toast notifications on the lock screen’ to edit, select ‘Not Configured’ or ‘Disabled’ radio option, and hit ‘Apply > Ok’ button to save the changes. Once done, restart your computer and check if the issue is resolved.
Method 4: Change the registry settings
Step 1: Open ‘Registry Editor’ app in Windows PC via Windows Search Box and go to following path
Computer\HKEY_CURRENT_USER\Software\Policies\Microsoft\Windows\CurrentVersion\PushNotifications
Step 2: Double-click ‘NoToastApplicationNotification’ entry to edit, set its value data to ‘0’, and hit ‘Ok’ button to save the changes. Once done, check if the issue is resolved.
Method 5: Change feedback and diagnostics settings
Step 1: Open ‘Settings’ app in Widows PC and go to ‘Privacy > Feedback and Diagnostics’
Step 2: Click ‘Change’ the default settings from ‘Basic’ to ‘Full’, and save the changes. Once done, restart your computer and check if the issue is resolved.
Method 6: Check third-party applications
Many applications like BitDefender, ESET, etc have the authority to change settings of your user profiles automatically and that’s why they can cause ‘Some settings are managed by your organization Windows Update’ error. So, you can try disabling the profile on your third-party applications and check if the error is resolved. All have to do is open the application and go to ‘Profile’ and check if it is set as Work. Now, open the settings of third-party application and disable it from changing the profiles on its own.
Method 7: Change system properties

Step 1: Open ‘Control Panel’ in Windows PC via Windows PC via Windows Search Box and click ‘Large Icons’ option from ‘View By’ section at top
Step 2: Click ‘System > Advanced system settings’
Step 3: Click ‘Network ID’ present at near button of screen. Windows will ask if this computer is a home computer of business network. Select the check option which says ‘This is a home computer. it is not part of a business network’.
Step 4: Now, Windows will prompt you restart your computer for changes to take effect. Save the your works and restart your computer, and check if the issue is resolved.
Method 8: Edit all registry settings at once
You can also try to fix the issue by changing all registry settings at one using .reg file in ‘https://drive.google.com/file/d/0B9oZLqAezog6aEo1M1lySlE2aUE/view?usp=sharing&resourcekey=0-dkyOipssmzzrtQa4V67qqw’ link, and open it to change all policies at once. Once done, restart your computer and check if the issue is resolved.
Method 9: Reset GPO settings to their defaults
Step 1: Open ‘Group Policy Editor’ app and go to following path
Local Computer Policy > Computer Configuration > Administrative Templates > All Settings
Step 2: In right-pane, click ‘State’ column heading to sort the policy settings by State column, change the state of these entries of ‘Enabled/Disabled’ to ‘Not Configured’ and then apply the settings.
Step 3: Repeat the above mentioned steps for following path as well.
Local Computer Policy > User Configuration > Administrative Templates > All Settings
Step 4: Restart your computer and check if the issue is resolved.
Conclusion
I am sure this post helped on How to fix Some settings are managed by your organization Windows Update error in Windows 10 with easy ways. You can read & follow our instructions to do so. That’s all. For any suggestions or queries, please write on comment box below.


