Tips to fix Slow LAN speed Windows 11:
In this post, we are going to discuss on How to fix Slow LAN speed Windows 11. You will be guided with easy steps/methods to resolve the issue. Let’s starts the discussion.
‘Slow LAN speed’ in Windows 11: It is common Windows Problem considered as Slow LAN speed issue. This issue indicates you are experiencing poor internet connection in your Windows computer that state your device’s LAN speed is slow. This problem can ruin your experience online whether you are streaming Netflix or playing your favourite online multiplayer games. Slow LAN speed problem can also make your downloads take an eternity to complete and waste your precious time.
There could be several reasons behind the issue including the faculty network cables, slow DNS servers, bad configured network settings, DNS settings and IP settings, corrupted/outdated network drivers, interference of VPN, proxy and/or firewall in computer, and other issues in Windows computer. You should make sure network adapter driver is properly installed and is up-to-date to latest version in computer.
If not, network driver update is necessary in computer if you don’t want any network/internet connection relating issues. Sometimes, this type of issue is occurred due to some temporary issues in your Windows computer and network device like router/modem or WiFi device. You can fix the temporary issue just by restarting your computer and network device (WiFi device, router or Modem) both, and then check if it works for you. If not, you can follow our instructions to fix the issue. Let’s go for the solution.
How to fix Slow LAN speed Windows 11?
Method 1: Fix Slow LAN speed issue with ‘PC Repair Tool’
‘PC Repair Tool’ is easy & quick way to find and fix BSOD errors, DLL errors, EXE errors, problems with programs/applications, malware or viruses infections in computer, system files or registry issues, and other system issues with just few clicks.
Method 2: Restart or reset your router/modem/WiFi device
One possible way to fix the issue is to perform network device (WiFi device, router or modem) restart or reset operation. To restart your router, you need to unplug your router from power cord and turn OFF your router, and wait for about 60 seconds and then re-plug it and turn ON your router, and then check if it works for you.
Method 3: Check your internet connection
You should make sure you have stable internet connection and speed, and there is no issue with internet connection at all. You should check if internet cable is working fine and properly connected to router and computer ends. If your internet is shared among multiple users at same time, then you may not get enough bandwidth. So, you can limit the number of active connections on your network in order to fix.
Method 4: Change DNS server addresses
Another possible way to fix the issue is to change DNS server address in Windows computer.
Step 1: Open ‘Settings’ app in Windows PC and go to ‘Network & Internet > Ethernet’
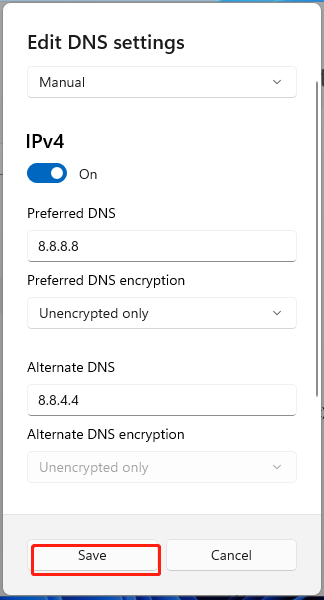
Step 2: Click ‘Edit’ next to ‘DNS server assignment’ text. In the opened ‘Edit DNS settings’ popup, select ‘Manual’ from dropdown, set IPv4 toggle ON, and you will see two textboxes named preferred DNS and Alternate DNS
Step 3: Enter the DNS server that you want to use like 8.8.8.8 and 8.8.4.4 in preferred DNS and alternate DNS respectively, and then hit ‘Save’ to confirm the changes. Once done, check if the issue is resolved.
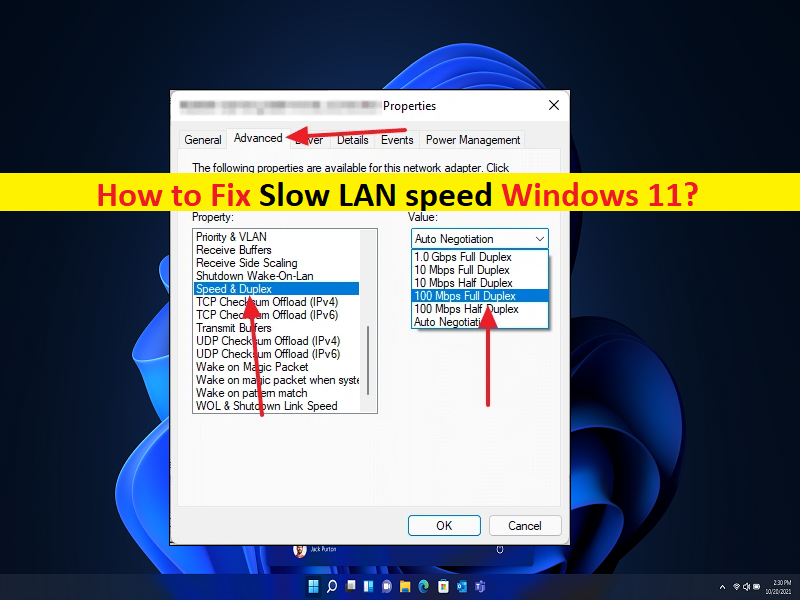
Method 5: Change speed and duplex settings
You can improve network speed by changing speed and duplex in network settings.
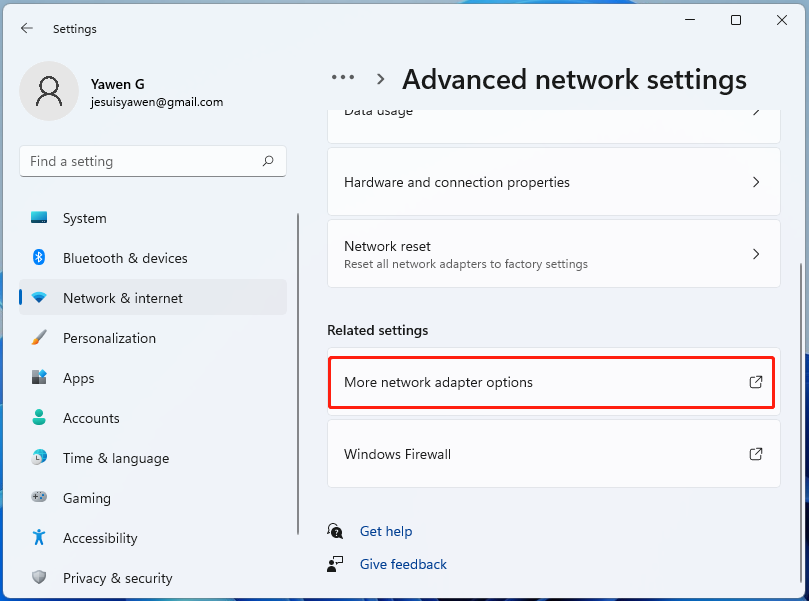
Step 1: Open ‘Settings’ app in Windows PC and go to ‘Network & Internet > Advanced Network Settings > More Network Adapter Options’
Step 2: Right-click on your Ethernet adapter and select ‘Properties’
Step 3: Click ‘Configure’ and go to ‘Advanced’ tab in Properties window, select ‘Speed & Duplex’ option from Property dropdown
Step 4: if your bandwidth in 100MBps or near that, select ‘100 MBPS FULL Duplex’ from ‘Value’ dropdown and hit ‘Ok’ button to save the changes. And check if it works for you.
Method 6: Update network adapter driver
Updating network adapter driver to latest & compatible version can resolve the issue.
Step 1: Open ‘Device Manager’ in Windows PC via Windows Search Box and expand ‘Network Adapters’ category
Step 2: Right-click on your network adapter driver and select ‘Update Driver’, and follow on-screen instructions to finish update process. Once updated, restart your computer and check if the issue is resolved.
Download or reinstall network adapter driver update in Windows PC [Automatically]
You can also try to update all Windows drivers including network adapter driver using Automatic Driver Update Tool. You can get this tool through button/link below.
Method 7: Uninstall VPN Client
This issue can be occurred due to interference of your VPN Client connection in computer. You can uninstall VPN Client in computer in order to fix, and check if it works for you.
Method 8: Disable Windows Update service
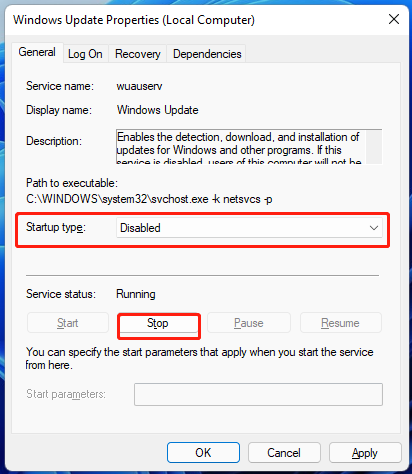
Step 1: Open ‘Services’ app in Windows PC via Windows Search Box
Step 2: Find and double-click on ‘Windows Update’ service to open its Properties. Click ‘Stop’ button under ‘Service Status’ section, and then hit ‘Apply > ok’ button to save the changes, and check if it works for you.
Method 9: Disable IPv6
Another possible way to fix the issue is to disable IPv6 feature in your network adapter settings in computer.
Step 1: Open ‘Settings’ app in Windows PC and go to ‘Network & Internet > Advanced Network Settings > more Network Adapter Options’
Step 2: Right-click on your Ethernet adapter and select ‘Properties’. Find and uncheck the checkboxes next to ‘Internet Protocol Version 6 (TCP/IPv6)’, and then hit ‘Ok’ to save the changes, and check if it works.
Method 10: Disable large send offload
You can disable Large Send Offload feature in order to fix.
Step 1: Open ‘Device Manager’ in Windows PC and expand ‘Network Adapters’ category
Step 2: Right-click on your network driver and select ‘Properties’. Click ‘Advanced’ tab, select ‘Large Send Offload v2 (IPv4)’ from ‘Property’ dropdown, and select ‘Disabled’ from ‘Value’ dropdown
Step 3: Finally, click ‘Ok’ button to save the changes and check if the issue is resolved.
Conclusion
I am sure this post helped you on How to fix Slow LAN speed Windows 11 with easy ways. You can read & follow our instructions to do so. That’s all. For any suggestions or queries, please write on comment box below.


