Tips to fix Sleep Option missing in Windows 10 Power Options:
In this post, we are going to discuss on How to fix Sleep Option missing in Windows 10 Power Options. You will be guided with easy steps/methods to resolve the issue. Let’s starts the discussion.
‘Sleep Option missing in Windows 10 Power Options’: Sleep Option in Windows 10 PC is great way to give your PC a few moments of rest and save some battery life while at it. It is quite simple & easy to add Sleep Option to Start Menu in Windows PC and also to turn ON Sleep Mode in Windows PC to turn your PC into Sleep mode. However, several users reported they faced Sleep Option missing in Windows 10 Power Options.
There could be several reasons behind the issue including the video card/graphics card driver incompatibility issue, incorrect system settings, your system administrator manages some settings, sleep and other power-saving states are not enabled on your computer’s BIOS settings. Another possible reason behind the issue can be the outdated/corrupted device drivers, outdated Windows OS, interference of other conflicting software, and other issues. Let’s go for the solution to fix.
How to fix Sleep Option missing in Windows 10 Power Options?
Method 1: Check Power Options Settings
Step 1: Open ‘Control Panel’ in Windows PC via Windows Search Box, search and go to ‘Power Options’ in Control Panel
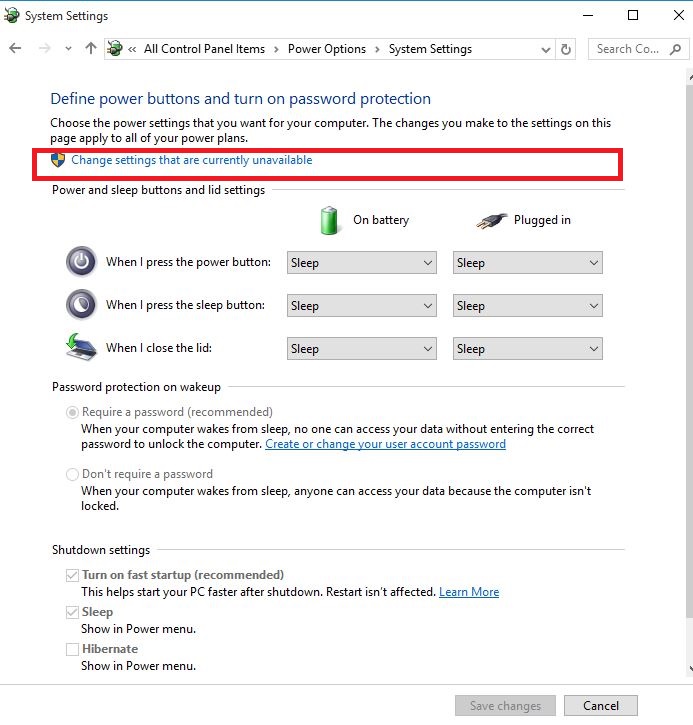
Step 2: Click ‘Choose what the power buttons do >Change settings that are currently unavailable’
Step 3: Go to ‘Shutdown Settings’, find ‘Sleep’ and tick the box to show in ‘Power’ menu, and then hit ‘Save Changes’. Once done, restart your computer and check if the issue is resolved.
Method 2: Update Device Drivers
Updating all necessary device drivers in Windows PC can resolve the issue. You can update all Windows Drivers including graphics card driver and all other device drivers using Automatic Driver Update Tool. You can get this tool through button/link below.
Method 3: Check the available sleep states
Step 1: Type ‘cmd’ in Windows Search Box and press ‘SHIFT + ENTER’ keys on keyboard to open ‘Command Prompt as Administrator’
Step 2: Type ‘powercfg –a’ command and hit ‘Enter’ key to execute. The available sleep states available will be displayed.
Method 4: Reset and restore the Power Plans to default
Step 1: Open ‘Command Prompt as Administrator’ using above method
Step 2: Type ‘powercfg –restoredefaultschemes’ command and hit ‘Enter’ key to execute. This will reset the power plan settings to default.
Method 5: Make Group Policy Changes
Step 1: Press ‘Windows + R’ keys on keyboard, type ‘gpedit.msc’ in ‘Run’ window and hit ‘Ok‘ button to open ‘Group Policy Editor’ app
Step 2: Type ‘User ConfigurationAdministrative TemplatesStart Menu and Taskbar’ and double-click on ‘Remove and Prevent access to the Shut Down command’, and select ‘Disabled’ option
Step 3: Now, double-click ‘Change Start Menu Power button’ and select ‘Enabled’ and save the changes. Once done, check if it works for you.
Method 6: Switch the account to local account and then back to ‘Microsoft Account’
Step 1: Open ‘Settings’ app and go to ‘Accounts > Your Accounts’
Step 2: Click ‘Sign in with a local account instead’ and follow on-screen instructions to create the local account
Step 3: Once you are signed in through local account, go to ‘Settings > Accounts > Your email and accounts’ and sign in with Microsoft Account instead, enter your Microsoft account credentials during setup.
Method 7: Uninstall and reinstall the driver
Step 1: Open ‘Device Manager’ in Windows PC via Windows Search Box and expand ‘Display Adapters’ category
Step 2: Right-click on your graphics card driver and select ‘Uninstall Driver’ to uninstall it and after that, restart your computer and check if the issue is resolved. Restarting computer will automatically reinstall missing graphics card driver in computer.
Method 8: Perform Clean Boot
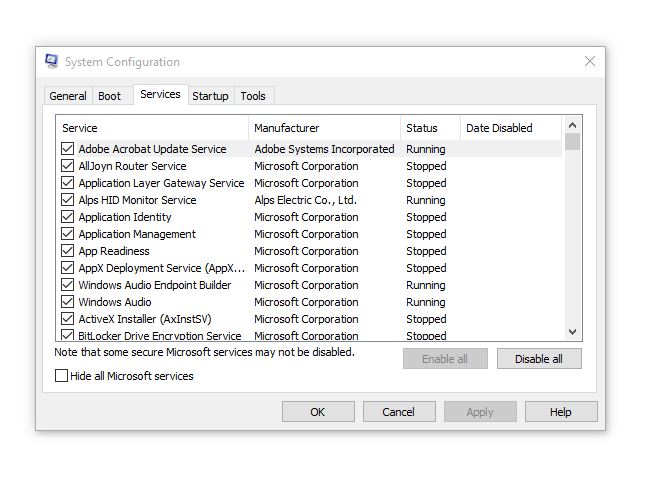
Step 1: Open ‘System Configuration’ app in Windows PC via Windows Search Box
Step 2: Click ‘Services’ tab, select ‘Hide all Microsoft Services’ checkbox and hit ‘Disable All’ button, and then hit ‘Apply > Ok’ button to save the changes. Once done, restart your computer and check if the issue is resolved.
Method 9: Perform System Restore
If the issue is still persist, you can perform system restore operation in computer to fix.
Step 1: Press ‘Windows + R’ keys on keyboard, type ‘rstrui’ in ‘Run’ window and hit ‘Ok’ button to open ‘System Restore’ app
Step 2: Click ‘Next’, select a valid restore point according to date & time when there was no issue at all in computer, and then hit ‘Next > Finish’ to start restoring process and once finished, restart your computer and check if the issue is resolved.
Fix Windows PC Issues with ‘PC Repair Tool’:
‘PC Repair Tool’ is easy & quick way to find and fix BSOD errors, DLL errors, EXE errors, problems with programs/applications, malware or viruses infections in computer, system files or registry issues, and other system issues with just few clicks.
Conclusion
I am sure this article helped you on How to fix Sleep Option missing in Windows 10 Power Options with easy ways. You can read & follow our instructions to do so. That’s all. For any suggestions or queries, please write on comment box below.


