
What is ‘Server DNS address could not be found’ error in Chrome on Windows 10/11?
If you are facing Server DNS address could not be found error Chrome or ‘Server DNS address could not be found’ error on Google Chrome browser in Windows 11/10/8/7 computer, and looking for ways to fix, then you are in right-place for the solution. You are provided with easy steps/methods to resolve the issue. Let’s starts the discussion.
‘Server DNS address could not be found’ error on Chrome:
‘Server DNS address could not be found’ error is common error usually appeared while browsing internet using Google Chrome browser or when you try to access/visit certain websites in Google Chrome browser. This error is known to occur on almost all Windows versions like Windows 11, 10, 8 and Windows 7 OS based computer. This error prevents you from accessing specific or certain websites on Google Chrome for some reasons.
If you are not aware, every website on interest has numerical and unique IP that is relating to Human-Understandable domain name, this IP address is used for the packet communication and if DNS server which acts as translator fails to retrieve the IP address of site you try to visit, this error is occurred. The possible reasons behind the issue can be the issue with DNS server itself, issue in your browser, network and computer.
This issue can be occurred due corrupted Chrome’s host cache, outdated network adapter driver, corrupted or bad configured network settings, and other issues. You should make sure network adapter driver is properly installed and is up-to-date to latest & compatible version in computer, and other issues. It is possible to resolve the issue with our instructions. Let’s go for the solution.
How to fix Server DNS address could not be found error Chrome in Windows 10/11?
Method 1: Fix Server DNS address could not be found error Chrome with ‘PC Repair Tool’
‘PC Repair Tool’ is easy & quick way to find and fix BSOD errors, EXE errors, DLL errors, problems with programs/applications, malware or viruses infections in computer, system files or registry issues, and other system issues with just few clicks.
Method 2: Delete all files in your ‘etc’ folder
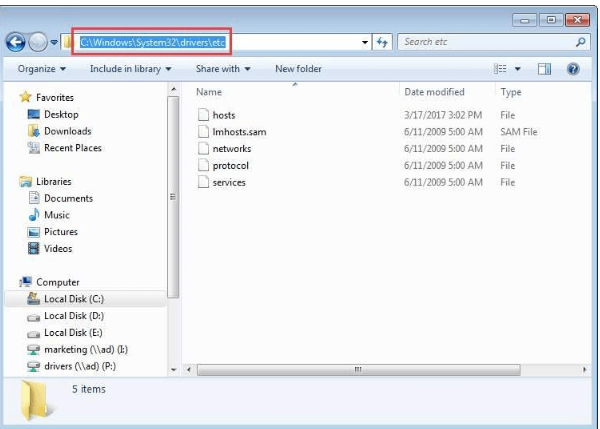
Step 1: Open ‘File Explorer’ in Windows PC and go to following path
C: > Windows > System32 > drivers >etc
Step 2: Delete all contents inside ‘etc’ folder and then retry accessing internet in Chrome, and check if the issue is resolved.
Method 3: Clear Chrome’s host cache
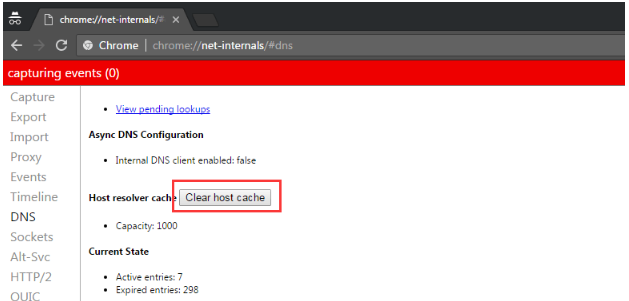
You can clear Chrome’s host cache in order to fix the issue.
Step 1: Open ‘Google Chrome’ and type ‘chrome://net-internals/#dns’ in ‘URL bar’ and hit ‘Enter’ key to execute
Step 2: Click ‘Clear Host Cache’ button, and once done, check if the issue is resolved.
Method 4: Update Network Adapter Driver
Updating network adapter driver to latest version can resolve the issue.
Step 1: Open ‘Device Manager’ app in Windows PC via Windows Search Box and expand ‘Network Adapters’ category
Step 2: Right-click on your network adapter, and select ‘Update Driver’ and follow on-screen instructions to finish update and once done, restart your computer and check if the issue is resolved.
Download or reinstall network adapter driver update in Windows PC [Automatically]
You can also try to update all Windows driver including network adapter driver using Automatic Driver Update Tool. You can get this tool through button/link below.
Method 5: Change DNS server settings
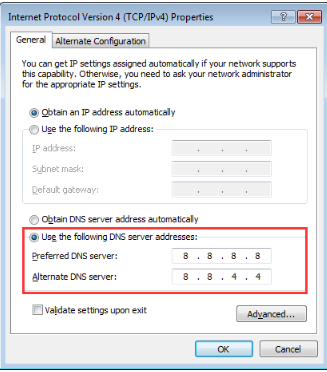
You can apply certain changes in DNS server settings in computer to fix.
Sep 1: Open ‘Control Panel’ app in Windows PC and go to ‘Network and Sharing Center’ via search in Control Panel
Step 2: Go to ‘Change Adapter Settings’, right-click on your connection and select ‘Properties’
Step 3: Select ‘Internet Protocol Version 4 (TCP/IPv4)’ and hit ‘Properties’
Step 4: Select ‘Use the following DNS server addresses’ radio option, type ‘8.8.8.8’ and ‘8.8.4.4’ in preferred and alternate DNS server field, and then hit ‘Apply > Ok’ button to save the changes. Once done, restart your computer and check if the issue is resolved.
Method 6: Renew and flush DNS
Step 1: Type ‘cmd’ in Windows Search Box and press ‘CTRL + SHIFT + ENTER’ keys on keyboard to open ‘Command Prompt as Administrator’
Step 2: Type the following commands and hit ‘Enter’ key after each to execute.
ipconfig /flushdns
ipconfig /renew
ipconfig /registerdns
Step 3: Once done, restart your computer and check if the issue is resolved.
Method 7: Try using VPN
If the issue is still persist, you can try to fix the issue by using a VPN Connection in computer in order to bypass any restrictions that restricting you from accessing websites on Chrome, and then check if it works for you. You can try NordVPN, Express VPN or other popular VPN service in your Windows computer.
Method 8: Reinstall Chrome
If the issue is still persist, you can uninstall Chrome browser and reinstall it in computer to fix.
Step 1: Open ‘Control Panel’ app in Windows PC and go to ‘Uninstall a Program > Programs & Features’
Step 2: Find and right-click on Chrome browser, and select ‘Uninstall’ to uninstall it and after that, restart your computer
Step 3: After restart, download and reinstall Chrome browser and check if the issue is resolved.
Conclusion
I am sure this post helped you on How to fix Server DNS address could not be found error Chrome in Windows 10/11 with easy ways. You can read & follow our instructions to do so. That’s all. For any suggestions or queries, please write on comment box below.


