Tips to fix Secure Boot is greyed out in BIOS:
In this article, we are going to discuss on How to fix Secure Boot is greyed out in BIOS. You are provided with easy steps/methods to resolve the issue. Let’s starts the discussion.
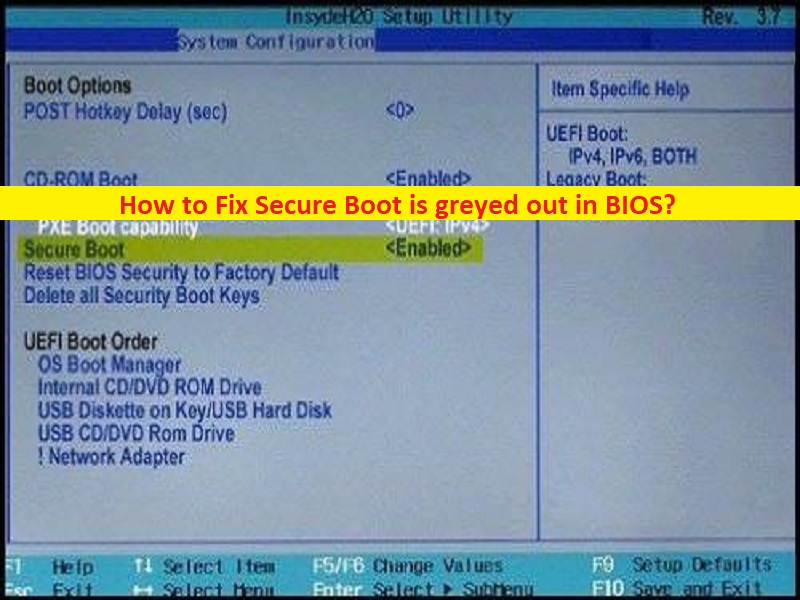
‘Secure Boot is greyed out in BIOS’:
‘Secure Boot’: Secure Boot is a security standard designed & developed by members of PC industry to help make sure that a device boots using only software that is trusted by the Original Equipment Manufacturer (OEM). When you starts /restart PC, the firmware checks the signature of each piece of boot software including UEFI firmware drivers, EFI applications, and the operating system. When you add UEFI drivers, you will also need to make sure these are signed and included in Secure Boot Database.
However, several users reported they faced Secure Boot is greyed out in BIOS on their PC/Laptop. When you open BIOS/UEFI in your computer in order to check the status of Secure Boot, you may experience Secure Boot is greyed out. This issue can be occurred due to outdated BIOS, corrupted BIOS settings, Secure Boot is not available and/or other issue. If you are facing the same and looking for ways to fix, then you are in right-place for this. Let’s go for the solution.
How to fix Secure Boot is greyed out in BIOS in computer?
Method 1: Set Admin Password
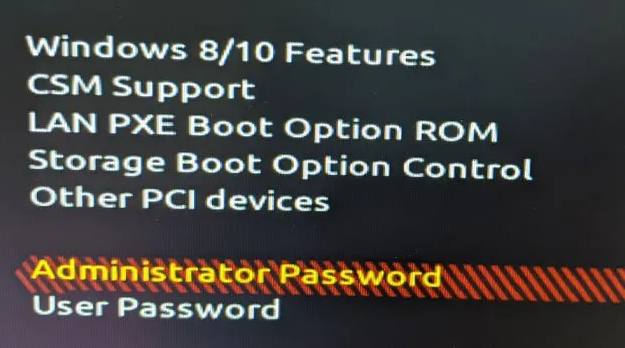
One possible way to fix the issue is to set Admin password in BIOS.
Step 1: Restart your computer and when booting initiates, press ‘F2’, ‘F3’, ‘DEL’ or other BIOS supported key to enter into BIOS mode
Step 2: Once you are in BIOS mode, switch to BIOS tab and select ‘Administrator Password’, and hit ‘Enter’ key, Enter the password twice to confirm and then save & exit BIOS, and then check if it works for you.
Method 2: Disable Fast Boot
Another possible way to fix the issue is to disable Fast Boot in computer.
Step 1: Restart your computer and boot into BIOS mode
Step 2: Go to ‘Boot’ tab and select ‘Fast Boot’, disable it if it is enabled, and then save & exit BIOS and restart your computer, and check if it works for you.
Method 3: Reset BIOS to factory defaults
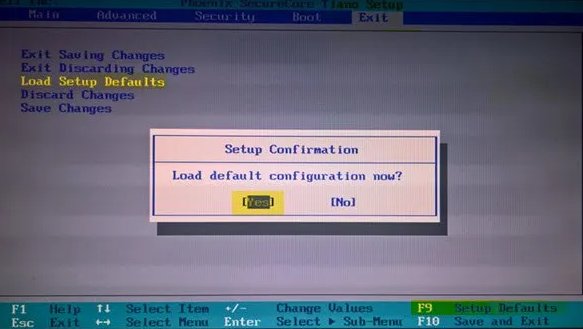
Another way to fix the issue is to reset BIOS settings to factory defaults.
Step 1: Boot your computer into BIOS mode
Step 2: Look for ‘Load Setup Defaults’, ‘Restore Security Settings to factory defaults’ or similar option and click it in order to perform resetting operation and once done, save & exit BIOS and restart your computer and check if the issue is resolved.
Method 4: Update BIOS
Updating BIOS settings to factory default can resolve the issue. You should follow your PC/Laptop motherboard’s manufacturer official to download and install latest BIOS update in computer and one updated, check if the issue is resolved.
Method 5: Check if Secure Boot is available
This issue can be occurred if Secure Boot is not available in your computer. You can check the status of Secure Boot through below steps.
Step 1: Restart your computer normally and then open ‘System Information’ app through Windows Search Box
Step 2: Find ‘Secure Boot State’ option and find the status or value of this option. If it is ON, Secure Boot is available.
Fix Windows PC Issues with ‘PC Repair Tool’:
‘PC Repair Tool’ is easy & quick way to find and fix BSOD errors, errors, DLL errors, EXE errors, problems with programs/applications, malware or viruses infections in computer, system files or registry issues, and other system issues with just few clicks.
Conclusion
I hope this post helped you on How to fix Secure Boot is greyed out in BIOS with easy ways. You can read & follow our instructions to do so. That’s all. For any suggestions or queries, please write on comment box below.


