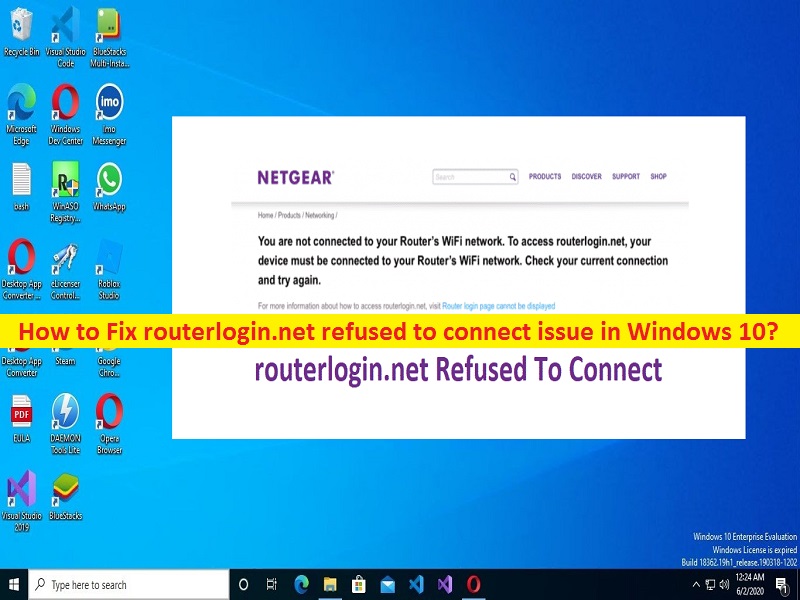
What is ‘routerlogin.net refused to connect’ issue in Windows 10?
If you are facing ‘routerlogin.net refused to connect’ error while trying to access your Netgear routers’ login page ‘routerlogin.net’ in your browser in Windows 10 computer, then you are in right place for the solution. Here, you will be guided with easy steps/methods to resolve the issue. Let’s starts the discussion.
‘routerlogin.net’ page: routerlogin.net and routerlogin.com are official website of Netgear router offers Netgear router’s users to configure their Netgear home routers. When you visit these websites from inside a home network, Netgear router congnizes the website domain names and converts them to appropriate router IP address automatically.
It is quite simple to access or log into Netgear router. To do so, you need to open your browser in computer or mobile device and enter ‘routerlogin.net’ or ‘routerlogin.com’ URL in URL bar of browser. Now, enter username & password of your router. Once you logged into this URL, you are allowed to check router status and configure router settings.
‘routerlogin.net refused to connect’: It is common issue related to Netgear router’s page ‘routerlogin.net’. This issue indicates that you can’t access to routerlogin.net page on your browser for some reasons. There could be several reasons behind this issue including issues with your browser, problematic network and system’s settings. Several users reported they faced ‘routerlogin.net not working’ issue when they tried to access management console of router through routerlogin.net page.
One possible reason behind this issue can be wrong username & password of router you are entering into routerlogin.net while login. You should make sure you are using proper username & password of router (Like ‘Admin’ and ‘password’ are default values). This error can also be occurred due to problematic network connection like damaged router cable or not connected properly, or temporarily glitch with your router.
Another possible reason behind ‘routerlogin.net refused to connect’ issue can be corrupted cache and cookies of browser like Google Chrome which you use to access the page, misconfigured browser’s settings, interference of antivirus software installed in computer, and other reasons. Let’s go for the solution.
How to Fix routerlogin.net refused to connect issue in Windows 10?
Method 1: Fix ‘routerlogin.net refused to connect’ issue with ‘PC Repair Tool’
If this issue is occurred due to some problems with your Windows computer, then you can fix the issue with ‘PC Repair Tool’. This software offers you to find and fix all types of Windows issues including BSOD errors, EXE errors, DLL errors, problems with programs, malware or viruses issues, system files or registry issues, and other system issues with just few clicks. You can get this tool through button/link below.
Method 2: Power cycle your router and Windows computer both
Sometimes, this error is occurred due to temporary glitch in your router and Windows computer. You can power cycle your router and system both in order to fix the issue.
Step 1: Turn OFF both router and computer
Step 2: Unplug power cable from router and power outlet
Step 3: Wait for 30-40 seconds and then reconnect the cable back to router and to power outlet
Step 4: Turn ON both router and computer and wait to establishing the connection. Once done, try accessing ‘routerlogin.net’ page in your browser and check if the error is resolved.
Method 3: Try different connection mode
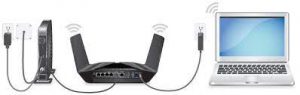
If you are experiencing ‘routerlogin.net refused to connect’ error when you are using wireless network connection, then you can switch to Ethernet cable connection. To do so, you should have Ethernet cable and then connect your router and computer with Ethernet cable. Wait to establish the connection and then check if the ‘routerlogin.net not working’ issue is resolved. If facing the same issue with wired network, then you can switch to wireless network. It is recommended to connect 5GHz band wireless network in order to fix the issue.
Method 4: Try your router’s IP address to access your router management console
If you are still facing issue while trying to access Management Console in routerlogin.net page, then you can try your router’s IP address for this issue.
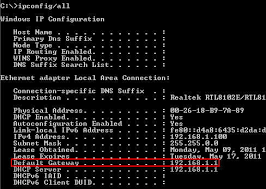
Step 1: Press ‘Windows + X’ keys on keyboard and select ‘Command Prompt as Administrator’
Step 2: Type ‘ipconfig /all’ command and hit ‘Enter’ key to execute. This will show you details of wireless LAN adapter WiFi (router’s wifi). Note down ‘Default Gateway’ values (usually it is 192.168.0.1. or 10.0.0.1)
Step 3: Open your browser and enter the address you have noted down in URL bar of browser (without HTTP and HTTPS), and check if the error is resolved.
Method 5: Clear browser cookies and cache
As mentioned, this issue can also be occurred due to corrupted cache and cookies of your browser. You can try clearing browser cache and cookies of browser in order to fix the issue.
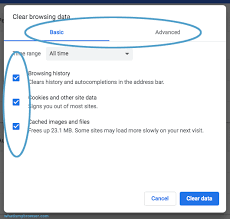
Step 1: In Google Chrome browser, click on ‘Three-Dots’ icon at top-right corner and select ‘More Tools > Clear browsing Data’
Step 2: In ‘Clear Browsing Data’ window, select ‘All Time’ from ‘Time Range’ dropdown, and select all categories checkboxes, and then hit ‘Clear Data’ button
Step 3: Once done, restart your browser and try accessing ‘routerlogin.net’ page again and check if the error is resolved.
Method 6: Try Incognito Mode, Try different browser or Try Internet Explorer Mode of Edge browser
If you are facing ‘routerlogin.net refused to connect’ error while trying to access routerlogin.net page in normal window of browser, then you can try accessing the page in ‘Incognito Mode’ or ‘Private Window’ of your browser, and check if the it works.
If the problem is still persist, try different browser to access routerlogin.net page. For example, if you are facing error on Google Chrome, then you can try Mozilla Firefox, Internet Explorer or other browsers, and check if it works.
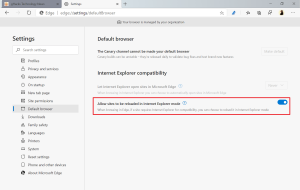
You can also try Internet Explorer Mode of Edge browser to access ‘routerlogin.net’ page in order to fix the issue. To do so, you need to open ‘Edge’ browser and click on ‘hamburger menu’ at top-right corner and select ‘Settings’, click on ‘Default browser’ in left pane, and enable ‘Allow sites to be reloaded in Internet Explorer Mode’ option, and then restart your Edge browser and try accessing routerlogin.net page.
Method 7: Try different device
If you are facing ‘routerlogin.net refused to connect’ issue in Windows computer, then you can try to fix the issue by accessing the same on different computer with different Operating system installed, or try on mobile. For example, if the issue is occurred on Windows 10 computer, try computer with deferent Windows OS, or some other OS like MacOS based computer. Also, you can try accessing the same page on Android mobile, or use ‘Negear Nighthawk/Netgear Genie’ app, and check if the error is resolved.
Method 8: Disable or uninstall antivirus software
Sometimes, this issue is occurred due to interference of your third-party antivirus software installed in computer. It might possible your antivirus is blocking routerlogin.net page from accessing for some reasons. You can disable your antivirus temporarily in order to fix the issue. If disabling antivirus didn’t work for you, then you can uninstall your antivirus software completely in computer.
Method 9: Reset your router to factory defaults
This error can also be occurred due to corrupted firmware of your router, bad configured router’s settings or other reasons. You can perform your router reset to factory defaults in order to fix the issue.
Step 1: Disconnect all devices from router connected to it like PC, laptops and others. Make sure your router is turned ON and only power cable is connected to router
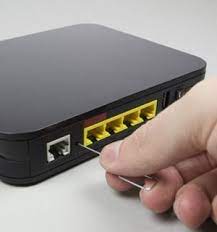
Step 2: Use ‘Power Clip’ or ‘Pin’ to press & hold ‘Reset’ button on router or ‘Restore Factory settings’ button and keep holding the button for 5-7 seconds. Power LED should flash during this process.
Step 3: Now, release the ‘Reset’ button and wait for your router to restart properly
Step 4: Now, connect your router to internet and connect to computer with Ethernet cable or using wireless network. Once done, try accessing routerlogin.net page in your browser and check if it works.
Method 10: Clear out NVRAM of router
If resetting router to factory default didn’t work for you, then you can try to fix the issue by clearing NVRAM of your router.
Step 1: Follow ‘step 1 and step 2’ of above method but this time, you will need to hold ‘Reset’ button for 30 seconds and keep holding the button, and remove power cable of router and again wait for 30 seconds
Step 2: Keep holding ‘Reset’ button again and plug power cable to router and again wait for 30 seconds
Step 3: After 30-30-30 seconds, release ‘Reset’ button and now wait for 1 minute.
Step 4: Unplug power cable of router and wait for 30 seconds, and after plug the cable back to router and turn ON your router
Step 5: Connect the router to the internet and computer and wait for establishing the connection. Once done, try accessing routerlogin.net page and check if it works.
Conclusion
I am sure this post helped you on How to fix routerlogin.net refused to connect issue in Windows 10 with several easy methods/steps. You can read & follow our instructions to do so. That’s all. For any suggestions or queries, please write on comment box below.


