What is ‘PWA Identity Proxy Host stopped working errors in Reliability History’ error in Windows 10/11?
In this post, we are going to discuss on How to fix PWA Identity Proxy Host stopped working errors in Reliability History error in Windows 10/11. You will be guided with easy steps/methods to resolve the issue. Let’s starts the discussion.
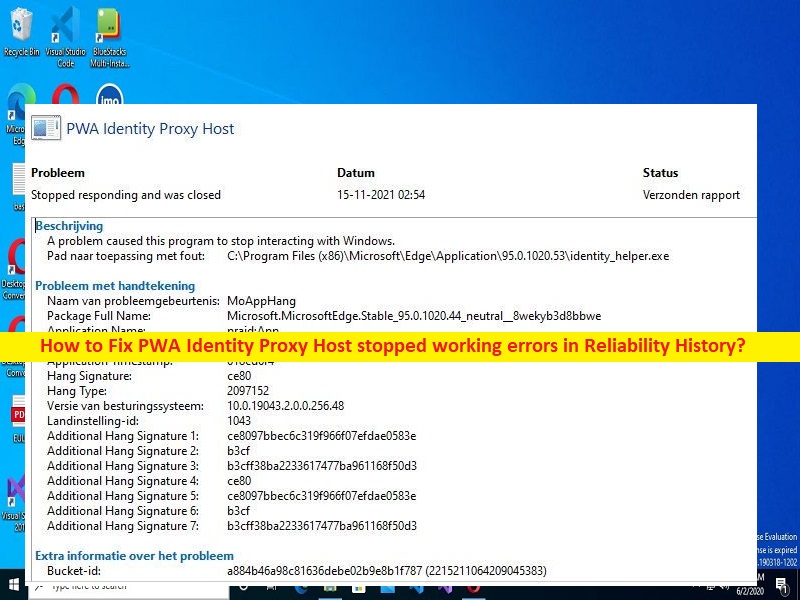
‘PWA Identity Proxy Host stopped working errors in Reliability History’ error:
It is common Windows Problem considered as Windows Reliability Monitor. This error is appeared usually when you use Windows Reliability Monitor in Windows 10/11 computer. This error is sometimes relating to Edge Chromium. There could be several reasons behind the issue including outdated MS Edge, outdated Windows OS, web apps identity proxy is enabled, Edge extensions are running background, proxy and VPN interface, third-party interference, recent system change, corruption in system files or other issues.
Sometimes, this type of issue is occurred due to some temporary issues in computer. You can fix the temporary issue just by restarting your computer, check if the issue is resolved. One possible way to fix the issue is to disable third-party interference in computer, but there is also some other possible solutions to fix the issue as mentioned in the post. Let’s go for the solution.
How to fix PWA Identity Proxy Host stopped working errors in Reliability History error in Windows 10/11?
Method 1: Fix ‘PWA Identity Proxy Host stopped working errors in Reliability History’ error with ‘PC Repair Tool’
‘PC Repair Tool’ is quick & easy ways to find and fix BSOD errors, DLL errors, EXE errors, problems with programs/applications, malware or viruses infections in computer, system files or registry issues, and other system issues with just few clicks.
Method 2: Disable webapps identity proxy
One possible way to fix the issue is to disable webapps identity proxy in your browser.
Step 1: Open ‘Edge’ browser and type ‘edge://flags’ in URL bar and hit ‘Enter’ key to open the page/tab to ‘Webapp identity proxy flag’
Step 2: Change the toggle relating to ‘Web Apps identity proxy’ to ‘Disabled’, save the changes and restart your computer, and check if the issue is resolved.
Method 3: Update MS Edge
Updating MS Edge browser to latest version can resolve the issue.
Step 1: Open ‘MS Edge’ and click ‘Action’ button
Step 2: Click ‘Help and Feedback’ from context menu and click ‘About Microsoft Edge’
Step 3: Your browser will check for available updates and install the automatically if any new one are available and once updated, restart your computer and check if the issue is resolved.
Method 4: Update Windows OS
Updating Windows OS to latest version can resolve the issue.
Step 1: Open ‘Settings’ app in Windows PC via Windows Search Box and go to ‘Update & Security > Windows Update’ and click ‘Check for updates’ button
Step 2: Download and install all available updates in computer and once updated, restart your computer and check if the issue is resolved.
Method 5: Prevent Edge extensions from running in background
Step 1: Open Edge browser and click ‘Three-Dots’ icon at top-right corner and select ‘Settings’
Step 2: Go to ‘System and Performance’ and uncheck ‘Continue running background extensions and apps when Microsoft Edge is closed’.
Step 3: Once this change has been enforced, restart your computer and check if it works for you.
Method 6: Disable VPN/proxy
Interference of VPN/Proxy in Windows computer could be a reason behind the issue. You can disable VPN/proxy in order to fix the issue, and after that, check if it works for you.
Disable proxy:
Step 1: Press ‘Windows + R’ keys on keyboard, type ‘ms-settings:network-proxy’ in ‘Run’ window and hit ‘Ok’ button to open proxy settings
Step 2: Scroll down to ‘Manual proxy setup’ section, and move to right side of screen and uncheck ‘Use a proxy server and then restart your computer, and check if the issue is resolved.
Disable VPN:
Step 1: Press ‘Windows + R’ keys on keyboard, type ‘ms-settings:network-vpn’ and hit ‘Ok’ button to launch VPN tab of Settings app
Step 2: Click your VPN in right pane of VPN Connection tab, and select ‘Remove’ option, and then check if it works for you toward resolving the issue.
Method 7: Perform clean boot
You can perform clean boot in computer in order disable conflicting apps/services.
Step 1: Open ‘System Configuration’ app via Windows Search Box
Step 2: Click ‘Services’ tab, uncheck ‘Hide all Microsoft Services’ checkbox, and hit ‘Disable All’ button
Step 3: Finally, click ‘Apply > Ok’ button to save the changes and once done, restart your computer and check if the issue is resolved.
Method 8: Run SFC Scan and DISM scan
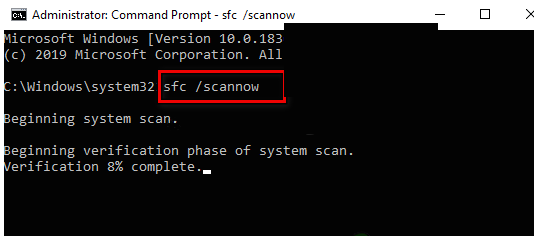
Step 1: Type ‘cmd’ in Windows Search Box and press ‘CTRL + SHIFT + ENTER’ keys on keyboard to open ‘Command Prompt as Administrator’
Step 2: Type the following commands and hit ‘Enter’ key after each to execute.
sfc /scannow
dism.exe /online /cleanup-image /restorehealth
Step 3: Once executed, restart your computer and check if the issue is resolved.
Method 9: Perform System Restore
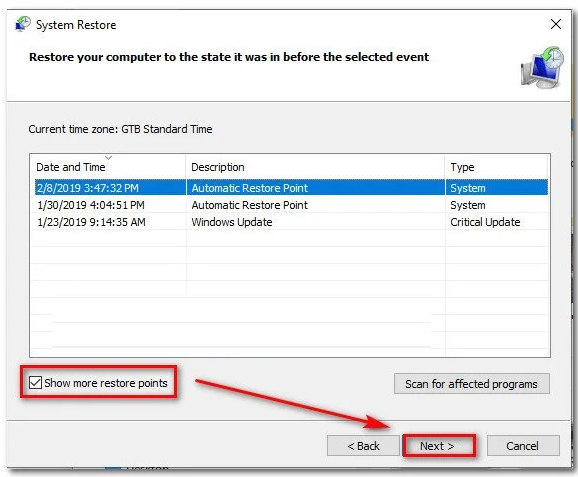
If the issue is still persist, you can try to fix the issue by performing System Restore in computer.
Step 1: Press ‘Windows + R’ keys on keyboard, type ‘rstrui’ in ‘Run’ window and hit ‘Ok’ to open ‘System Restore’ app
Step 2: Click ‘Next’, select a valid restore point according to date & time when there was no issue at all in computer, and hit ‘Next > Finish’ to start restoring process, and once done, check if the issue is resolved.
Conclusion
I am sure this article helped you on How to fix PWA Identity Proxy Host stopped working errors in Reliability History error in Windows 10/11 with easy ways. You can read & follow our instructions to do so. That’s all. For any suggestions or queries, please write on comment box below.


