What is ‘Minecraft black screen when joining server’ issue in Windows 10?
In this post, we are going to discuss on How to fix Minecraft black screen when joining server in Windows 10. You will be guided with easy steps/methods to resolve the issue. Let’s starts the discussion.
‘Minecraft black screen when joining server’ issue in Windows 10:
‘Minecraft’: Minecraft is sandbox video game designed and developed by Mojang Studios. This game is available for Microsoft Windows OS, macOS, and Linux OS based devices. In this game, players explore a blocky, procedurally generated 3D world with virtually infinite terrain, and may discover and extract raw materials, craft tools and items, and build structures, earthworks and simple machines. Depending on game modes, you can fight computer-controlled mobs, as well as corporate with or compete against other players in the same world.
However, several users reported they faced Minecraft black screen when joining server issue on their Windows 10 computer. There could be several reasons behind the issue including corrupted/outdated graphics card driver, outdated Windows OS, incorrect system settings, corruption in Windows computer, issue with Minecraft game app itself, interference of other conflicting software, and other issues.
You should make graphics card driver and all other device drivers are properly installed and are up-to-date to latest & compatible version in computer if you don’t want this type of issue. Also, make sure Windows OS is up-to-date to latest version. It is possible to fix the issue with our instructions. Let’s go for the solution.
How to fix Minecraft black screen when joining server issue in Windows 10?
Method 1: Fix Minecraft black screen when joining server with ‘PC Repair Tool’
‘PC Repair Tool’ is easy & quick way to find and fix BSOD errors, DLL errors, EXE errors, problems with programs/applications, malware or viruses infections in computer, system files or registry issues, and other system issues with just few clicks.
Method 2: Launch Minecraft game in compatibility mode
One possible way to fix the issue is to set Minecraft game app to run in compatibility mode in computer.
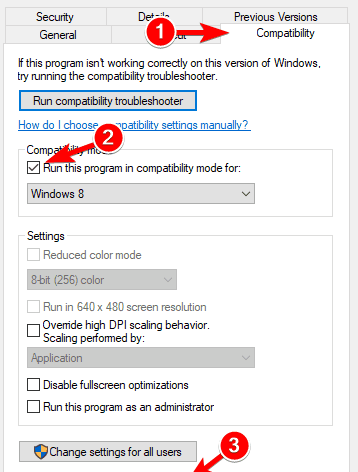
Step 1: Find and right-click on ‘Minecraft’ app icon, and select ‘Properties’
Step 2: Click ‘Compatibility’ tab, check ‘Run this program in compatibility mode for’ checkbox and select Windows 8 prior one from dropdown and then hit ‘Apply > ok’ button to save the changes. Once done, re-launch Minecraft game and check if the issue is resolved.
Method 3: Disable your antivirus/firewall
This issue can be occurred due to interference of third-party antivirus/firewall program installed in your computer or native antivirus/firewall program. You can disable your antivirus/firewall program in computer in order to fix the issue and after disabling, check if it works for you.
Method 4: Update graphics card driver
Updating graphics card driver to latest & compatible version can resolve the issue.
Step 1: Open ‘Device Manager’ in Windows PC via Windows Search Box and expand ‘Display Adapters’ category
Step 2: Right-click on your graphics card driver and select ‘Update Driver’, and follow on-screen instructions to finish update. Once updated, restart your computer and check if the issue is resolved.
Download or reinstall device driver update in Windows PC [Automatically]
You can also try to update all Windows drivers including graphics card driver and all other device drivers using Automatic Driver Update Tool. You can get this tool through button/link below.
Method 5: Set the anti-aliasing to default
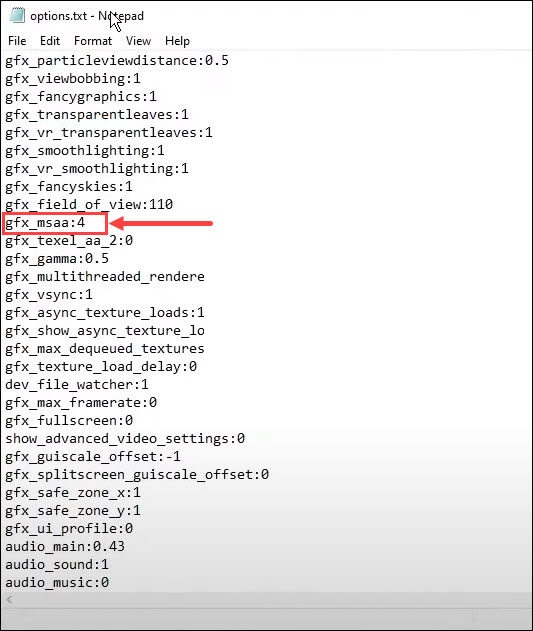
Step 1: Open ‘File Explorer’ and go to following path.
%LocalAppData%PackagesMicrosoft.MinecraftUWP_8wekyb3d8bbweLocalStategamescom.mojangminecraftpe
Step 2: Find and open ‘options.txt’ file, find the line with following entry and change number to ‘4’ like gfx_msaa:4
Step 3: Save the file and then restart Minecraft game and check if it works.
Method 6: Close unnecessarily opened programs
This issue can be occurred due to interference of conflicting software installed in computer. You can close unnecessarily opened programs in computer in order to fix.
Step 1: Press ‘CTRL + SHIFT + ESC’ keys on keyboard to open ‘Task Manager’ app
Step 2: Find and right-click resource-hogging program, and select ‘End Task’ to close them. Once done, re-launch Minecraft game and check if the issue is resolved.
Method 7: Uninstall and reinstall Minecraft game
If the issue is still persist, you can uninstall and then reinstall Minecraft game in order to fix.
Step 1: Press ‘Windows + R’ keys on keyboard, type ‘%appdata%.minecraft’ in ‘Run’ window and hit ‘Ok’ button to open ‘AppData folder of Minecraft’
Step 2: Copy the ‘Saves’ folder and paste it to your desktop, as it contains your Minecraft World.
Step 3: Now, delete everything inside .minecraft folder and then open ‘Control Panel’ in Windows PC via Windows Search Box
Step 4: Select ‘Uninstall a Program > Programs & Features’, find and right-click on ‘Minecraft’ and select ‘Uninstall’ to uninstall it and after that, restart your computer.
Step 5: Now, download and install Minecraft game from official site in your computer and once installed, check if it works for you toward resolving the issue.
Method 8: Check Minecraft server status
This issue can also be occurred due to some issue with Minecraft server. You should make sure Minecraft server is up and running properly. You can check Minecraft server status via its official site or visit ‘Downdetector.com’ page for this. If you investigate there is some issue with Minecraft server, then you will need to wait until the server issue is resolved.
Conclusion
I am sure this post helped you on How to fix Minecraft black screen when joining server in Windows 10 with easy ways. You can read & follow our instructions to do so. That’s all. For any suggestions or queries, please write on comment box below.


