
What is ‘Microsoft GameInput crashing’ issue PC?
In this article, we are going to discuss on How to fix Microsoft GameInput crashing PC. You are provided with easy steps/methods to resolve the issue. Let’s starts the discussion.
‘Microsoft GameInput crashing’ issue:
It is common Windows problem considered as random PC reboots issue or Blue Screen of Death (BSOD) error. This error is usually appeared in the middle of your work in Windows computer, or while gaming, or when you start/restart your computer. This issue indicates you are unable to work or play games on Windows computer comfortably. When you open Windows Event Viewer app in Windows computer, you noticed that the crashes are caused by Microsoft GameInput with following messages.
“Windows Installer reconfigured the product. Product Name: Microsoft GameInput. Product Version: 10.1.22621.1011. Product Language: 1033. Manufacturer: Microsoft Corporation”
The possible reasons behind the issue can be corruption in system files or registry, outdated Windows OS, issue with Gaming Services, corruption in Windows computer, and other issues. It is possible to resolve the issue with our instructions. Let’s go for the solution.
How to fix Microsoft GameInput crashing PC?
Method 1: Fix Microsoft GameInput crashing issue with ‘PC Repair Tool’
‘PC Repair Tool’ is easy & quick way to find and fix BSOD errors, EXE errors, problems with programs/applications, malware or viruses infections in computer, system files or registry issues, and other system issues with just few clicks.
Method 2: Run SFC Scan and DISM Scan
You can run SFC scan and DISM scan in computer to repair corruption in system files and system image in order to fix the issue.
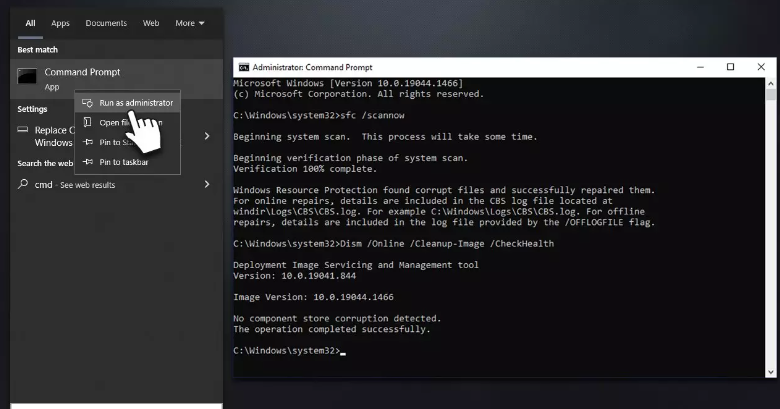
Step 1: Type ‘cmd’ in Windows Search Box and press ‘CTRL + SHIFT + ENTER’ keys on keyboard to open ‘Command Prompt as Administrator’
Step 2: Type the following commands and hit ‘Enter’ key to execute.
Sfc /scannow
DISM /Online /Cleanup-Image /CheckHealth
DISM /Online /Cleanup-Image /ScanHealth
DISM Online /Cleanup-Image /RestoreHealth /Source:C:\RepairSource\Windows /LimitAccess
Step 3: Once executed, restart your computer and check if the issue is resolved.
Method 3: Update Windows OS
Step 1: Open ‘Settings’ app in Windows PC via Windows Search Box and go to ‘Update and Security > Windows Update’ and click ‘Check for updates’ button
Step 2: Download and install all available updates in computer and once updated, restart your computer and check if the issue is resolved.
Method 4: Reinstall Gaming Services
Step 1: Right-click on ‘Start’ menu and select ‘Windows Powershell (Admin)’
Step 2: Type the following command and hit ‘Enter’ key to execute.
Get-AppxPackage *gamingservices* -allusers | remove-appxpackage –allusers
Step 3: After that, executes the following command and hit ‘Enter’ key after each to execute.
Remove-Item -Path “HKLM:\System\CurrentControlSet\Services\GamingServices” -recurse
Remove-Item -Path “HKLM:\System\CurrentControlSet\Services\GamingServicesNet” –recurse
Step 4: Once executed, restart your computer and check if the issue is resolved.
Method 5: Rename GamingServices folder
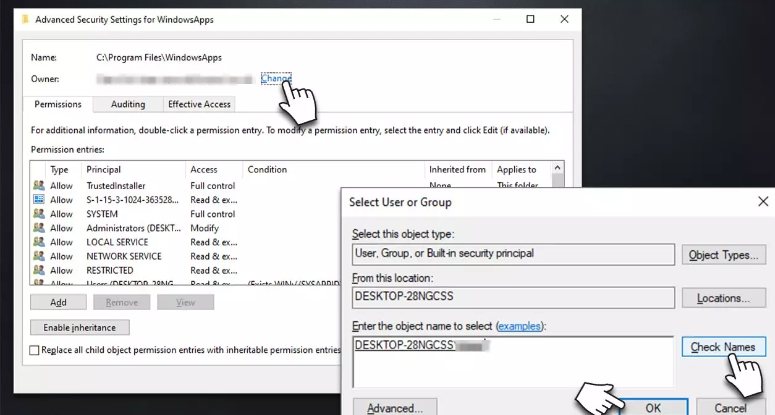
Step 1: Open ‘File Explorer’ in Windows PC and click ‘View’ tab and mark ‘Hidden Items’ checkbox
Step 2: You need to access the following path: C:\Program Files\WindowsApps
Step 3: Right-click ‘WindowsApps’ folder and select ‘Properties’. Click ‘Security’ tab and select ‘Advanced’
Step 4: Type in your username or administrator and click ‘Check Names’, and select the appropriate account, and click ‘Ok’ button
Step 5: At the bottom of ‘Advanced Security Settings’ window, mark ‘Replace all child object permissions’ option
Step 6: Finally, click ‘Apply > Ok’ button to save the changes.
Step 7: Scroll down and locate ‘Microsoft.GamingServices.X.XX.XXX.X_x64__XXXXXX’ folder in ‘WindowsApps’ folder, and you should rename every single one of them – you can simply add a latter or word within the name and once done, check if the issue is resolved.
Method 6: Clean Windows 10 installation
If the issue is still persist, you can try to fix the issue by performing clean Windows OS installation in computer. To do so, you need to insert a bootable Windows OS installation Media USB to computer and boot your computer with it, follow on-screen instructions to finish installation. Once installed, check if the issue is resolved.
Conclusion
I hope this post helped you on How to fix Microsoft GameInput crashing PC with easy ways. You can read & follow our instructions to do so. That’s all. For any suggestions or queries, please write on comment box below.


