What is ‘Kernel power error 41’ in Windows 11?
In this article, we are going to discuss on How to fix Kernel power error 41 Windows 11. You will be guided with easy steps/methods to resolve the issue. Let’s starts the discussion.
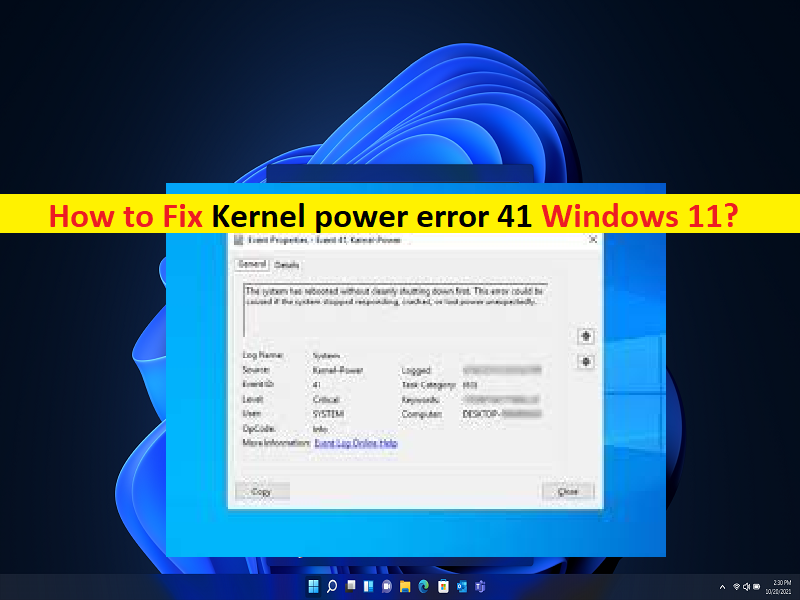
‘Kernel power error 41’ in Windows 11: It is common Windows Problem considered as Windows Event Viewer error. This error is appeared in Windows Event Viewer App in Windows 10/11 computer usually when you are experiencing system doesn’t shutdown properly or keeps restarting. When you open Event Viewer app in Windows 11 computer in order to check why you are facing computer doesn’t shutdown clearly or it keeps restarting, you notice Kernel power error 41 in Event log. Let’s take a look at error message.
“The system has rebooted without cleanly shutting down first. This error could be caused if the system stopped responding, crashed, or lost power unexpectedly. Kernel power error 41”
There could be several reasons behind the issue including outdated/corrupted device drivers, interference of antivirus/firewall, incorrect system settings, outdated BIOS, issue with hardware attached to your computer, corruption in windows computer and other issues. You should make sure all device drivers are properly installed in computer and are up-to-date to latest & compatible version.
If not, device drivers update to latest & compatible version are necessary if you don’t want this type of issue in computer. You can also apply certain changes in device’s settings including in power settings in order to fix. It is possible to resolve the problem with our instructions. Let’s go for the solution.
How to fix Kernel power error 41 Windows 11?
Method 1: Fix Kernel power error 41 with ‘PC Repair Tool’
‘PC Repair Tool’ is easy & quick way to find and fix BSOD errors, DLL errors, EXE errors, problems with programs/applications, malware or viruses infections in computer, system files or registry issues, and other system issues with just few clicks.
Method 2: Update Device Drivers
Updating all necessary device drivers to latest & compatible version can resolve the issue. You can update all Windows drivers including graphics card driver, sound card driver, and other device drivers using Automatic Driver Update Tool. You can get this tool through button/link below.
Method 3: Disable Duplicate audio drivers
Another possible way to fix the issue is to disable duplicate audio drivers if any running in your computer.
Step 1: Open ‘Device Manager’ in Windows PC via Windows Search Box and expand ‘Sound, video and game controllers’ category.
Step 2: Right-click on those duplicates audio device drivers in the list, and select ‘Disable’ to disable it. Once done, check if the issue is resolved.
Method 4: Uninstall third-party antivirus/firewall
This issue can be occurred due to interference of third-party antivirus/firewall program installed in computer. You can uninstall third-party antivirus/firewall program in computer in order to fix the issue.
Method 5: Change your power settings
You can apply certain changes in power settings in computer in order to fix.
Step 1: Type ‘Power’ in Windows Search Box and choose ‘Power & Sleep Settings’ from menu to open it
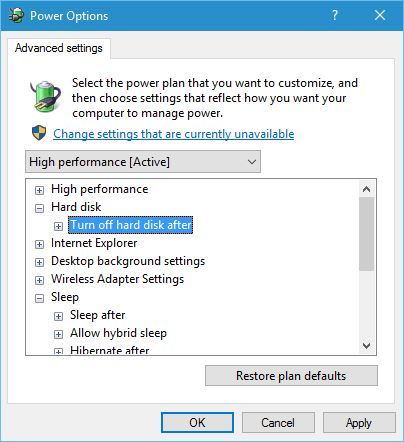
Step 2: Click ‘Additional Power Settings’, find your current plan and click ‘Change Plan Settings’ next to it, and then click ‘Change Advanced Power Settings’
Step 3: Find ‘Hard Disk’ section and expand it, click ‘Turn OFF hard disk after’ and set it to ‘Never’ or you can do that by entering ‘0’ value in it.
Step 4: Find ‘Sleep’ section and set the sleep timer to ‘0’ in order to turn it OFF. Finally, click ‘Apply > Ok’ button to save the changes, and then check if the issue is resolved.
Method 6: Turn OFF Fast Startup
Another possible way to resolve the issue is to disable Fast Startup feature in computer.
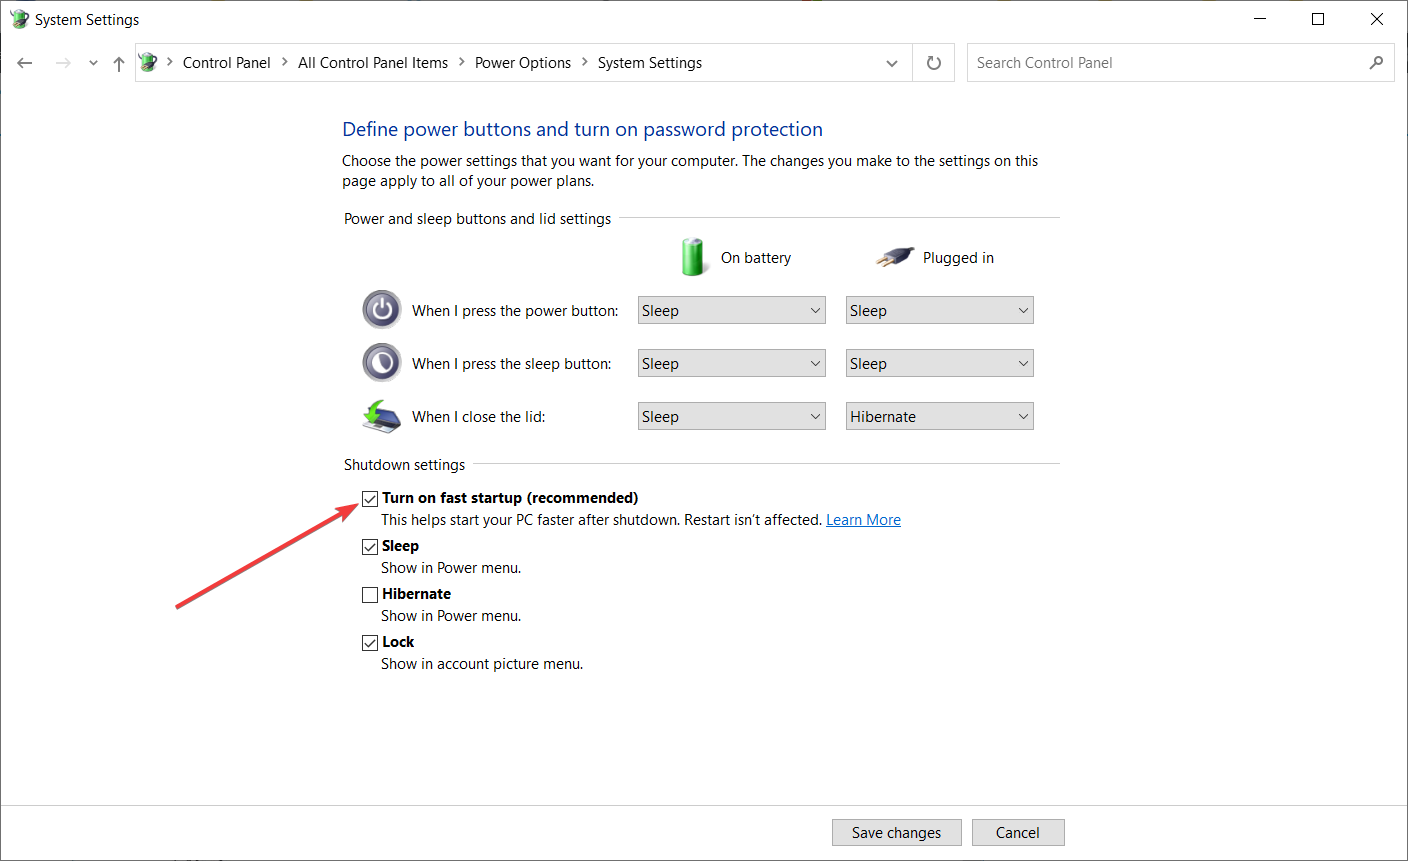
Step 1: Open ‘Power Options’ in Windows PC via Windows Search Box and click ‘Choose what the power buttons do > Change settings that are currently unavailable’
Step 2: Scroll down to ‘Shutdown settings’ section, locate ‘Turn ON fast Startup (recommended)’ and uncheck it, and then hit ‘Save Changes’ to save the changes and check if the issue is resolved.
Method 7: Update BIOS
Outdated/corrupted BIOS could be a reason behind the issue. You can perform BIOS update in computer in order to fix. You should follow your PC/laptop motherboard manufacturer official guideline to download & install BIOS update in your computer. Once updated, check if the issue is resolved.
Method 8: Check your hardware
This issue can be occurred due to some issue with hardware attached to your computer or issue with your PC/laptop’s motherboard hardware. If you investigate any hardware attached to your computer or motherboard hardware is problematic, you can replace those hardware with new one in order to fix, and then check if it works for you toward resolving.
Method 9: Uninstall problematic Windows Update
This issue can be occurred due to some problematic Windows update installed in your computer. You can uninstall the problematic updates from computer in order to fix.
Step 1: Open ‘Settings’ app in Windows PC and go to ‘Windows Update > View Installed update history > Uninstall Updates’
Step 2: Find and right-click on problematic updates or recently installed Windows update, and select ‘Uninstall’ to uninstall it and after that, restart your computer and check if it works.
Method 10: Disable ‘Auto-restart’ in Advanced System Settings
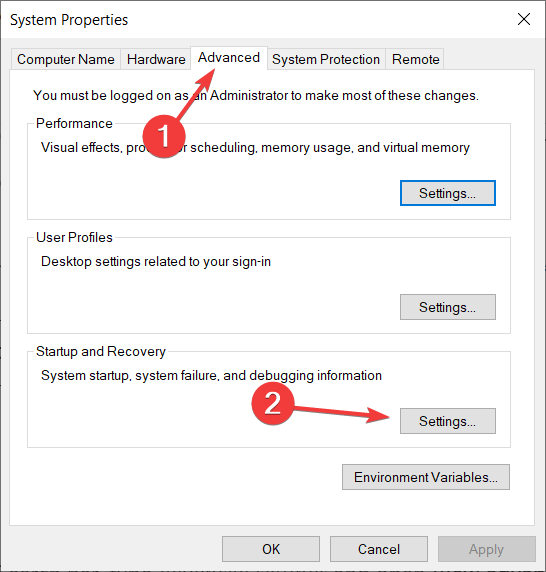
Step 1: Open ‘View Advanced System Settings’ via Windows Search Box and click ‘Advanced’ tab
Step 2: Click ‘Settings’ under ‘Startup and Recovery’ section, uncheck ‘Automatically Restart’ box, and confirm the changes. Once done, check if the issue is resolved.
Conclusion
I am sure this post helped on How to fix Kernel power error 41 Windows 11 with easy ways. You can read & follow our instructions. That’s all. For any suggestions or queries, please write on comment box below.


